Create a tile backsplash over your stove in four easy steps with this easy to do project, for beginners and experts alike. With a few tools and materials, you can turn any blank spot over your counter tops into a work of art that looks like a million bucks.
Step One: Start Prep Work and Buy Materials
First, know the square footage of the area where you will be installing tile. Go to your nearest home improvement center or tile contractor, and purchase tile that fits as close as possible to your square footage over your counter or stove. There are numerous choices of tile for mosaics and designs. Picture tiles are a great way to draw attention and center any backdrop. Patterns, inlays, and raised borders give to an elegant look; but be careful some can cost a fortune.
In addition to the purchase of the tile, you will need several other materials and tools, so get out your wallet. Backer board is the first material needed when you begin your project. It is a cement wallboard that repels water and never rots. It creates a secure bond to the tile. A wet tile saw is needed to cut straight sections of tile. This can be rented or purchased, depending on your budget. You will also need one ½-inch screws to secure the backer board to your wall. If you have any outlets or switches in your tile backsplash, you will need to buy the appropriate sized outlet box extenders. These are plastic shims that will adjust the thickness you add with the backer board and tile. Tile adhesive is required to hold the tile to the backer board. A notched trowel is required to apply the tile adhesive evenly over the backer board. Tile spacers are needed to keep the space between the tiles uniform. They are available in various sizes, so choose the size that best suits your project. Colored grout is a mortar product that fills in the space between the tiles. It typically matches the tile, but a contrasting design should be taken into consideration, when you purchase a bag. A grout float is a sponge or rubber faced trowel that pushes the grout evenly in place between the tiles. A cheaper alternative would be a hard sponge with a sharp edge. You will need a small brush and tile sealer for certain types of tile. Check with the supplier when you purchase the tile, if you will need any sealer products and supplies. Finally, you will need blue painters tape and a drop cloth to cover any appliances or counter tops for debris or spills.
Step Two: Installing the Backer Board
Backer board is the cement board that the tile bonds to. It also resists water and rot, so it will last for lifetimes to come. You can cut the backer board with a tile saw for smaller sections, or use a circular saw fitted with a carbide blade for ½ thick backer boards. Cut to the exact square footage of your project area. I recommend using ¼-inch backer board for easy handling in tight spaces. You can also cut the ¼-inch backer board with a sharp utility knife. Locate the studs in the wall with a stud finder or simply hammer a nail into the wall and measure 16-inch intervals to find other studs. You can make as many holes as you need because you will cover up the holes with the backboard. Make marks with blue tape so as not to damage the area uncovered by the tile backsplash. Attach the backer board with one ½-inch screws. Place a screw in each stud on the top and bottom and in the center of the backer board every 12 inches.
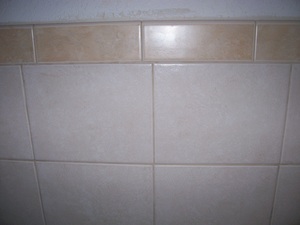
Step Three: Attaching the Tile
It’s a good practice to layout the tile on the floor fully assembled. Make sure it’s out of the way so you don’t step on it while you’re working. Cut all the pieces later after the whole pieces are attached to the backer board. They may be a different measurement by the time you get the larger pieces up. Layout marks along the backer board with a pencil and find the center on the wall. Use a small level to make a vertical mark along the backer board. After you complete the layout of the tile, apply the tile adhesive to the wall with the notched trowel. Spread from the bottom upward. Spread enough to lay 1 ½ rows of tile at a time until you get near the top with the tile. Don’t cover up all of your marks. Place the first row of tile centered on your mark and work outwards in both directions. Don’t worry about cutting any tile just yet, you will do that later. Spread another layer of tile adhesive and then place another row of tile on top of the previous row of tile. Add the tile spacers as you set each tile. Work your way up to the top of the backsplash. Now you need to make some cuts. Measure the cuts by placing a tile up to the wall and mark it with a pencil. Make the cut with a tile saw. To get adhesive into the small places you can simply spread adhesive on the back of the tile and press it into place.
Step Four: Apply the Grout
After the entire project dries for 24 hours, you can begin to add the grout. Start by removing all the spacers with a screwdriver or a large nail. Scrape off any extra tile adhesive that may have dried on accidentally on the face of the tile or in the spaces that are raised up with extra adhesive. Next, mix some grout in a bucket together with water until you reach a mud like consistency. Add the dry powder first, and then add water as you need it, while constantly mixing it together. Use the grout float to press the grout into the spaces between the tiles. If it falls out or shrinks, your mix is to wet, and then dry grout will need to be added. Press the grout float along the entire surface of the tile in a circular motion to evenly disperse the grout. Let the grout dry for 20 to 30 minutes. Use a clean sponge and bucket of water to wipe the excess grout from the tile. This will take many passes and fresh buckets of clean water. Repeat the process until the grout is uniform and the tile surface is clean. A clean, dry rag can be used to buff the tile if it has a milky sheen the next day. Clean any over spills with water and a sponge on paint or other surfaces, before the grout dries.