We’ve all seen them. Everyday they’re on the street and in the parking lot. They’re a sore sight during the day and they hinder sight at night. What are they? They’re clouded, yellowing headlight lenses, and a surprising number of cars suffer from them. My car suffered from them too, and so I decided to do something about it. The purpose of this article is to give car owners useful information about this condition and to describe an effective method of remedying it.
Clouded, yellowing headlight lenses afflict millions of cars on the road. While many of these are older model cars, others are sometimes only be a few years old. Clouded, yellowing headlight lenses are not only detrimental to the appearance of the car, but can also dim the headlights significantly enough to become a safety concern at night.
Why did my headlights turn yellow?
The cause of the yellowing is constant exposure to damaging sunlight, air pollution, dust, and other contaminants. Over time, these elements can wreak havoc on the plastic headlight lenses of most modern cars and trucks. (You may have noticed that older cars with glass headlight lenses never seem to have this problem.) The good news is that the damage to these plastic lenses is usually only surface deep, and with a little bit of work, the empowered car owner can have his or her headlights back to a sparkling shine in no time.
(Read on for how to fix this problem.)
Possible solutions
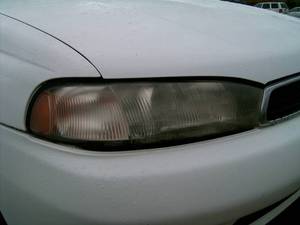
My 1996 Subaru Legacy wagon had suffered from terribly yellowed headlight lenses for a few years before I finally decided to do some research into ways to fix the problem. I began searching websites and message boards for solutions. I found numerous auto repair establishments offering services to restore headlight lenses, but at a cost of sometimes hundreds of dollars. I also found that many people had experimented with numerous ways of restoring yellowing headlight lenses on their own. Some claimed that applying substances like brake fluid or toothpaste to the lens would remedy the problem, although many people also claimed this had not worked for them, or had made the problem even worse. The most popular and by and large the most successful method I found was wet-sanding the lenses. This technique entails wet-sanding each lens with progressively finer grits of sand paper to remove the yellowed, damaged plastic, then using a plastic polishing compound to smooth the surface to a like-new shine.
The product I purchased to fix my headlights: Headlight Lens Restoration Kit by Permatex
I didn’t have a lot of time to spend on this project, and had even less money to spare, so I wasn’t too hot about going out and buying a bunch of different sand papers, polish, and whatnot. I recalled hearing that an all-inclusive kit was available at local auto parts stores for the completion of this restoration. The kit, the Headlight Lens Restoration Kit, is made by Permatex, a well known maker of automotive sealants, adhesives, and other repair materials. I had used many of their products many times before in my own auto repairs, and also in my summer job at an auto shop. The kit cost around $13.50 and contained everything I needed to complete the wet-sanding and polishing job: four sheets of sand paper in 1000, 1500, 2000, and 2500 grits, instructions, a pair of latex gloves, a small cloth, and a bottle of “Plastic Restoration Polish.
How to use the Headlight Lens Restoration Kit
A few days after purchasing the kit, and after reading the instructions thoroughly, I set out to perform my restoration. The following is my account of the process, and I hope to make it very clear so as to allow anyone to perform the task on their own headlights. Please note that the method I used is not specific to the Permatex brand kit. A variety of sand papers and a bottle of plastic polish purchased separately might achieve the same results.
After liberally wetting the driver side headlight, I began wet-sanding the lens beginning with the 1000 grit sand paper. I sanded for 25-30 minutes with this grit alone, and kept sanding until every imperfection was gone and the lens was a very uniform matte finish. Note that the time it might take you to complete this step would vary based on how badly yellowed your headlights were in the first place. I was able to tell that it was almost time to move to a finer grit when the water coming from the area being sanded turned from a yellowish, milky fluid to a brighter white, more transparent fluid.
Next I spent about 5-10 minutes sanding with each of the 1500 and 2000 grits. After that I spent another 20 minutes or so with the 2500 grit, sanding in a horizontal direction for a few minutes, then sanding in a vertical direction for another few minutes. I gradually let up on the pressure as I sanded with the 2500 grit, and made sure the sand paper and the lens were both liberally lubricated with water. The result was that, by the end, I was basically keeping only enough pressure on the sand paper to keep it against the lens, no more. I noticed that I could tell that the lens was almost smooth enough when the water started to bead up on the lens rather than appear to spread out.
How to use the plastic restoration polish
After all the sanding was done, the headlights looked acceptably clear, but not shiny. Now it was polish time. I found that it was basically like waxing a car, although it required me to press harder than I would on a car finish, in order to work a good shine out of the headlight lenses. I polished each headlight for about 10 minutes, going over it once, then buffing, then over it again, and finally buffing a second time. All told, the entire sanding and polishing process took about three hours for both lights.
The results
When all was said and done, I was very happy with the results. My dull, yellowed, clouded headlight lenses were now crystal clear. I also found that my headlight beams were now much brighter than they were before, and my night driving became substantially easier. For the amount of time and money spent on this little project, the results made it well worth the effort.
Maintaing my headlights
This is not the end of the job however. I plan to regularly use a plastic polish on my headlight and taillight lenses in the future, to keep them protected from the damaging elements that our cars face daily. In fact, had I kept them protected since the car was new, I probably would have never needed to restore them some ten years later.
I hope that I was able to show you that this problem can be solved with a minimal amount of time and money. Millions of cars on America’s streets drive with clouded, yellowing headlight lenses everyday, and many drivers strain to see by their dim light every night. With a little bit of time and effort, these drivers can bring their headlights back to life. In the process, they can afford their car a new attractive appearance, and afford themselves a new margin of safety.