I need shelves in my sewing room, but either I have the money and can’t find what I want at the DIY store or the perfect shelves cost too much.
Instead of letting that get the best of me, I was staring at a stack of cardboard in the garage and the idea hit me- build shelves with it.
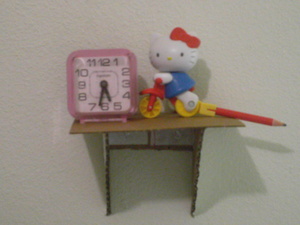
I have built several shelves of differing sizes; all hang on the wall holding everything from alarm clocks to books. All are made of cardboard.
The plans given here are for a simple small sized shelf. Additional information will allow the builder to produce much larger, stronger shelves. If you have a piece of plastic or board that would make a perfect shelf, information is given to allow its construction.
This simple shelf is inexpensive and can be given away or sent for recycling at the end of its useful life. Use in any college or military dorm room, apartment or house.
The measurements of the shelf are the width of the shelf, which matches the triangle support width.
You will need:
• Cardboard
• Heavy scissors or utility knife
• Ruler and straight edge
• White glue
• Construction adhesive
• Adhesive shelf paper
• Paper strips
• Removable hanging hooks
• Marker or pencil
Cut the pieces:
Measure two triangles with each matching side as four inches long. Cut two. These are the shelf supports.
Measure a piece of cardboard four inches long and two inches wide. Cut one. This is the center brace.
Multiply the shelf width (which matches the width of the triangle) by 1.5. This gives the shelf length. In this example, 4 x 1.5 = 6. The shelf will be four inches wide by six inches long.
Begin the construction:
Measure and mark the center of the brace piece. This piece will be to the inside of the shelf.
Measure and mark the center of the shelf. This will be the underside of the shelf. Set aside for now.
Place the triangles with the angled sides outward and the four-inch sides to the top and side of the brace. Using glue and paper strips or adhesive shelf paper strips, attach the sides of the brace to the straight sides of the triangles. Make sure the triangles can fold up so they can hold the shelf comfortably. Tape the inside joints and the outside joints for strength. Make sure the brace and the triangles are level.
Hold the shelf against the triangle. Match the center mark of the shelf to the center mark of the brace. Attach with glue or paper strips.
This simple shelf is finished, except for decoration, painting, etc. mine holds nearly a pound on the wall. There is only one layer of cardboard to the entire shelf.
To create larger shelves:
Shelves larger than six inches (that’s six inches wide with a six inch wide brace), need two layers of cardboard glued together. Cut double pieces of each piece and glue these together before assembling the shelf.
Shelves between ten inches and a foot (the largest I’ve made), need three layers of cardboard glued together. Since the largest, twelve inches needs a shelf eighteen inches wide, I added a middle support so there are three supports instead of two. It looks great.
To decorate your new shelves:
Cover with adhesive shelf paper, magazine pages, music pages, comic papers, wrapping paper, and so forth.
Cover with fabric over quilt batting for a padded shelf to match padded headboards and furniture.
Decorate with buttons, decorative tacks or nails (with children’s rooms, glue these in place with construction adhesive), rhinestones and more.
Cover directly with fabric or vinyl.
Cover with plain brown paper or adhesive shelf paper, then paint any color scheme you wish.
To hang shelves:
For the 4″ shelf, I inserted two push- pins through the cardboard brace in between the two triangles into the wall. This would also work well on a bulletin board.
For larger shelves or if pinholes are disallowed, glue ribbon strips to the back of the shelf brace. Allow enough ribbon to make a loop around a plastic ring and back to the brace. Alternatively, tie the ribbon to the ring. Using removable wall hangers, or removable glue strips, affix to wall and hang by the rings. Use at least one ring for every 4″ of shelf length. If the shelf hangs away from the wall, glue cardboard shims to the back of the triangles. This is just a thin strip of cardboard used as filler so the triangle contacts with the wall. It will allow the shelf to hang level.
For a shelf eighteen inches to two feet long, use construction adhesive to attach a furring strip brace at the top of the cardboard and under the shelf. Use eye screws drilled into the strip from the top of the shelf.
Ordinary picture hangers will work for lightweight shelves that do not hold much weight.
Some additional points:
Always use flat cardboard for a flat shelf.
Supervise children around heavy scissors or utility knifes. Always wear eye protection when using utility knives.
Place a board under cardboard when cutting with a utility knife. This protects tables, floors, hands, etc.
This is a great project to get children interested in crafts, design, math, science, decorating and home improvement. Since they helped build the furniture, they’re more likely to take care of it. Make a series of shelves for knick-knacks collected over the summer vacation and give to the Grandparents as gifts.


