Most people are satisfied if they manage to get a web page made with a template, uploaded, and it looks like a web page. Text, pictures, a little about themselves, maybe a bit of bragging on their kids or kidding of their friends. ‘Hey, look, I’m on the web. Anybody can pull up my page and see me.’ And they’re happy to leave it that way forever, or at least until they change their ISP. Not everyone aspires to be a web guru.
If that’s you, there’s absolutely nothing wrong with it. Enjoy your web presence, tinker with it occasionally when the mood strikes, or you can beg or bribe your daughter, son, or brother-in-law to change it a little.
Then if one day, like me, you decide you’re going to take the plunge and, by golly, build your own website from scratch, be assured, it can be done. But also, be warned, it will take a little work. Actually, it took a lot of work for me. I doubt that simply reading this series of articles will teach you enough to build your website. But I hope it will encourage you and whet your appetite to learn more.
As I mentioned in the first article in this series, I bought two books on HTML coding at the used bookstore. A really basic one, a primer, you might say, got me started. As Ms. Castro says in the second book I bought, you can find software programs which will do the code for you. But if you learn HTML (Hyper Text Markup Language, you recall, it took me forever to be able to remember what the acronym stood for), it means you won’t be limited to a particular program’s features. This drawback in using templates was what made you consider learning HTML in the first place, right?
Basic fact about HTML – the features of a web page are enclosed in ‘tags.’ Simply put, tags are pairs of symbols, the ‘greater than’ sign and the ‘lesser than’ sign found on the last row of keys on your keyboard.
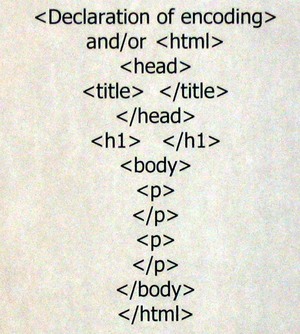
Like these – < >. The picture accompanying this article illustrates a simple page set of HTML tags.
At the top of your page(s) you will need to place several items. First is the declaration of the type of encoding you are using, HTML or (X)HTML. When I was learning to code my first pages, this flew right over my head. I just started off with ‘HTML’ inside a tag, which must be at the beginning of every page. After I learned a little more, I went back, read, and used the declarations. You’ll find the different declarations which can be used in the book(s) you’re going to buy. Just type it once, then cut and paste on your pages. The declaration, if you use it, will incorporate the ‘html’ tag.
Next will come the ‘HEAD’. Type an on opening tag, a pair of the ‘greater’ and ‘lesser’ signs, with the word ‘HEAD’ between them.
Every page must have a title, this is the text seen on the blue bar at the top of a web page in most browsers. The title is used by search engines such as Yahoo and Google, as well as visitors’ browsers’ history lists and bookmarks. So it should be short and descriptive. Type the opening tag with the word ‘title’ between the signs. Type whatever snappy title you’ve come up with, (mine is ‘Sylvia’s Place’). Then type the end set of signs, or tag, with a forward slash and the word ‘title’ between them. This is a closing tag.
Type an opening tag with H1 between the first two signs. Type a closing tag with a forward slash in front of the H1 . Any text you type between the two tags, such as My Flower Garden, would be displayed as a Heading. There are five levels of Headings, H1-H5, with H1 being the largest type and H5 the smallest.
You can, and probably will, specify a font, though if you don’t your visitor’s browser will display text in whatever its default font may be. A ‘p’ inside an opening tag tells browsers that a block of text, a paragraph, is next. Any text can be given attributes, like ‘b’ or ‘i’ to tell browsers how it is to be displayed.
You decide you want the text of your paragraphs about your garden to be in boldface type. If you type another opening tag enclosing a ‘b’ immediately following the ‘p’ tag, the paragraph(s) will be displayed in boldface.
The ‘i’, of course, means ‘italic.’ If you don’t place the ‘/p’ inside a closing tag at the end of each paragraph, if you have more than one, you will wind up with a looooong block or page of text. You will also need to type a closing ‘b’ tag to end the boldface type display.
You may have noticed that I began these definitions using capital letters to describe what is inside the tags and changed to lower case. Either is acceptable and I used all caps for a while, but now prefer lower case.
Type whatever information you want in however many paragraphs you wish on the page, then end the body section with, that’s right, an ending tag with a slash before the word ‘body’ in it. Then type another closing tag with the slash and ‘html’ in it.
Eventually you may want to provide a link to another page or someone else’s site on your page. I’ll go into those and the picture or image tags, which are actually links to images, and some other tags, in the next article and begin talking about Cascading Style Sheets.