If you’ve got a big box, you can turn it into a colorful, little house for the toddler in your life. A big empty box inspired me to make a toddler home for my grandson. It made him smile, and it was also a great way to get crafty while reusing something that was destined to end up in a landfill. If you follow these simple instructions, you’ll see how easy it is to make a cardboard house for the toddler in your life.
Search your garage, basement and craft stash; and you might find that you already have everything you need. If you don’t, the paint and brushes should cost only about 10 dollars. You can complete a cardboard box house in just a few hours. If you want to crank up your creativity and add lots of little details, it will take a bit longer. You can do all the work yourself, but it’s also a great project for a family crafts day. With supervision, even your toddler can use a brush to add his own little bit of color.
Tools
-Scissors that are strong enough to cut cardboard
-A mat knife or box cutter (optional)
-Paint brushes in several small sizes
-Marker or pencil
Materials
-A large cardboard box
-Extra cardboard for decorations
-Several bottles of craft paint in different colors
-A bottle of white tacky glue
-Brown wrapping paper or newspaper
-Wide masking tape or brown paper tape
Make your cardboard toddler house
I had several large boxes at home, so my choice was easy. I decided to use one that was 38 by 20 by 23 inches. It had large flaps, which gave my cardboard toddler house a nice tall roof. You can use any big box you find.
-Stand your box upright.
-Tape two box flaps together to form a pointed roof.
-Tape along the entire seam to hold it in place
-Hold up the other ends and trace the outline of the pointed roof as a guide for cutting the front and back A-frame sections of the house. (See illustration #2)
-Cut away the marked areas.
-Tape the four top pieces of the house together to form an A-frame roof.
-Seal all roof edges with a strip of tape or with strips of paper and glue.
-Use a marker to draw a door on the front of your cardboard toddler house.
-You may cut the door away completely or leave one side in place for opening and closing.
-If your box has any messy surfaces from shipping stickers, cover it with a large sheet of brown or other plain paper for a smoother painting surface.
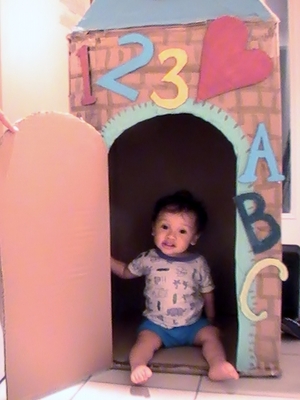
You don’t have to get carried away with painting your toddler’s cardboard house. Just paint some “shingles” on the roof and “bricks” on the walls. Paint a door or windows for an added touch of color, then finish the job by adding decorations in the theme of your choice.
Make house decorations
Decorations will brighten up your little house. Create them in your toddler’s favorite theme or however you choose. My grandson has several toys that play A, B, C/1, 2, 3 songs; so I decided to make that the theme of his little home. Here’s how you can do something similar:
-Use a marker to draw large letters, shapes and numbers on pieces of thick cardboard.
-Use scissors, a mat knife or a box cutter to cut them out.
-Paint them in bright colors.
-Once your decorations have dried, add a thick layer of tacky glue to the back.
-Let the pieces sit for a few minutes before sticking them into place.
-Let them dry before letting your toddler play in his new little home.
Get creative with other toddler house themes
If you have a few extra boxes, you can create an entire toddler neighborhood. Make a castle with turrets and a moat. Make a princess house in pale pink with bright pink windows and doors. Make a little guy’s home in blue with blue details. However you choose to create your house, your toddler will love it.


