The first time I saw a black & white photograph that had color accents I was intrigued. The process surely had to involve a lot of work and a talented artist at the least, or so I believed. Through the years, I saw different examples of black & white photographs with touches of color, some hand colored, and others computer aided. Each example made me want to try to duplicate something similar with a few select photographs of my own. When I purchased a copy of Adobe Photoshop Elements, it was with this in mind that helped me decide that I did indeed need a copy.
I scoured the Internet for information and tutorials on how to get the desired effect that I was after, and while some of them were straightforward, such as hand coloring a copy of a black & white photograph, some were drawn out, lengthy tutorials on how to lift one color from a copy from within a photo editing software program. Surely there had to be a different, i.e., easier way to go about this. There was!
In Adobe Photoshop Elements, open a copy of a color photo that you would like to duplicate this technique with. Keep in mind that the original photograph that you are working from must be in color to begin with for this technique to work. Go to File, Open, and choose the file where you have previously stored your image, and select the image itself. Once you have opened it within Elements, save a copy immediately, so that if you end up with undesirable results, you will still have your original file to work with.
Next, click on Layer, New, and Layer via Copy. The image on your screen will not appear any different than it did before you did this action, but in reality, you now have two copies of your picture, one layered on top of the other.
Now, to create your black & white photograph, you are going to edit the top layer, the copy you just created. There are essentially two ways to do this. One way is to click on Filter, Sketch, and Halftone Pattern. When the window opens that allows you to adjust the settings for the halftone pattern, you might wish to adjust the Contrast slide. Once you have the adjustments you are comfortable with, click OK so that the halftone pattern is applied to the top layer of your photograph. Alternatively, you can also click on Enhance, Adjust Color, and Remove Color. Note that herein lays the secret to how you are going to create a black & white photograph with color accents. Beneath the black & white copy of your photograph lies the color copy, for the moment, just not visible.
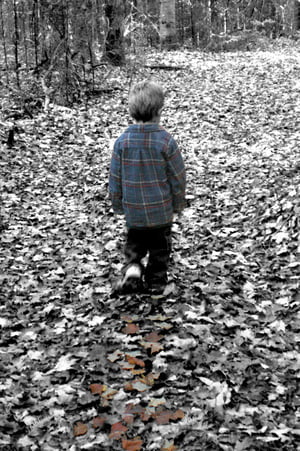
At this point, you will need to consider what parts of your picture you would like to reapply the color too. In my example, I have restored color to my grandson’s flannel shirt and a few leaves on the ground simulating his footsteps. I achieved this by selecting the Eraser Tool, which in turn opened the Brush option and then selected a default brush shape and size that I was comfortable working with as I erased the top layer Black & White photograph, allowing the color photograph below to show through the top layer. I also clicked on View and Zoom, which allowed me to zoom in on the area of the photograph that I wished to restore color too. You can zoom in and out, as you work, as long as you are comfortable with the option and it provides you with enough control to erase just those parts you want to remove.