I wanted to make an on-board welder for my truck, but my wvo conversion didn’t leave much room for an extra alternator. I didn’t want to fool with my stock charging system until I had a chance to experiment and decide if would be worth the trouble. I made up my mind to build a portable welder from a lawnmower. I used almost all scrap parts. I can always upgrade it later if it works out and keep it. I would like to replace my stock alternator with an early 80’s ford alternator with an external voltage regulator. They put out 90 amps and are easier to convert. They do not need to be opened and modified.
I started with a 6.75 horse power Toro self propelled mower. It was a free curb-side pick up. I put gas in it and it started right up, but would not turn off. The cable was crimped and the linkage for the shut off switch on the engine was damaged. I put on gloves and pulled the wire off the spark plug. I fixed by making an old school shut off from a metal strap and self tapping screw to ground the plug wire.
I removed the blade and unbolted the engine from the deck. I was happy to find a small pulley on the shaft. It was used to power the drive wheels and save me from searching for one. I make a template of the mounting holes on the deck with some cardboard and spray paint.
I moved on to my old GM alternator (free from a friend) while I waited for the paint to dry. I found some directions online to by pass the voltage regulator, but nothing that matched up with my old alternator. It looks like it might have an external regulator. I had two spade connectors that went right to the brushes to power the field. One of them had a jumper that went over to the diodes. I cut out the jumper and reassembled the alternator. I made another cardboard template from the alternator.
I used a left over piece of 3/4 plywood for the frame. I wanted to use the mower deck, but had too many curves and bumps. I thought about building it from angle iron, but the wood should last long enough to get my feet wet. I used the templates to layout where the engine and alternator will sit. I left some room next to the alternator for a small 12v battery to power the field. I cut out the holes and mounted the parts. I used two lengths of 2X6 for the legs.
I used some jumper cables for the welding cables. I made wire lugs by cutting 5/16″ copper tubing into 2″ pieces. I crimped them to the wire with a flat screw driver and a hammer. I flattened the other end of the lug and drilled a small hole for the post. The positive wire gets bolted to the positive post on the alternator. The negative wire get bolted to the negative post or the alternator housing, which ever is easier. The 12v battery is wired to the spade connectors to power the field.
I started the engine, powered the field and checked for voltage. I had nothing. I needed to ground the negative field wire to the alternator housing. I did it by pushing the spade connector as far to the side as it would go, until it was touching the body of the alternator. I will get around to properly grounding to someday, but for now it works. My meter was now reading 70 volts DC. I still had some throttle left. I should get close to 100 volts at full throttle.
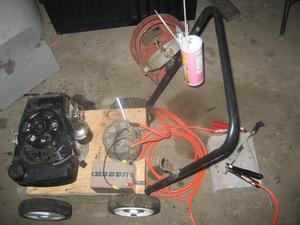
The wooden legs allowed the welder to dance around while it was running. I still had the rest of the mower, so I mounted the wheel and the push handle to the welder. The front to wheel are fixed and will not roll. I can move the welder by lifting the front wheel and pushing it like a wheel barrel. The rubber wheels solved the dancing problem. I mounted two clips to wrap the cables and a cup to hold some rods to the push handle. The smaller rods seem to work the best.
I picked up a 200 volt dc meter from ebay for $20. I had to buy a small belt to power the alternator. Everything else was scrap parts. You don’t need the volt meter, but I want to have a good idea of what’s going on. It also helps you judge the power that you are feeding to the welding rod.
You can install a 110 volt outlet and adjust the rpm’s until you are making 100 volts. It will power light bulbs and any tools that have brushes, like drills, grinders and saws.


: Good President or Just a Good Republican?")