As an avid crocheter and busy seller of my handicrafts I’m often asked to share some patterns. Sometimes i feel like I’m guarding a treasure trove of ideas, and i want to defend my territory, and sometimes I’m willing to drop a few hints and tips for my fellow crocheters.
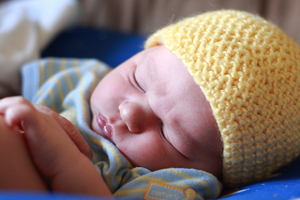
So here is my basic beanie, in one solid color, its a pattern I’ve devised on my own, from trial and error. This will make you a newborn sized beanie of around 12 inches.
Using my pattern means using the same yarn i do, as each pattern i write is for a specific brand of yarn, so hop down to your local craft store ( or walmart ) and pick up your favorite color of Vanna’s Choice brand yarn and a J hook. Got your materials? Fantastic, lets get started!
First step you are going to make a slip knot. Don’t close your slip knot, just make it and start from there. Using your tail chain two. Now you will make 12 double crochets into your slip knot circle. When you have 12, use a slip stitch to complete your circle and pull your slip knot closed with its tail, you now have your first row.
Row 2. Chain two, and put a second double crochet in the beginning chain. You will now place two double crochets in each stitch of the previous row for 24 total double crochets around. Connect with a slip stitch to your starting chain two.
Row 3. Chain two, and put a second double crochet in the beginning chain. In the next double crochet, make one double crochet. In the next put two double crochets. You will do this pattern of one double crochet, then two double crochets in the following stitch all the way around for a total of 36 double crochets around.
If you were to measure the diameter at this point, it should be about 3.5 inches across
Time for our last increase row.
Row 4. Chain two and put another double crochet in the start of the chain. For the next two stitches put a single double crochet, this pattern will vary from our previously established pattern of every other stitch being an increase stitch. This time it will be every third stitch. So your pattern will go, double crochet in the first stitch, double crochet in the second, two double crochets in the third, and start over. Do this pattern around and join with a slip stitch.
You will now be creating the body of the beanie.
Row 5- 8. Chain two. Double crochet around, join with a slip stitch to beginning chain.
Row 9. Chain two, single crochet around, join with a slip stitch to beginning chain and cut a tail of 4 inches minimum, then tie off.
For an alternate pattern you can add a colored stripe in rows 6 and 7.
When you finish row number 5. Cut the color with a 4 inch tail minimum. but leave the stitch open. Take your second color, slip it through the first one, and pull the first stitch tight. You will now have one loop of a second color on your hook. Chain two and double crochet around as the pattern calls for. When you are ready to do row 8, cut a 4 inch tail and preform the same color change as before. Leave one loop on your hook, slip a second color through it and pull the first color tight, you now have one loop of your original color on the hook. Chain two and finish the beanie.
To finish off. Take a yarn needle and thread your 4 inch tails one at a time on it. Then weave it through your beanie, At least 5 stitches in one direction, turn and go back over the same stitches the other direction to secure your tails.
You now have the basic beanie finished!
I hope you enjoyed my simple pattern for a basic beanie! Get crafting!