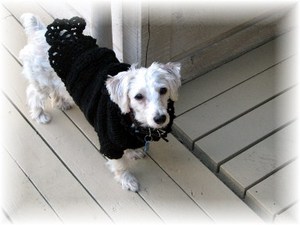
Why should you learn how to knit a dog sweater yourself? After all, you can buy one in the store. But knitting your dog a sweater is rewarding in so many ways. You’ll get to see your furry friend looking elegant in the dog sweater you made him. You can customize the size, color and pattern to his special needs. You can add crochet fringes to a girl’s dog sweater, or add a long scarf for especially cold days. Learning how to knit a dog sweater is a great winter craft even if you have just a few hours to spare. Depending on the size of your dog you can finish knitting him a sweater in a few hours or up to a day. So here’s how I made this dog sweater for my little girl, and all the tips you need to knit a dog sweater for yours.
What You’ll Need to Knit a Dog Sweater:
Yarn in the color of your choice
Knitting needles
Crochet needle
Scissors
2 knitting safety pins or multi-purpose ties
Measuring tape
Follow These Steps to Knit a Dog Sweater:
1. Decide on the pattern
It’s much easier to knit a dog sweater if you already have a sweater pattern to copy. If your dog already has a store-bought sweater, measure the length and width of the sweater, as well as the distance of the arm holes from the bottom hem and from each other. You can keep referring to this sweater as you knit the dog sweater yourself. Otherwise, take the equivalent measurements on your dog’s body. You can cut a pattern out of newspaper and dress your dog in it to make sure your measurements are all accurate. Remember, though, that wool will stretch a little once worn.
2. Knit the Hem
Alternate knit and purl stitches to create a small hem for the dog sweater (here’s how to make a purl stitch, and how to make a knit stitch). It’s up to you how thick you want the hem to be. Make sure the length of your sweater ends mid-point under the belly, so the sweater won’t get soiled while your dog is doing his business. You can always crochet or knit more hem line above after your finish the dog sweater.
3. Knit the Dog Sweater Arm Holes
Knit the dog sweater in knit stitches until you reach the point where the arms should begin. Measure how big a hole the store-bought sweater has, or measure the upper part of your dog’s arm to determine how wide a hole he’ll need. Use your measuring tape to determine how many stitches you will have to drop to create the leg holes. Knit the dog sweater only until you reach the point where the leg hole should start, then loop the stitches you wish to drop one into each other until you drop them all.
4. Continue Knitting the Dog Sweater Around the Leg Holes
Because you’ll end up with 2 leg holes, you’ll have three sections of sweater that need to be knitted separately, one between the leg holes and 2 on either side. Therefore, you’ll need to free the knitting needles as you move between the sections. Use a knitting safety pin to keep the stitches whole until you get back to them, or just use multi-purpose ties as I did (see picture).
5. Knit the Dog Sweater Collar
Once you reach the necessary height to the leg holes in all three sections ,you’ll need to create stitches over the holes again to tie the three sections back into a single dog sweater. The easiest way I found to do this was to switch to a crochet needle and knit as many stitches as I needed, then loop them on my knitting needle. After this is done for both leg holes, keep knitting the sweater until you reach the neckline, then once again create the knit-purl hem. Make this hem extra long, to create a turtle-neck sweater for your dog. Don’t worry about the neck being too wide as the body of your dog will pull the neck of the sweater down to accommodate the wide space in the front, between the forelegs.
6. Knit the Dog Sweater Together
Put the dog sweater on your dog and make sure the measurements are right. If a few inches are missing, you can simply add them as you close the sweater into a tube. I threaded the side of the knitted sweater back onto my knitting needle, then I created a hem again. I connected this hem to the other side of the sweater using a crochet needle.
7. Knit a Flower on the Back of the Dog Sweater
To create a hole for my dog’s harness I created a small hole at the back, where I knitted the sweater into a tube. I then crouched a flower over the hole to enclose it against wind and rain and add beauty to the girly dog sweater. This is optional, and you can knit this dog sweater without the harness hole.
8. Knit the Dog Sweater Sleeves
It was easy to simply crochet sleeves onto the holes in the dog sweater (the stitch is the same as the knit stitch). I simply advanced in a circle until the sleeve was long enough.
9. Knit a Long Back on the Dog Sweater
Despite ending the sweater early to prevent soiling from below, it’s a good idea to knit an extension on the back of the dog sweater. You can thread the knitting needle again and create an additional hem. Or you can crochet a curving addition, which is more lady-like (as you can see on my sweater pictures).
Knitting a dog sweater is a great winter craft for beginners who are learning how to knit and want a quick project. I wish you success knitting your very own dog sweater!