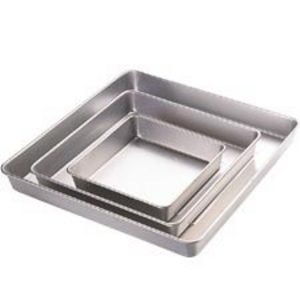
I purchased my Wilton 3 piece Square Cake Pan Set about nine years ago when my daughter was getting married. The 3 piece included 8, 12, 16 inch square pans by 2 inches deep. They are made of a very sturdy aluminum which has proven to be very durable. Dishwasher safe. The set of 3 cake pans cost me $40.00 plus tax.
I had met with my daughter’s future mother-in-law and a couple of the bridesmaids to discuss the wedding shower, decorations, etc. I said that I could make the shower cake. We were all also to bring a dish to pass.
Well now it was time for me to sit down and draw up the design for my the shower cake. The wedding colors were emerald green and white. So that was the colors I would stick with. My sister-in-law was making all of the bouquets and flowers for the wedding so I gave her a call to see if I could get the exact colors she was using for the wedding. We got together and she showed me what she was using. I selected white roses, ferns and other greens. Then I decided to go with pearls that were strung on clear fishing line they would bend forward which would add a nice touch with the white roses and greens. My sister-in-law then made me a crown of white roses, greens and pearls for the top of the cake. Everything was pulling together.
A couple days before the shower I got my square pan set out, and sat down to write down what I needed to pick up. I would need eggs, oil, water, powder sugar, evaporated milk, and Crisco. Now to figure out how much of each I needed to buy.
8 inch square pan = 4cups cake batter and 2 1/4 cups frosting bake at 350 for 30 -35 minutes
12 inch = 10 cups cake batter and 3 1/2 cups frosting bake at 350 for 40-45 minutes
16 inch = 15 1/2 cups batter 5 1/2 cups frosting, bake at 325 for 50-55 minutes
So I needed a total of 29 1/2 cups batter = 6 cake mixes (each mix makes approx. 5 cups)
Frosting I would need 10 3/4 cups frosting, which I always make extra, so lets make it 12 cups. So I would need 3 – 2 pound bags of powdered sugar
Crisco, 4 cans evaporated milk, 1 dozen eggs, vegetable oil and water.
Once I had picked up my groceries to make the cake then it was time to bake the cakes.
I greased and flowered the pans heavily so the cakes would come out easy. Mixed up the batter and filled the pans 2/3’s full. I baked them for the suggested time and then tested to see if the centers were done. They were so it was time to set them out on the closed in front porch and cool them. Once cooled. I had already prepared my large bread board by covering it with aluminum foil and putting some laced paper doilies on top of the foil by taping it down. Once the largest cake was cooled my husband helped me tip the cake by putting the cutting board over the cake and we tipped the board and cake over.
I then had to mix a batch of frosting so that I could put frosting between each cake. Once I frosted the bottom cake, it was time to tip the next cake on top of it. My hubby tipped up the bread board on a slant while I lined up the cake for centering. I touched one corner of the pan to the frosted cake and tipped it upside down quickly. Now 2 layers were in place. Once the second layer was frosted we did the same with the last cake and was able to frost that one too. Then it was time to take my parchment paper and make my self a cone, once that was done I cut a section off of the tip of the cone and inserted the large star decorating tip. Once that was inserted I spooned frosting into my parchment bag, folded and rolled up the open end and began to put my decorated edge around the base of the bottom cake then the top edge of the bottom cake, next I edged where the 2 cakes met, and then edged the outside edge of the second cake and edged where the top cake met the second one. Once that was done I edged the top edge of the top cake.
Now with all the edges frosted it was time to start decorating the cake with the flowers, leaves, ferns and pearls. I had chosen to decorate on all corners of the squares. I select 3 white roses, greens and ferns for each corner of the base, and on each layer except the top. On the top of the cake I put the crown of white roses, greens, ferns and pearls that my sister-in-law had made me. The cake was now finished. It turned out beautiful.
Now it was time to clean up my mess I made. I washed up my cake pans. Which washed up very nicely. Dryed them and stacked them inside of each other for storage. They were made heavy enough that I did not have to worry about them bending or warping on me.
I have always been please with any pans or products I get from Wilton, for one they stand behind their product. All the pans that I have purchased over 35 years still look as good as the day I purchased them. They definitely have longevity, and are quality made.
I have used these 3 pans for graduation, confirmations, 1st communion, birthdays, anniversary’s and more. I either use them separately or mix 1 or more together to give me a unique design. One thing I have to mention is you know how regular cake pans have a tendency once in awhile to show a little rust or wear and tear, well my Wilton pans show no signs of wear or tear. They are just as shiny as when I purchased them. I am very pleased with my cake pans.