I love all things vintage, but I can’t always afford to buy them. Sometimes you can’t even find specific items like a vintage Chinese checkers board. This Vintage Chinese Checkerboard is a fun and easy wood working craft project. You can play games on it or even hang it on the wall as decor in your home.
This is a fun project you and your kid can make together. So, if you are looking for something beside s a birdhouse to build with your child, try making this vintage Chinese checker game board craft project.
To Make a Vintage Chinese Checker Game Board You Will Need:
1 Pieces of Pine cut 15″ by 16″
Power Drill
¼” drill bit
Acrylic paint (Red, green, tallow, blue, white, and black)
Gel Wood Stain
Paint Brush
Old white t-shirt or rag
Painters Tape
Pencil
Ruler
The first step is to find a nice flat piece of pine board. Cut it to your desire size. I made mine 16 inches by 16 inches.
Next, draw out you pattern on the Chinese checkerboard. Use a large coffee can or even a compass to draw a perfect circle in the middle of your board. Trace it on the board with a pencil.
Now, you need to draw 8 equal triangles coming off of the circle. You can do this easily by drawing a pencil line directly across the diameter of the circle. Straight across the middle. Repeat this process making a perfect T shape. Now, make a perfect X by drawing a diagonally line through the center of your circle. Repeat this diagonal line crossing in the opposite direction.
Your circle is now marked off into 8 equal parts. Use each part as the base of the 8 triangles that extends out from the circle.
Once you have your triangles complete you are ready to mark off the holes in your vintage Chinese checkerboard.
Each triangle should start with holes at the base. As you move up each row away from the circle space your hole in between the previous circles. Work your way back row after row. Ending finally with one marble hole. I like to use a pencil to mark these dots and then drill after the whole board is mapped out.
Repeat this process on every triangle of the Chinese checkerboard. Then start on the circle. Start on that middle line your drew. Evenly space your holes, marking them with a pencil. Continue to work out row after row until you reach the outer edge of your circle.
Now you are ready to drill. You have a choice to make at this point of the craft project. You can either drill the hole in your Chinese checkerboard all the way through to only drill then half way through. Either way would be fine and both types of holes can be found on vintage 1950’s Chinese checkerboards.
If you want to only drill you hole halfway I recommend tapering off your drill bit with a piece of blue painter’s tape. Place it about 1/4 ” in on the bit. This way every time you drill you stop when you reach the tape. This will make your holes uniform in depth.
Once your holes are drilled you can paint. I like to prime my game board first, but that is optional.
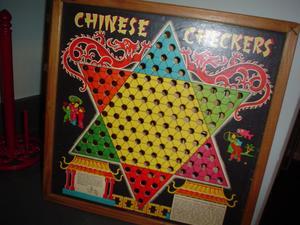
Traditionally you will find vintage Chinese checkerboards from the 1950’s have a black background. The colors are reserved for the triangles and the circle. Be sure to paint triangle opposite each other in the same color. You should also use four different colors for the triangles.
Once all of your paint has dried outline the circle and start with white paint. You can use a paintbrush or a white paint pen.
Use yellow paint to paint designs on the empty space where you have painted the backgrounds black. You can even paint the words “Chinese Checkers” on the board. Place “Chinese” on the top left balk area and “Checkers” on the top right black painted area.
Add marbles and you are ready to play Chinese checkers! You could also hang this on the wall with a picture frame hook.