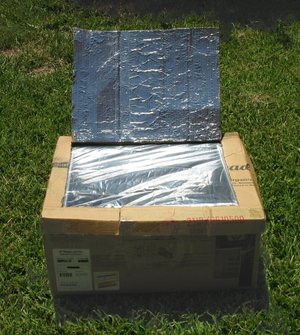
School Science Fair Project: Cardboard Box Solar Oven
A couple of years ago my son and I made a solar oven for his school science fair project. The project was a huge success, and won my son a second prize for the science fair.
What You Will Need
Two cardboard boxes. The outer box should be fairly large. Fortunately I had just bought my son a computer on eBay, and the box it came in was the perfect size. The inner should be at least 15 inches by 15 inches, but it can be bigger. The idea is to set the small box inside the large box so that there’s plenty of air space in between the two boxes.
One sheet of cardboard for the lid. These are available at the grocery store. We used scrap cardboard for this step, and the result wasn’t really optimal. So I recommend that you go ahead and purchase this large sheet, unless you have some old large sheets of cardboard lying around. If you try to salvage a smaller piece of cardboard, you may not have enough to cover your project completely. This sheet should be about two or three inches wider than your box on all sides.
One roll of aluminum foil.
Black paint. You can use spray paint, although I personally prefer non-toxic craft paint, which I tend to have around anyway. You can use charcoal grey or navy if you don’t have black on hand. It’s better to use whatever you’ve got handy than to go out and buy new materials, especially since the point of this project is to be environmentally friendly.
Keep in mind your child is going to need lots of help with this project. It’s perfectly okay to help him or her as much as he needs. However, be sure to have your child do as much of the work himself as possible, and make sure he understands what he’s doing. If you do the whole project yourself, especially if it’s for the school science fair, that isn’t right. It’s cheating.
Set the larger box down and fold the flaps closed. Then set the smaller box on top, and trace around the bottom edge. Then cut out the area which has been marked out on the flaps, so that the small box will fit cleanly inside the large one. A box cutter or Exacto blade is much better than scissors for this step, which make the project difficult to impossible. If your child will be working with a sharp blade, supervise him very carefully, or perform this step yourself while he watches. A metal straight edge is very useful for this sort of cutting; it prevents the knife from slipping, which creates a cleaner line, and also reduces the risk of injury. When I was in art school, a two foot metal straight edge ruler was a required item on our supply list.
Then glue the aluminum foil to the inside of both the large and small box. Place some more foil on the inner edge of what remains of the flaps of the outer box. Glue down the flaps of the outer box. Wad up some newspaper and place it on the bottom of the large box. Adjust the newspaper so that the top of the smaller box is perfectly in line with the top of the larger box. Glue the flaps of the small box to the flaps of the large box, and trim the excess with a box knife.
Cut out another piece of cardboard the size of the inside bottom of the inner box. Glue aluminum foil to one side of the cardboard. Paint the foil black and allow to dry. This will form a “drip pan” which you can place in the bottom of the solar oven when it is used for cooking.
To build the removable lid, place the large sheet of cardboard on top of the solar oven. Trace the outline of the solar oven from underneath. Fold over the excess cardboard (which should be about two or three inches wide) so that it forms a lip around the solar oven. Make sure that the corrugations in the cardboard go from left to right rather than up and down. We missed this step somehow when we were assembling our solar oven, and as a result we couldn’t prop the lid open properly. So be sure you get it oriented properly so you don’t have the same problem.
Draw a line around the lid which is the same size as the solar oven opening. Cut this out on three sides only, so that the flap can open upward. Place some more foil on the inside of this flap.
Bend a twelve inch segment of wire hanger, and then place this inside the corrugations of the cardboard on one side to prop the lid open.
Turn the lid upside down and glue the oven bag to the underside. There is no need to open the bag; just glue it on whole.
Be sure to glue the oven bag closed on its open bag. This way the air inside the bag will expand, helping to increase the heat in the solar oven during cooking. It will also prevent condensation from collecting inside the bag.
Your solar oven is complete, but in order for the science project to be complete, we have to cook something. We chose oatmeal cookies for our science fair project. Solar oven recipes should preferably be free from eggs, dairy, and other animal products, at least at first,since we can’t guarantee that the temperature inside the oven will be hot enough to kill any bacteria which is in the food.
This is a good vegan recipe which should work well in any solar oven, as well as in a conventional oven:
1/3 cup peanut butter
2 ripe bananas, mashed
1 tsp vanilla
2 tbsp soy milk
2 tbsp maple syrup or corn syrup (optional)
2 ½ cups rolled oatmeal
1 teaspoon cinnamon
1/4 cup whole wheat flour
Have your child help you assemble this recipe. First mash the bananas, then add the peanut butter, soy milk, vanilla and syrup. Add the oats, flour and cinnamon.
Then spoon the result on two separate ungreased cookie sheets. Make sure that one of the sheets will fit inside your solar oven.
Bake one sheet in the conventional oven for 13 to 16 minutes. Bake the other cookie sheet in the solar oven until they appear to be done.
We did this recipe in fall, when the sun was beginning to wane so we had some trouble getting the oven to really heat up. However, we did get the solar oven cookies to solidify sufficiently. When they were done, we took digital photographs of the cookies and the oven, and also took some pictures during the cooking process. I instructed my son to make a note of how long it took for each batch of cookies to finish cooking, and the final result of each. Whereas the cookies in the conventional oven had taken about twelve minutes to finish cooking, the solar oven cookies took around two hours. We compared the texture and taste of the two batches of cookies, and my son recorded these results in his project log.
The second time we baked the cookies, it was a hot day in August. We didn’t get the cookies in until rather late in the day, but we still had better results than in our fall-time cooking attempt. It was a little windy, and the lid kept blowing off, so I had to get a couple rocks to keep it on. Fortunately my husband collects these, so I had some handy. Other strategies, such as turning the oven to face the sun and setting the pan toward the back of the oven where there was more direct sunlight also helped.
I set the timer for 30 minutes but somehow missed the buzzer. When we went out, the pan was so hot we needed oven mits to get it. The cookies cooled much more quickly than if they had been in a conventional oven. The cookies were delicious, warm, chewy and not too sweet. My boys and I ate them almost faster than we could cook them.
We created a large posterboard with these observations and project results. I had to do a lot of the work myself, but encouraged my son to do as much as possible. I permitted him to take the camera and, with supervision, take the pictures of the oven himself, and to incorporate printouts of these pictures into his posterboard.
My child’s teacher made a point to mention how much everyone loved the solar oven science fair project. Overall, it was a huge success. This project can be done in a couple of days, but it is a lot easier if you leave a couple of weeks to complete it. This is a very well-rounded school science project that is highly interesting and stimulating not only for you and your child, but is also a huge crowd pleaser at science fairs.