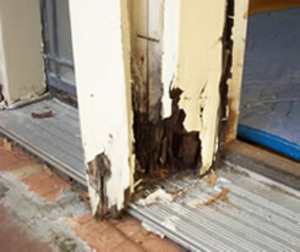
A cracked door frame may appear to be a bigger repair job than the average home handyman is willing to take on but there is really nothing complicated about replacing this material when the need arises. If the crack is more than a surface crack then replacement is what you’re looking at. Surface cracks can be filled with wood filler putty and then painted over.
The frame, actually called a door casing (see illustration here) is made up of two vertical pieces called the jambs and the head piece that connects the two at the top. The entire assembly can be purchased at lumber suppliers and major home repair wholesalers like Lowe’s and Home Depot. It is not necessary to replace the entire door casing if only one part is damaged but when replacing a jamb piece make sure you get the correct side – striker plate or hinge side – and that it is for the correct swing of your door – right or left hand – provided you can find these pre-mortised pieces sold separately.
Materials and tools you will need will be:
• Razor knife
• 6 penny finishing nails
• 12 penny finishing nails
• Reciprocal or circular saw
• 2′ level
• Wood shims
• Hammer
• Nail punch
• Flat pry bar
• Caulk and caulk gun
• Wood putty to cover nail heads (if the material is a wood stain, they do sell colored putties to match)
• Paint and brush for final touch up
Before you start, pull your door off the hinges by taking your nail punch, place it on the underside of each hinge and hammer it upward to pull the hinge pin out. It works best if you start at the bottom and finish with the top hinge. Pull the door away from the jamb hinges and set it aside. To begin your repair you will need to remove the casing molding around the door. You can re-use this material if you work slowly and take care not to damage it as you remove it. In the event that this does get damaged make sure you have located a supplier that carries your style of casing. Homes older than 15 – 20 years old may make it difficult to find the dimensions of their molding even though the style is still available.
Take your razor knife and score the caulk joint between the casing molding and the door casing frame, sides and top. This will make it easier to remove and give a clean line that doesn’t disturb the paint. Then at the bottom of the casing molding wedge a flat pry bar in between it and the jamb piece, drive it in about half way with a hammer and then slow pry the molding away from the jamb.
Do not pry it completely away at this point or it will crack. Instead, move your flat bar up as far as you can and continue to pry the molding away from the jamb until you reach the top. This should dislodge it far enough apart where the trim nails holding the casing will be weak enough to separate the two without damaging the molding. Do the same with the remaining pieces on both sides of the door casing. Pull out the old nails from the back side of the casing mold. With an exterior door casing you may have thicker molding outside to remove if it butts up to brick. Be aware too that some exterior ddor jambs are not the standard 4-5/8″ width. Measure door jamb widths before you make your purchase
Also, on the exterior side of door casing where there is brick there will be a piece of 1×4 wood spacer under the brick molding. One edge of this 1×4 spacer is nailed to the jamb and the other edge is behind the brick. You won’t need to tear brick out to get to it but you do need to get your flat bar in between it and the jamb to separate it far enough where you can put a hack saw blade into it to cut the nails from it. Once you get the door casing piece out, be sure to back those nails out and remove them before installing the new piece.
Once the casing molding is off the quickest way to start removing the jamb is to cut the damaged piece in half carefully with a reciprocal saw or a circular saw. Slowly pull it away from the wood framing it is nailed to then proceed to pull out the other door casing pieces, carefully if they are undamaged so you can re-use them. After the entire jamb has been pulled out, go ahead and remove any nails or shim pieces from the stud framing pieces the door casing was attached to, making it ready to accept the new one.
Assemble the new pieces for the door casing (if you bought the separate piece) and center it in the framed opening. In the gaps between the jamb pieces and the framed opening, slip enough wood shims in to fit snug between to the two materials. Do this at four points; one at each top and one at each bottom. Drive a 12 penny finishing nail through the jamb at each of these four points until it pierces the wood stud enough to hold it. DO NOT DRIVE IT IN ALL THE WAY at this point.
Next, place your level on the edge of the jamb at the center and make sure that side is level and that visually the new jamb appears to be flush with the sheetrock on the both sides; inside only if it is an exterior door with brick bold. The outer edge should butt up against that 1×4 spacer board. Do the same thing with the other jamb piece. Then bring your level in and set it in the center facing of the jamb to make sure it is level in this direction. Gap the jamb between the back side and the wall stud until it is level, putting extra shims in at those four points as needed.
Once you are sure your jamb is level on outer edges and inner facing, secure the jamb at the four shimmed points by hammering finishing nails all the way in until only 1/8 of an inch is exposed (see illustration). You will counter sink the nail the rest of the way into the wood about an eighth of an inch with your nail punch once everything is set. To give strength all the way up and down the jamb you will need to put wood spacers at the center of each jamb and then one between it and the top and bottom shims you have already set. Secure them also as you did the earlier four points. As you proceed with this be sure to check your square and level status of the jamb with your level. It would be extremely difficult to pull the finishing nails back out to re-set an unlevel jamb if you have already counter-sunk them.
Now go ahead and re-attach the door and make sure it fits the jamb without rubbing and the latch catches the striker plate as it should. If the door does slightly rub against any part of the jamb, take a block of 2×4 wood and rest it against that part of the jamb or head piece the door is rubbing against; rap firmly on it with your hammer. This may move the jamb just enough to give it the room it needs without having to remove everything and re-setting the jamb. The 2×4 wood block protects the jamb from the hammer blow and distributes the blow across the length of the block. If the latch is just barely missing, adjust the striker plate up, down, in or out as needed.
Once the door is up and operating properly, go ahead and reattach your casing molding. Leave about a 1/8 inch from the inner thin edge of the casing mold to the outer edge of the jamb and head piece. This will be the area that you will caulk later. Use the 6 penny finishing nails about every 8 inches on the inside thin edge, making sure to drive it straight in so as not to split or penetrate the door jamb where it is visible. Then use your 12 penny fining nails about every 12 inches on the outer thicker side to secure it to the stud framing behind the sheetrock.
At this point you can counter sink all of your nail heads and cover them with wood putty. Be sure to use a damp cloth to smooth over these spots so they will not show up after you paint or stain the finished product. Re-caulk the areas where the casing molding attaches to the jamb and the sheetrock. Stained casing should not be caulk so be sure to use enough nails to avoid any significant gaps. Let the caulk set before painting.
The first time will go slow but hopefully there won’t be a next time. If there is you will now have the know-how it takes to get it done. As a final note, it is best to replace exterior door jambs when the seasons are such that loss of heat or air conditioning is not a factor