In my previous article on guitar maintenance for beginners, I explained the steps for replacing the strings on your electric guitar. Hopefully for those of you out there starting off on an electric this was helpful to you. It may be difficult to begin with but over time you will develop speed as your become more proficient at changing the strings. It takes me under fifteen minutes to change strings on a guitar. Of course I have been doing it for 14 years! But hopefully that will give you something to shoot for as you continue to develop your skills at playing and maintaining your instrument.
Now I realize that a large number of aspiring guitarists begin playing on acoustic guitars. The acoustic guitar is an ideal for beginners for a few different reason. I suppose the most important reason would be that they are slightly more difficult to fret and therefore will help build up finger strength and better developed fingertip calluses. But of course changing strings on an acoustic require a few different steps than that of an electric. So let’s begin so that you can get on with actually playing your guitar!
Once again you will need to consider what gauge of strings is most suitable for you. The lighter gauges will provide for easier fretting but are thinner and easier to break. Larger gauges are sturdier and give a thicker sound, but can be harder on the fingertips. Consult your local music dealer for help with this selection. After you have the strings you need, you will need to make sure you have the correct tools. As with an electric guitar, you will need a string winder (this will save your wrist a lot of work as you will not have turn the tuning keys by hand) and needle-nose pliers for cutting away excess string and they also will aid in removing the old ones. These pliers will also be necessary for extracting the pegs which hold the strings in the bridge.
Now begin by removing one of the old strings. It does not matter which one you start with but just make sure you change them one at a time. The angle of the neck is held in check, at least in part, by the tension of the strings. Loosen the tuning peg of first string that you are going to change (whether it be the low E, the high E or another in between). As it unwinds the string will lose more and more tension until it simply hangs loose. At this point use your needle-nose pliers to cut the string. The next part is tricky and requires great care so as not to damage your instrument. You will notice that the string is held into the bridge by a peg. If you are unsure, the bridge is the part on the body of the guitar where your usually rest your picking hand when playing. Use your pliers to pull this peg out. It will take a small amount of force but not too much. Also note that these pegs are made of pretty soft plastic and can easily be marred or scratched so do not apply to much squeezing pressure when removing these. If you can manage to grab and lift from underneath the top ball of the peg, this will minimize the aesthetic damage that may be done to it. Once the peg is removed then pull the string out of the hole and discard.
Packaging for guitar strings list which strings go in which position. It may help to know the order of the strings if you do not already: The top (thickest) string is the low E, next (moving downward) is A, then D, then G, B and then high E. Find the string that goes in the place of the one you just removed. Start by pushing the end with the ball into the hole in the bridge. You do not have to push it down far because you are going to follow it up with the bridge that you removed in the last step. The peg is designed to allow the string to pull back through when tightening but because of the ball on the end of the string the peg will prevent it from pulling all the way out. So after inserting the ball of the string into the bridge reinsert the peg. You want to push it so it is firmly in place but do not overdo it. Now stick the end through the hole in the tuning peg. However you will need to leave enough slack so that when you begin to tighten the string, it will wrap around the tuning peg at least twice.
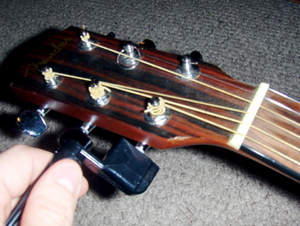
Here’s a helpful tip: As with an electric guitar once you have put the string through the tuning peg hole and have left plenty of slack, simply pull the end back to meet the rest of the string and hold those together thus wrapping the string around and through the peg. Now when you beginning tightening the tuning peg, if you hold the two parts together, you will not have to worry about the string pulling back out of the hole. Take your string winder (or fingers) and begin turning the tuning key in the direction that wraps the string around the peg. You want to do it so that the string wraps around the peg counterclockwise for the tops strings or clockwise for the bottom strings. This is so your strings go up the center of the headstock.
Once you have it tight enough (though not too tight yet), you can cut any excess string that is left hanging with the needle-nose pliers. Congratulations you have completed changing the first string. Now just repeat this process for the other five strings. Keep in mind that tuning is not an issue at this point. As you go simply tighten them to a moderate tension. Once you have completed the task you can use a tuner, a piano, or other means to tune the strings. Or you can use one of the many online tools.
Be advised that you will notice the strings coming out of tune easily the first day or so. This is because new strings stretch and need to be “broken in” so make sure you always replace your strings well in advance of a gig so that you will not have to endure tuning issues during your performance. But once the new strings are thoroughly broken in you will notice a new clarity and brilliance in your tone that was not there before.
It is a good idea to change your strings every three months. You may be able to wait longer if you do not play regularly. But you will find that keeping a fresh set of strings will make a wonderful difference in the sound you get out of your instrument. And take care of your strings between replacements. Use a lint-free terry cloth or the like to wipe sweat and skin cells from the strings after each time you play (especially for extended periods). I hope this tutorial has helped you learn more about caring for your guitar. Enjoy your new strings and happy fretting!