The Nine-Patch Quilt block is a classic and beautiful design. Here are instructions for making a Nine-Patch Quilt…
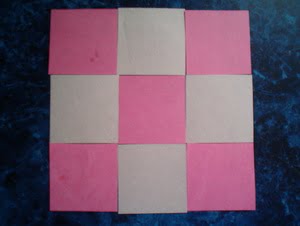
When choosing fabric for this project look for 100% cotton prints, in two contrasting colors. In the first photo you can see that my example block is cream and pink. You can use any bold color against a white, cream, or tone-on-tone fabric. You can even use a print fabric, if the print isn’t too large. You can alternate the colors by changing all the darks to the light, and all the lights to the dark. (Try doing half the blocks that way and then build the quilt in an A-B-A-B-A-B pattern for a really interesting result.)
You can also add a third color, by changing all the center squares to a color that blends with the colors of the outer block pieces. If your light color is the same throughout, you can even use a different ‘dark’ or ‘bold’ color for each of the blocks. There’s no end of color combinations with this versatile pattern.
There are three photos attached to this article. The first is a completed two-color nine-patch block, so you can see what your goal is. The second is a picture of what your three strips should look like just before the final step. The third photo is of what your pieces should look like after step 6. If you’d like, you can print out these photos to use as examples as you work. The fourth photo is an example of a nine-patch block using a third color for the center block.
Step 1 –
If you’re working with fabrics that you think may shrink, go ahead and pre-wash, dry, (and iron if necessary) the fabric before starting.
Step 2 –
The finished block will be 9 inches square. With that in mind, decide how big you want your quilt to be, and count up how many blocks you will need. For example, 9 blocks would make a 27 inch square wall hanging.
Step 3 –
For EACH block you want to make you’ll need to cut out 4 pieces of one color and 5 pieces of the other color, for a total of 9 pieces. Keep in mind that if you’re planning to alternate the colors, those numbers will even out each time you complete a pair of blocks.
Step 4 –
Cut the each of the squares so that they are 3.5 inches on each side. After you’re finished sewing, each block will be 9.5 inches (9 inches, plus a quarter-inch seam allowance on each edge so you can assemble the blocks.) The square is the only shape you’ll need to assemble this quilt.
Step 5 –
Take two pieces, (one of each color), and sew them, right sides together, using a ¼ inch seam allowance. If you have an iron, press the seam towards the darker fabric. (You don’t *have* to iron, but it can make your pieces easier to work with, and your finished product will look neater.)
Step 6 –
Repeat step 5 two more times. When you’re finished, you should have three loose blocks left, and three two-colored rectangles. As you work, look at picture #3 to be sure that it’s starting to look as expected.
Step 7 –
Now compare what you’ve got the photo number three. It should look like that. Take the square piece that completes each row, and sew them, right sides together to their corresponding rectangle, using a ¼ inch seam allowance. Do that with all three sets. You should end up with three strips that look like like photo #2.
Step 8 –
Now take the three pieces you’ve created and arrange them so that they look like photo #1. Sew them together in two steps; first one side to the middle piece, and then the other. (Right sides together, ¼ inch seam allowance, iron if you wish.)
Step 9 –
Now you should have a completed block that looks like photo #1, (except in your colors). Repeat until you have as many blocks as you figured for in step two. Lay them out and rearrange them in whatever pattern you prefer. Sew them together, first in rows, and then sew the rows together, to complete your quilt top.
Beautiful!!
Please click on the author’s name (above the article) to read more of her work on Associated Content.
.


