The Ladder Leveler from LeveLok attaches quickly to either side of your ladder using the KeyLok Quick Connect system and adjusts the ladders leg on uneven surfaces for a steady base on your extension and multi-position ladders.
My house has a porch on the front but the sides are simple walls with only the windows as obstacles for painting, the front is the biggest problem. I figured on using half my extension ladder on the porch roof but the pitched sides slope toward the gutter and do not leave me with an even roof on about half the roof.
The problem with this is the porch roof is straight in the middle but slanted toward the two sides, this is actually called a hip roof. This means part of my ladder will not have an even spot to secure the legs of any ladder I have which is an extension and two multi-position ladders.
When I was checking out the roof simply screwing a 2 by 4 across the middle roof section that slants toward the front made a secure footing for the extension ladder base. Toward each side of the porch roof it slants toward the side so I needed to use some sort of leveler on the ladders outer leg.
I contacted LeveLok and they sent me two Quick Connect KeyLok kits to attach to both my ladder types for the review, a common Keller 28 foot extension ladder and a Gorilla Multi-Purpose ladder. Both ladders have a nice clear area to attach the leveler to each leg using the Quick Connect system and the work attaching both kits only took about an hour total.
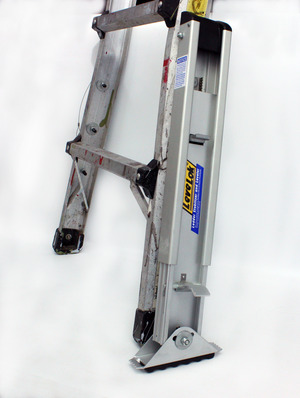
The KeyLok Quick Connect system is two channels that attach to each leg of your ladder and uses three slots and corresponding posts on the Leveler to attach it to your ladder. The slots are a hole with a corresponding slot much like wall attaching slots for screws only large enough to accommodate the posts on the leveler.
Each channel has a locking latch and release lever so the Leveler locks onto the channel when you slide it on and pull it upward. The latch to unlock the Leveler is between the Leveler and your ladders leg so there is no chance of accidentally releasing the Leveler.
The Leveler is a simple gear and release system that uses extra strong springs to ensure the Leveler pushes upward to retract the Leveler. When extending the Leveler you need to lift your ladder upward and push down on the flip up lever to extend it downward.
The Leveler has a release on the side to retract the Lever upward and you use the flip up lever below that to push the Leveler down when you want to set it for use. The Leveler is easy to install as far as these mechanical things go but you will need to use a drill to make holes to mount the Quick Connect base units on your ladders legs.
You first make sure the two base unit channels will work on your ladder and that nothing will be in the way when the Leveler is being used. You simply place the base unit on the leg and attach the Leveler as well as look to see that nothing like a rung or attaching hardware will get in the way.
I attached the Quick Connect base units to the two ladders and had no problems with each and nothing was in the way, you simply check and make sure the position is correct for the channel and bolts being used. The bolts will go through the side of each ladder leg according to the holes on the base unit so you mark each hole using the base unit holes.
Once you have the position marked you make sure the bolts you are going to be using will not hit a rung or other hardware and then drill the holes. The Quick Connect units attach with bolts, washers and nuts and the kit also comes with spacers if rungs or side hardware on either leg gets in the way.
I did not have to use spacers or the square washers for my Gorilla ladder but I did use the round washers on the inside with the bolts and nuts. The fiberglass legs of ladders like my Keller ladder require a bit more reinforcement so they include square washers for use with fiberglass ladders.
I did have to install spacers for the fiberglass ladder because the rungs for the ladder have some kind of mounting hardware for each rung that protrudes out from the rail. This means there is no flat surface the length of the Quick Connect rail on both legs but the spacers make sure you have the mounting surface you need.
The instruction for every ladder type includes enough explanation and directions with pictures to install the Quick Connect system to your ladder using the appropriate hardware. The kit comes with extra bolts and enough washers along with spacers to use for any ladder type you could attach the Leveler to including flat and rounded rail ladders.
Attaching the Leveler to the Quick Connect unit is as simple as sliding the Leveler onto the unit and lining up the three posts with the three slots then pushing it upward. To make sure the Leveler is locked in place you use a simple quick connect pin that slides through a hole near the center post.
This quick release pin locks the Leveler onto the Quick Connect base unit for safety but the latch on the top also needs to be used to remove the Leveler. Using the Leveler on a job is actually pretty easy but it does require having to lift your ladder off the ground to extend and remove or replace the Leveler.
You have a flip down step to help extend the leveler so you can actually use both hands to lift your ladder while using your foot to press the Leveler down into position. When extending the Leveler guessing about the length to extend it for any given area your ladder is on gets pretty easy.
On my roof and when using the Leveler along my sidewalk on one side and on my gravel driveway on the other worked out very well and was easy. When placing the ladder and having to switch the Leveler from one side to the other simply lifting the ladder a few inches to get the Leveler off is all you need.
You can remove the quick release pin and press the release latch before lifting the ladder so when you do lift the ladder the Leveler falls off or you can push it off the Quick Connect rail. To attach it to the other side you simply lift the ladder and slide the Leveler onto the Quick Connect unit which may take a bit of doing or simply set the ladders bottom rung on top of a 5 gallon pail flipped upside down.
When on my roof to switch the Leveler or install it on the side that did not have roof under it, the slanted area, it was as easy as sliding it on and pulling upward to lock the top release in place. You then install the quick release pin for safety so the Leveler has no possible way of coming off the Quick Connect unit while in use.
To set the Leveler you simply lift the ladder up maybe a half inch and step on the flip up step to push the Leveler foot toward the ground. Once the Leveler comes into contact with the ground or roof surface let the ladder down and check stability, it usually took me a couple tries to get the setting right when I started.
After using the Leveler on the front porch and part of the next side I had the task of setting the ladder and Leveler down in one simple motion and got the hang of things quickly. Using the two kits was equally handy and if you have several projects with multiple ladders buying two kits is a must.
I found having only one Leveler but both Quick Connects handy but with two Levelers it made things go much quicker without having to remove and place the Leveler every time I moved my ladder. A second Leveler would be especially handy if you have very rough or varying terrain to set you ladder on and will have a need to move the Leveler from one leg to the other often.
The Leveler comes in three models for varying thicknesses of ladder rails as well as your choice of permanent mounting or Quick Connect removable system. The Leveler itself is installed so that it is off the ground when your ladder is setting squarely but can extend about 9 3/4 inches when used.
This will vary a little when you install the Quick Connect base units as the ladder design itself may need you to install the unit above or below the best possible location. This should not be a problem and the ladder Leveler works equally well if it is installed a little above or below the desired locations detailed in the instructions.
Looking at several ladders at various stores you can easily see how well this would attach and I actually had no problems attaching it to both my ladders. The Gorilla ladder only required me to install it at a slight angle as the legs of the ladder are slightly angled at the bottom.
The Leveler and the Quick Connect units worked just as well and made for a much faster time when setting up the ladders while painting. The Keller extension ladder bottom section I used on my porch roof worked very well and I only had to ensure I secured the foot of the Leveler using a short piece of 2 by 4 screwed to the roof so it did not slip.
While working on the roof I always used a tie off from my attic to secure the ladder to the building and secured myself to the building using a safety line and harness. I used a set of three 2 by 4 boards inside my attic window and a tow rope securely tied to these three boards so I could attach a safety harness to one end and the ladder itself to the other.
This may sound crazy but I used this method instead of a short safety rope because the tow rope would safely hold my weight if I fell and the tow rope could be used later for other projects. I did buy a regular safety harness and carabineer for attaching me to the end of the tow rope and tied the tow rope to the boards with a clove hitch as well as wrapping the rope around a few times to shorten it.
The 2 by 4 boards inside my attic were kept in place by brackets screwed to the boards and 2 by 4 boards of the walls next to the attic window. This ensured the ladder would not move when I first tied the ladder to the boards while working on the highest part of the peak as well as giving me a safety line while I worked.
The LeveLok Ladder Leveler worked exceptionally well all around my house and was easy enough to install using a simple drill, the correct size drill bit and a wrench to tighten the bolts. It only took me about a half hour to install both legs to the one ladder and less time with the second but part of that time was taking the product shots.
It really would install in less than a half hour and as little as 15 minutes for most people, the Quick Connect system makes an easy way to attach the Leveler on either side of your ladder. I highly recommend the LeveLok Ladder Leveler and the KeyLok Quick Connect system for ladder stability and safety while working on extension and multi-position ladders.
One set of the LeveLok Levelers and Quick Connect units cost $100 but can also come preinstalled on several extension and multi-position ladders. Check out the LeveLok ladder safety devices including the LeveLok Leveler and KeyLok Quick Connect units at Levelok.com.