This is an easy craft that you can do with children of almost any age. Use big chunky beads for smaller children, which will be easier for them to grip.
Supplies:
========
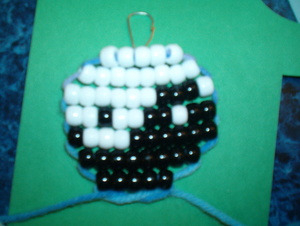
Pony beads – 28 white
Pony beads – 28 black
Yarn or ribbon
Two craft needles
Small metal key-loop
Step 1 ~
Load several feet of the yarn or ribbon on to the needles, with one needle at each end. (You’ll have some extra to cut off at the end. It’s much easier to start with too much than too little for this project. So give yourself plenty to work with.)
Step 2 ~
Thread five white beads onto your string, and slide them to the middle.
Step 3 ~
Add eight more white beads to one needle, and then run the second needle through those eight in the opposite direction. Snug them down against the first five, so that they’re lying in two rows. (The top row has the five. The second row has the eight beads with two passes of yarn inside them.)
Step 4 ~
Make the third row by stringing one white, then three black, then six white beads onto the first needle, and then running the second needle through and snugging them down next to row #2.
Step 5 ~
Make the fourth row by stringing 10 beads, in this order: black, black, white, black, black, white, white, black, white, white. (This will be your middle row.) Then run the second needle through those six and snug them down next to row #3.
Step 6 ~
Make the fifth row by stringing six black, then three white, and then one black bead onto the first needle, and then running the second needle through and snugging them down next to row #4.
Step 7 ~
Make the sixth row by stringing eight black beads onto the first needle, and then running the second needle through and snugging them down next to row #5.
Step 6 ~
Finally, make the bottom row by stringing five black beads onto the first needle, and then running the second needle through and snugging them down next to row #6.
Step 7 ~
Then tie off your yarn/ribbon by hiding the knot inside the last row.