For many years the traditional way of redecorating a room in the home was to either re-paint or re-wallpaper. Nowadays, however, there are a lot of different methods that are being used to provide those accent colors and really spice up a room renovation. Sponge painting over a base coat is popular, as it provides a faux textured finish, and gives the surface of the wall a three-dimensional look.
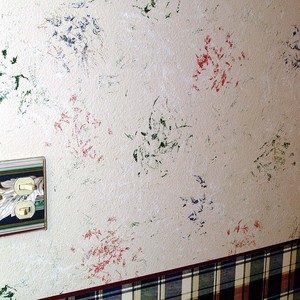
Another interesting look is obtained by applying accent colors over the primary coat with an ordinary household feather duster. Wispy little patterns strategically positioned break up the bleak formality of the all white or all beige wall, and provide colors that can be picked up in matching carpet, furniture, or draperies. The technique is probably easier than sponge painting, and can be finished in less time than it took to roll on the base color.
What you need. The process only requires a few extra articles, and a little extra time. Before you begin, you will need to select a base color, and three or four accent colors. For each accent color, you will need a separate feather duster, and a separate paint bucket. Each of the paint buckets have to be large enough to put the feather duster in easily. This means that the normal one-gallon paint cans will not work. If you are doing new construction, you can use the five-gallon buckets that most professional ceiling paint comes in. If you don’t have any of the five-gallon paint buckets, you can see if the local fried chicken chain restaurants will sell you some of their large paper buckets.
Paint color ideas. Everyone has their own preferences when it comes to colors in a room, and different paint colors can be selected, depending upon the size of the room, and how much lighting there is from windows. (When we feather painted the bed room, we selected a soft beige color for the base, and applied feather duster swirls in deep crimson, navy blue, forest green, and white.) Any colors that will match the other items you plan to have in the room will work.
How to apply the feather duster paint swirls. After the base coat has been allowed to dry completely, select one of the accent colors, and fill the bucket with approximately 0.25 inch of paint. Lightly tap the clean feather duster into the depth of the paint, wetting only the very edges. Next, raise the feather duster above the level of the liquid in the bucket and whip it in a circular fashion against the inside diameter of the bucket. This will ensure that you have knocked off all the excess paint from the feather tips. Too much paint on the feather duster will cause large globs to speckle the wall when you paint, which is not the wispy look that you will be trying to achieve.
The next step is to lightly dab the feather duster on the surface of the wall with a slight twist of the wrist. This will give your paint pattern a slightly rotational appearance. The twist does not have to be severe. If you are twisting the feather duster 30 degrees, or so, it should be enough to smear the paint very slightly, and result in the desired effect.
Place several of dabs of this first color on a section of the wall, allowing lots of space between the swirls. Keep in mind, that you have other paint colors to be placed on the same wall, and will need to leave room.
Work one wall at a time, to make sure you are getting the overall look that you like. Apply the various paint colors in an irregular fashion, instead of working them into a pattern. (Remember, if you wanted a repeatable pattern, you could have put up wallpaper.)
If you have never painted with a feather duster before, you may want to start out on a wall of the room that is not the first one seen as the room is entered. As you progress from wall to wall, you will learn what type of color spacing you prefer, and a little experimentation and practice never hurts.


