Step 1
Select a digital picture that you might already have where you’d like to make the subject the focus of the picture and insert a totally different background for neat effects. Open PSP 7 then open your image. Go to your layer palette and right click on the layer called Background and select “Promote to Layer”. The layer name changes to “Layer 1.
Step 2
Right click on Layer 1 and select “Duplicate”. This makes a copy of the image.
Step 3
In the Layer Palette, click on the pair of glasses next to Layer 1. This will hide this layer but you can’t tell until you start working with the visible layer.
Step 4
Now in the Layer Palette, click on the layer listed as “Copy of Layer 1”. Then click on the actual picture.
Step 5
Select the magic wand. This image looks like a magic wand! Click in the area away from the subject. This works best with solid backgrounds or backgrounds that aren’t too busy. If you have a very busy background, skip to the next step. After selecting the area outside the subject, hit the delete key. This will erase the background.
Step 6
Select the eraser tool. The icon looks like a red pencil with an eraser at the end of it. If you were using the magic wand from step 5, be sure to go to selections a the top and pick “Select None”. Go to tool options and change opacity to 100 and change the size to a higher number so it will make a bigger eraser or a lower number to make a smaller eraser. Use the eraser to clean the area around the subject so you only see what you want as your main focus.
Step 7
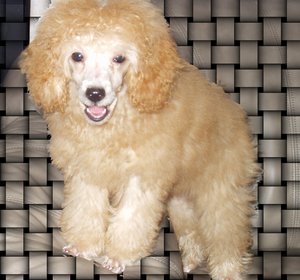
Go back to the Layer Palette and select Layer 1. Click on the eyeglasses next to this layer so the red X is removed. The click on Effects at the top and select “Textured Effects” then select “Weave”. Make the settings show Gap Size 25, Width 75, Opacity 100, Weave & Gap Color should be black. Fill Gaps should be checked then select OK.
If you don’t see a change after you’ve done this, then it could be that your “Layer 1” is on top of your “Copy of Layer 1”. To change this, go to your Layer Palette and click on Layer 1 and drag it to the bottom. Click here to understand more about working with layers.
This effect isn’t the coolest but it gives you an idea of how you can change your images to look different in a pleasing way. If you look at the images that I uploaded, you will see the final result of an image I worked on where the dog is the subject and if you look at the other image, it’s the original before I made the changes above.


