Every wedding I’ve been to, I’ve seen people bringing either wrapped presents or cards as gifts. I usually bring a card which contains a cash gift. The wrapped gifts are always just that – wrapped – so there is no need to worry about where to place the gift or if the bride and groom will see it.
Cards, however, are another story because they can get lost or stolen easily, and many people don’t know where to put a card. Think about it, would you just put your card on a table, or in a pile of other cards? How will you tell the married couple where your card is, among the hustle and bustle of the wedding?
Here is where the card box comes in handy. If your guests are gracious enough to share a gift with you on your wedding day, you want to make sure that they know where to leave it so they can get back to the party.
A card box is usually set up on the “gift table”, which is a table off to the side which usually by the guest book. I have seen many different card boxes, some homemade and some professionally done, and I wanted to share some options that are available to you when you are ready to purchase or make your own.
Purchasing a Card Box
Running a search on eBay, Etsy, or even Google, you will see there are a wealth of card boxes available, and in every pattern and color scheme you can think of. For example, my wedding has a hot pink and black color scheme, with a damask pattern. I searched for “hot pink black damask card box” and got over a hundred hits for card boxes. While they all looked really pretty, some of these card boxes are too elaborate – with price tags to match.
I’m not sure what the appeal is to spending over $60 on a card box… perhaps it’s for sentimental value? Where do you store the card box after you’re done? What are you going to do with a centerpiece that just looks like a big present? You should think about these things before spending a lot of money on a custom-made card box.
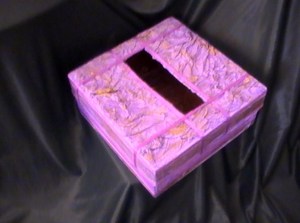
Do It Yourself Card Box
One of the easier routes I’ve found is to make your own card box. There are a lot of different patterns and styles available for you to try, and most, if not all, of the materials you need can be found at your local craft store.
Here is a list of materials you’ll need:
Exacto knife
Ribbon
Wrapping paper or cardstock to match your theme
Double-sided tape
Packing tape
A ruler
A box or circular container*
*Please note : if you would like to make a tiered card box, sort of like a wedding cake, you will need several boxes or circular containers in small, medium, and large. They should fit together like a Russian doll.
If you’re going with boxes, there is no need to purchase empty boxes. Look around your work or recycle bins for boxes that aren’t needed any more. Save your boxes from online purchases. Just make sure the box is big enough to fit one card for every two people that come.
Simple Card Box:
To start:
1. Take your box and tape it closed with packing tape. Be secure with your tape – you never know who might be lurking around to see what is in the card box.
2. Wrap your card box like you would a present. Here is where buying cute wrapping paper helps. I especially like the wrapping paper at Borders by the brand Paperchase. You can also find all sorts of neat wrapping paper at party stores or supermarkets such as Target or Wal-Mart. Be creative! Secure the edges of the wrapping paper with double-sided tape underneath the seams, so that you cannot see any tape on the outsides. This is purely cosmetic; if you don’t mind being able to see the tape on the sides, by all means, use regular clear tape.
3. Pick out which side you want the slot to be. You can either have it on the top or the side. It’s purely a matter of personal preference. Take a ruler and measure out one inch in on each side. Mark this with a pen or marker and measure one inch up from the corner you plan to put the slot. Mark this with a pen or marker.
4. Take your ruler and measure 1/2 in up from the mark you just made. Make another pen mark; trace a line to either side with the straight edge of the ruler so that you have a long and thin rectangle. Measure this again to make sure it’s neat and clean-looking.
5. Take your Exacto knife and VERY CAREFULLY carve out the rectangle you just made. If you did it correctly, you should be left with a slot on the top or side of the box for people to put their cards in. You might be leftover with some stray cardboard shreds or shreds of wrapping paper. Clean this up as best you can; if possible, tape down the strays by wiggling some tape with your fingers inside the slot so that the edges look clean and smooth.
6. Wrap some ribbon around the box so that it looks like a present. Try looking online or on YouTube for some fun ribbon-wrapping techniques.
Tiered Card Box:
If you’re looking for a more elaborate card box, you will need to put some extra steps in between the above instructions.
Starting with the biggest box, trace an outline of the next-smallest box around the top of the bottom tier. Before cutting this box, you want to make sure that the hole you cut is smaller than the tier you are going to put on top. This makes for a cleaner-looking end result and prevents any gaps or holes in your layers.
Take your Exacto knife and CAREFULLY cut out the outline you just made. Place the next tier on top to make sure it fits snugly. Wrap this box as you would a normal present, only instead of keeping all of the paper over it, you can cut out the excess from the hole you just made.
Repeat this on each remaining tier, until you have all the tiers you need cut out and wrapped.
Finish the box by starting at step 3 above.
Tips for a multi-tiered box:
Make each tier a different color or pattern. This makes the card box look a lot more fun and will make a good conversation piece.
Remember to wrap the ribbon around the WHOLE box, tiers and all, and not individually. Make sure you have a lot of ribbon.
Vary the placement of the tiers. No one said the tiers have to be in an exact straight line. Turn each tier 45 degrees and make your cut-out that way. You should end up with a fun and funky card box.
Other Ideas for the Craft-Challenged:
Check out places like Oriental Trading or Party City. They should have an assortment of gift card boxes available for weddings. Bear in mind a lot of these boxes are pretty plain and are pretty much just there for people to know where to put their card gifts. If you’re looking for something more personal, this might not be the option for you.
Birdcages make really cute card boxes. Don’t go to a pet store and buy a brand new one. Look on craigslist or eBay for used bird cages. Check out local garage sales for bird cages, too. You might find a really unique piece that you can keep for years to come!
Mailboxes are also a cute idea for a card box, especially if you can make your own out of wood. This might not be a good idea if, like I mentioned before, you are craft-challenged.
General Tips and Tricks:
Designate a person to watch the card box during your reception. Not saying that there will definitely be someone that will steal your gifts, but it never hurts to be too careful, especially when you’re dealing with money.
Don’t make your design too hard to open, especially after a night of heavy partying. It should be sturdy enough to withstand tampering, but easy enough to open if you put concentration into it. Just bear that in mind come the morning after when you’re ready to open your cards.
Remember to write thank you notes to everyone!!! (This doesn’t have to do with the card box, but it is very important and not to be taken lightly).
Hopefully this has helped you with the little minor detail of the card box. Just do your research and decide what option is the best for you.


