In making granulated, caked, or candied maple sugar, the syrup had to be boiled past the syrup stage and heated to 30-35 degrees over boiling point. With no thermometers, historic Native cooks used age-old methods of determining the correct time to pour the hot sugar. Pour too early, and the sugar will never turn into dry, crystallized sugar. Pour it too late, and the sugar will be burned for sure. Making sugar is an unforgiving activity, which is why learning the techniques while growing up in a sugar producing culture was key to becoming an expert. Such experienced sugar making is hard to duplicate for the modern novice, especially without the use of thermometers. It’s even hard for the experienced sugar maker to describe the nuances of timing and appearance with words. Maple sugar making in historic Native American fashion is truly just a process the beginner needs to jump into and get a feeling for.
I have been demonstrating the process of historic Native American maple sugaring for event and museum audience since 2008, and have been interpreting historic Native American maple sugaring since 2004. What follows is our (WIEP*) process and method, based on the experience we have acquired recreating the maple sugaring process within a strict historical-cultural framework:
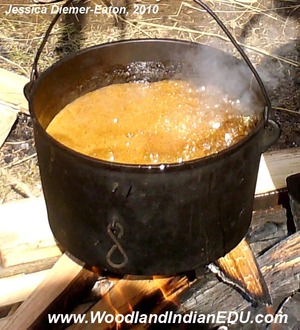
Our sap filled iron kettles are suspended over a roaring fire. The fire burns hot enough to bring the 10-gallon kettle to a rapid boil. As each hour passes, the sap becomes more concentrated and begins to show a light gold-brown coloration. Each of our kettles (4-5 in all) are reserved for a stage of sap in the evaporation process; the largest kettle contains the freshest sap and the smallest contains the most processed of sap (usually syrup). As each batch shrinks with evaporation, it is poured into the next stage kettle until the smallest kettle is filled with syrup.
It is at this time we focus our attention on turning the batch of syrup into sugar. We usually use our tin-lined brass and copper kettles for this job, but we have also used iron kettles for finishing sugar with great success. Although we aim for up to a quart of syrup per batch, as low as a pint will work just fine. Sugar should be made in small batches, and we don’t exceed the quart amount at one time. Each batch of syrup is put into a pot that can hold about 3 times the size of the syrup. This is because the hot sugar will swell when it cooks and it needs much room to grow. Don’t take this piece of information lightly, as it is truly astonishing how much the hot sugar expands, and how in only seconds it can boil over (which is especially regretful when finishing maple sugar on the kitchen stove).
Popular tricks to stop over boiling includes dipping a wooden ladle into the hot sugar, brushing a cluster of pine needles across the bubbling top, or applying an oil to the rim of the pot. Our method of keeping a steady boil (and temperature), without over boiling is all about heat regulation. Our pots are suspended with a specialized double-pole hearth apparatus that allow the kettles to move from directly above the hot coals off to the side of the flames. We took our cue from an early 20th century photo of an Ojibwa sugar camp that exhibited this hearth style that suspended pots in a manner that allowed heavy pots to be adjusted quickly and easily. The sugar needs to be kept at a rapid boil without boiling over, which means it must be adjusted sometimes by just inches while extremely hot. To just take it off the flame entirely is not productive in finishing sugar, and could even ruin the batch.
While keeping the boiling steady, we look for signs that it is ready for the next step; that the sugar has cooked at a high enough temperature for the right amount of time. Because we don’t use a thermometer, we rely on the hot sugar’s appearance and texture to time when it is best to cool it. The hot, bubbling sugar should be twice its size than what it was when it was started, and almost nothing by a sea of foamy, little bubbles. We take a ladle and scrape down the inside of the pot. If the hot sugar “foam” separates cleanly and is slow to fill back in, this is a positive sign that the sugar is or almost ready to take off the fire. Another sign we look for is a marbling in the hot sugar “foam.” This happens when the bottom gets a little hotter and as the ladle scraps the bottom of the pot and is taken out, some of the dark brown “caramel” streaks to the top of the golden brown sugar foam. This is a promising sign but can easily be burned if left on the fire too long after such coloration, nor does this sign need to be present when it is time to pour. Although we don’t rely too much on drip tests, others truly prefer it. Drip tests include dripping the sugar to see the string or trail it produces (a tacky, slow, thick drip signals it’s time), or dripping it in the wind to look for a J formation (when the wind curls the drip a bit), or dripping some on clean snow (if it stays together and tacky, it’s time). Timing when the hot sugar is ready to be cooled is probably the trickiest step to get down. It truly is an “awareness” the sugar maker must develop through experience.
When the hot sugar is ready to be finished into granulated sugar, we pour it into a wooden trough where it is paddled as it cools. An old time wooden dough trough and butter paddle works well for this task. Careful not to get any on us as it has the ability to give severe burns, we take the back of the curved wooden spoon and push the hot creamy sugar back and forth, from one end of the trough to the other, in a spreading motion. As the sugar mass cools, it takes on a peanut butter texture, and paddling becomes a little more difficult with the resistance of the hardening sugar. We don’t reduce the intensity of our paddling, and if need be, pass the job off to another person to keep the paddling strong and steady. Slowing down on the beating of the hot sugar will stunt its finishing, causing huge lumps of hard sugar instead of granulated sugar. Continuing the paddling eventually turns the peanut butter texture into a dry, granulated consistency. However, we don’t cease paddling until the sugar is cooled to around room temperature; stopping early can result in crystallized sugar sticking together even after it was separated. Maple granulated sugar can vary from course to fine grain, and most batches will produce an array of grain sizes. The sugar will vary in hue, from a light cream to a deep golden-brown.
If hard Maple sugar cakes or “candies” are desired, the hot sugar was poured from the pot directly into greased wooden molds to cool. Pouring directly will result in dark, candied sugar usually with minimal mottling of light sugar. The texture of the hard candy can be softened by briefly stirring the hot sugar before pouring into the molds. Once the sugar has solidified, it is knocked out the molds and ready to consume, cook with, or store away for later use.
*WIEP: Woodland Indian Educational Programs provides demonstrations of historic Northeastern Native American life-ways for museums, reenactments, and powwows.


