Whether you are Sarah Palin trying to block out Joe McGinnis or just want a small space of your own in the backyard, a nice fence can be a great addition. It can also be a very easy thing to mess up and, if done wrong, it can actually make your home look worse. There are several things that you can do to save some time and money, while adding something to your home that you can be proud of. The benefits to a solid fence are countless and it is a worthwhile improvement that most of us should make. Not only can they add peace and serenity to your back yard, they can also block out peeping toms, intruders, and stray animals. The benefits can also be monetary. A well-built fence can increase property value and it can add a lot towards the appearance of your home. While chain link may be easy and relatively cheap to install, it offers little in the way of privacy and can detract from your home’s appearance and is best used to contain your front yard. A short chain link fence out front adds that barrier, but still allows for visibility. For the back yard, you could go with a nice brick wall, but that does little for the aesthetic aspect of your home. A nice solid wood fence is often the best choice for the back yard. This can offer you the privacy and security of a wall, while maintaining the visual appeal of a more natural and softer material. One thing that you can do is combine a brick and wood fence for a sturdier barrier, while still maintaining the beauty of wood. You can accomplish this by using a one to two foot wall at the base and building your wood fence on top. This works best if you have an uneven back yard. If there are hills or low spots in your yard, you may want to consider this method to establish a level plane to put your fence on.
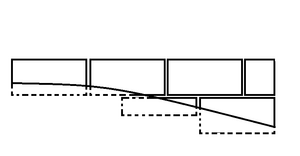
Installing a brick base to a wood fence is quite simple. Before you get started, check with the local housing regulations to see what criteria the fence needs to meet. Some housing districts will limit the materials or height of your fence. You want to stay in these regulations, or you may have to tear the fence down once you finish putting it up. The first thing you will need to do is dig a trench for your fence line. This will only need to be about six inches deep and just wide enough to fit one of your cinder blocks with a half inch clearance on either side. If there are low spots to your fence, you will need to dig a little deeper. You will have to lay the blocks in a stepping pattern. You can often get the blocks cut in half if there is a slow downgrade. Most stores like Lowe’s and Home Depot will do this service on a couple of your blocks for no additional charge. Some will even stock pre-cut “half blocks” for this purpose as well. You will also need some blocks cut in half length-wise to make your wall aesthetically pleasing (see the picture). Once you have the trench ready, you can install your bottom layer of bricks. To do this, pour about an inch thick layer of concrete into the trench. You don’t want to do the entire thing yet, since it will dry before you get to the end. Laying a six foot section at a time tends to work well. You can pour the concrete into the first six feet of your trench and then place the bricks. When you get near the end, pour another six feet of concrete. Continue this until you reach the end of the fence line. You will want this base to set overnight and continue in the morning. Before you call it quits on the first day, you will want to ensure you have a level base though. Using a liquid or laser level, check to make sure you have an even base. If there is a slight difference at this point, it will be a major difference along the top of your fence. It is easier to correct flaws now then after you get everything done.
The next step is to finish the bottom wall. You will want to start with a length-wise cut brick and then continue with full bricks the rest of the way around. This will give you a sturdier wall and look more professional. You can use regular concrete or mortar to anchor the cinderblocks to each other. The decision on which one you want to use is entirely yours. Different bricks may require mortar. You can check with your local hardware store to find the best match of cements to use with your chosen blocks. Continue to lay each level of brick until you reach at least a foot at the shortest point (if you have a graded yard, the heights will vary on the wall. After you install each level of block, go back and make sure it is level. By ensuring you have a level block wall, the top of your fence will look great. A small difference in the brick wall can make a huge blemish in the finished product.
Once you have your brick base the desired height, you can start to build your wood fence. The first thing you will need to do on this part is set a stud about every six feet. This means you will put a 4×4 in the cinderblock wall at this increment, all the way around the fence line. These fence posts should be about a foot shorter than the desired height of your fence. For each stud, just slide it in the hole and fill in the rest of the space with concrete. You will want to use a cement trough to make sure the top is nice and smooth. Once you get the posts in, you want to let them sit overnight before attaching your fence. While you are waiting, you can start to pre-assemble your fence. To do this, get two 2×4’s and start to attach your fence boards. You will want one about one foot from the bottom and the other about one foot from the top. Cut them to length so that they will fit snugly against the fence posts. Now you can lay your fence boards (4×1 wood panels) on the ground. Make sure the ends are perfectly even so that everything is squared up. Now lay your 2×4 across these boards. Once again, you will need to make sure everything is straight. Now trace the 2×4’s with a pencil or chalk line. Now place the boards on top of the 2×4’s and line up the traced lines with the boards, keeping the lines on the top. This will give you a guide to put the screws in. Use three screws (or nails) in a triangle pattern to attach each board to each 2×4. This means six screws will be used for each board. If there is too much or too little 2×4 for the end boards, leave the ends off for now. You can even those out after you get everything attached to the fence poles.
After your fence posts have set overnight, you can take some thin decorative bricks to cover the holes in the top. You can combine colors (red top trim on a gray wall looks nice) or make the topper bricks the same color. This will keep animals and rodents from living in your fence and give it a nicer look than just bare cinderblock. If you purchased flat top boards for this project, you can now design the top of your fence as well. This step may be easier to accomplish prior to nailing the boards to the 2×4’s, though. There are several different designs that you can go with here. Some people prefer the pointed slant and some like the rounded look. A forty-five degree angle is all you need for either of these. For a pointed top, measure to the exact center of the fence board and mark off a forty-five degree angle. Complete the angle line until you have gone completely off the board. For a rounded top, measure in one inch on either side and mark off a forty-five degree angle. Draw the line until you run off the board. Now cut along the line. For a point, you are done. If you desire the rounded look, just sand the sharp corners to a smooth finish. You can use your creativity to make any top you want. There are several ideas out there, or you can design your own. Just keep in mind that the design part shouldn’t go below the 2×4, so you will want to limit your cuts to the top foot of your fence.
After you have the toppers installed and the fence boards cut, you can now put the pre-assembled sections up. If you have a couple of people working on your fence, you can have one or two people building the remaining sections that you need while two people start attaching the sections to the fence. To attach the sections, the best method is to use a steel L-bracket with at least two inches on each side. This will give you support and a solid anchor. You will want to use one on the top and bottom of each 2×4. Once you have all of the sections installed, you can now go along the outside of the fence and fill in any missing fence boards that you may have had to leave out from the pre-assembled sections. You will also want to put a fence board on each fence post.
There are several things that you can do at this point. You can paint your fence, use a clear coat, or cover it with vines. The options are really endless. The decorations that you can put on your wood fence can really put your personal signature on your home. One thing that you will want, and need, to do is use some type of weatherproofing varnish or stain on it. If you don’t, you will be putting up a new fence every couple years. There is very little needed to care for your fence and you can always change the color and look of it later in life. Wood is a very beautiful and easily customizable addition to any home. A little effort can make your home not only look safer, but feel safer.