You can easily build a picket fence for privacy or good looks without having to buy premade sections, here’s my fence project and some great hints and tips.
I built my fence for my back yard out of pickets, 2 by 4’s and square posts, all pressure treated and bought at a local home improvement store. The pickets or fence boards are about 5 to six inches wide and six feet tall, treated to resist rotting and inexpensive, sort of.
To build a fence, according to all those how to websites, you simply measure, dig holes and put corner posts, then the running boards and finally the fence boards. Some hints and tricks are the things that are missing from all those articles I found on the internet and a few are done before you even start.
Buy some tools before your fence material, a decent post hole digger will serve you well for years of digging deep holes without the hassle of a rental. You can also rent a post hole digger or a gas operated digger, I find it’s easier to buy when you’re doing a project over a few weekends instead of racing the clock to return a rental.
The next great tool if you do not have one is an air powered nail gun, Campbell Hausfeld is a popular brand but many brands are very good and will help in a lot of home projects. Driving a few hundred nails by hand is an arm killer and an air gun will help in a lot of projects including the fence.
The nail gun I received for review costs about a hundred and fifty along with a decent compressor that costs about a hundred, a few more tools like a hammer and shovel along with a wheel barrel are about all you need. Some common tools you probably have are a hammer and some screws for the string, a mason line that is a hundred or two hundred feet for leveling the tops of the fence and a two or four foot level.
The fence I made is from the six foot fence pickets, 2 by 4 cross boards that are eight feet long and 4 by 4 posts that are ten or twelve feet tall. The posts go into the ground about four feet to ensure a sturdy post and you will need two inch and four inch nails, you can a little off on the nails like 1 3/4 and 3 3/4 inches.
I also poured a bag or two of concrete in each hole and steadied the post with a 2 by 4 or suitable board that I screwed to the post and then to a stake in the ground. To start this whole process you need to go and buy some lumber, Lowes and Home Depot are better than Menards for the lumber as Menards is a cheaper lumber and the pickets are pretty sad looking there.
I bought the corner and 2 by 4 boards at Menards but had to dig through the piles to find ones that were straight with no knots but you can also just buy them elsewhere. The fence I built uses a corner or post for an upright to hold the fence up and two 2 by 4 boards to nail the pickets to and each post is secured in the ground with cement.
I suggest starting at a corner or if you’re building your fence from a building screw a post to it, both ends of my fence go from my home walls to my garage walls. Planning your fence should be easy but needs to start with a phone call to locate any buried cables or gas lines.
I ran my fence from the corner of my house to the garage with a gate at each end by the house right over some sidewalks so gates are also going to be mentioned. Planning should be done before and after you buy some lumber but you can do some planning on paper by measuring the fence line and seeing how much lumber you’re going to need.
For every eight foot section you need two corner posts and two 2 by 4 boards along with about 17 pickets for a close privacy type fence. Each corner post will share the 2 by 4 boards running along the fence for a stretch of fencing but I chose to stagger the boards above and below each other.
Fencing that is for any length more than eight feet should have a post every eight feet and should have some kind of corner post if it is a long fence. Wind can have a large effect on a long section of fence, I have seen many fences along homes that have no protection from wind blown down repeatedly.
If you have a long fence you should make some kind of corner post arrangement or use a slanted post to the ground from a 2 by 4 to brace the fence. Posts should be ten feet tall and should be buried four feet along with a concrete base for support as well as digging a half foot deeper and adding gravel for drainage.
Five feet is deep for a hand post hole digger but you can do it or renting a gas powered one is a good option as long as you plan ahead a bit. I did not do any painting of fence lines on my grass or use anything other than mason string and a level purchased at Menards to get things straight.
You can account for uneven ground simply by slanting the pickets and 2 by 4 boards or by using taller pickets but finding taller pickets may be tough. If you have very uneven ground you can slant the fence and account for differences so the fence looks good to you or keep the tops even and fill in the bottoms with landscape timbers or blocks.
I first laid the 2 by 4 boards that are eight feet long along the ground where the fence was going to be and dug a starting hole for the locations of the posts. I overlapped the 2 by 4 boards and also staggered them above each other so as to have the most board on each post.
My 2 by 4 boards are not even along the fence but one set is above and below the next so the four inches of board is on each post instead of 2. Simply lay out the boards and dig holes, each about eight feet apart four to five feet deep and about two feet in diameter at the top.
You can start digging each hole with a regular spade shovel, one of those five foot tall types for gardening works great and probably a wheel barrel for the excess dirt and for the concrete. Once the hole is dug and a small amount of gravel is put in the bottom to help drain and keep water away from the bottom of the post you can set the post in the hole.
I marked each post at the height I wanted to have protruding out of the ground at six feet and used the top of the posts to tie the string onto a screw put in the top of the posts. I ran the string from one post to the next to get a straight fence line from the pickets but I did not use the string for the last section, just lazy.
If no corner posts are going to a building you need to start somewhere along your fence so pick a corner and dig, then use two angle boards to anchor the post for the cement. You will use one or two 2 by 4’s or smaller boards attached at about four to five feet from the ground and angled to the ground where it will also be screwed to a stake driven into the ground.
You can also use my preferred method of using the post screwed to a wall as the first anchor point and the top 2 by 4 board as one of the two angled boards to steady the post in the ground. You can use either method but I found that putting the fence partly together and then pouring the posts cement in worked just fine.
I started my fence from the corner of my garage for the longer stretch of fence before I came to the gates that are close to the house. I screwed a post to my garage using four inch deck screws with a hole drilled two inches into the post to get the screw all the way through the fence and into the wall.
I made sure the fence post was lined up with a 2 by 4 inside the garage for the support otherwise it would not have been very sturdy, you can add a board inside if you need it. Once the corner post is up I went to the first 2 by 4 board and with a helper nailed it to the post, then to the next post using a level to ensure the board was parallel to the ground.
The corner post is now going to be steady in one direction but can fall over in the other so I screwed a 2 by 4 to it and angled it to the ground at a stake pounded in. This stake is about five feet from the post and at a 90 degree angle from the fence line so it will support the post in the other direction from the fence board.
Now you get the post straight up and down in both directions, you have the 2 by 4 holding it to the corner post and to a board going down at an angle so you can now move the bottom of the post to get the post straight using a level. You can also use two angle boards to stakes if there are no posts going to a wall and move the post around to get it level on the bottom having the boards already screwed to the posts.
Once the posts were secured in place temporarily I mixed a bag of cement, not the non-mix post cement, just regular cement like Quikcrete in 60 pound bags works. The kind that you just pour water on when it’s in the ground dry will not work as you want the mix to be fully wet the depth of the hole.
I used about a bag and a half to two bags of cement per hole and bought the cheap kind from Menards that sells for about $2 per bag or less on sale. I also used this cement for some garage work but it works great for fence posts and is cheap so buying thirty or forty bags is not a big cost.
Mix the cement a little water at a time till it is all wet and thick, about the consistency of really thick pancake batter, the cement needs to be able to pour out of the wheel barrel but not so thin that is will take forever to dry. This takes some practice but the dry cement will show and all you need to do is mix the water using a shovel around till all the cement is wet and still pours out of the wheel barrel instead of comes out in big blobs.
Once each hole is filled, I usually mixed two bags at a time and work on ten or so holes at once, move on to the next until you’re done with your concrete. Let the posts dry about three days before working anymore as you want to ensure they are sufficiently hardened and will not be moved.
Once the cement is dry you can start on the rest of the 2 by 4 boards and nailing them to the posts, simply nail them at about four feet high and two feet for the first section. The next 2 by 4 boards will go below the upper one and above the lower one and then the third section goes at two and four feet lining up with the first.
This gives you more area for the ends of each board for nailing than if you put the boards on each post and lined up just for appearance. This makes the fence look odd from the inside but it also gives a lot more strength to each 2 by 4 board on each post.
Once the 2 by 4 boards are secured you can secure the pickets or upright boards to the 2 by 4 boards using about two inch nails instead of longer ones used to secure the 2 by 4 to the posts. I placed each board right next to the prior one and nailed it in with my nail gun and simply moved on to the next.
Once in a while I checked the boards with a level and would leave a slight gap on the top or bottom if the boards were out of level. If you need more of a gap toward the top or bottom to make the boards level this is much better than getting to the end of a length of fencing and having a two inch gap at the end on the top or bottom.
I check level of each upright board about every half-length or every four feet so I also allowed my compressor to catch up with air pressure. My smaller air compressor can only nail about eight to ten nails before needing more air so a break every now and then is required.
Once the upright boards are nailed in place you can relax and work on any special areas like gates, gates are simply sections of fence two to four feet wide with hinges. I used a cross brace on each section from the top corner to the bottom to give support but I am not sure it matters which way to go.
I found some sites recommend going from the top near the hinge to the bottom near the open side but I also found others saying the opposite. I think the main concern for a cross piece is to give stability so the gate does not bend or wobble when opening and closing.
I used two very heavy hinges, about five or six inches on the pointed end and square on the end that is connected to the post, the fence hinges are also sold at home improvement stores. A gate handle is also useful and I bought the kind that goes through the fence and has a squarish handle to open the gate from the inside and outside.
I had a few unique situations with my fence, a sidewalk that is under one section of fence that required me to attach one post to the concrete and a fence that is not going to have a full use gate. The fence running about an eight foot section along a sidewalk was easy to solve, I used a bracket and another post on the other side of my entrance stairs to my house to brace it.
The fence gate is half on and half off the sidewalk so the fence post that has the hinges I placed on the dirt area and dug down so the post was secure with cement. The other side is secured to the concrete sidewalk with anchors is wobbly so I used a 2 by 4 to another post at a ninety degree angle and at eight feet to support the top of the post.
This eight foot board goes above my back porch and stairs and the post for it comes down on the other side of my steps right next to my patio and secured in concrete like the other posts. While it may not be the most attractive having the 2 by 4 board over my back steps it does make the gate and piece of fence on the sidewalk secure.
At each gate I used twelve foot posts and left two feet above the height of the fence so I could run a piece of 2 by 4 over the top of the gate to help support both posts. This gate support above the gate gives the posts support so they do not separate or lean apart or also to help support the gate itself.
I also ran a small section of fence behind my garage to prevent people from walking across my property behind my garage and across an area behind the back vehicle door I will no longer use for vehicles. I will be replacing the garage door with a regular hinged personal door and have a small area beyond it for my composting and other uses that also leads along the back of my garage.
A small four foot section went between my garage and the corrugated steel fence behind it and a 30 foot section went up between the one section of my garage and that steel fence behind my property. I have a small area in this section that I can use for my gardening compost pile and dog compost pile but I need a temporary way to get on the other side of this section.
I built a two foot wide piece of the fence with the normal 2 by 4 boards and set two 2 foot sections of 2 by 4’s on this to nail the upright boards to. Once the uprights were nailed on to the 2 by 4’s the section of fence now had about eight uprights nailed to two 2 by 4’s and setting on the 2 by 4’s that are nailed to the posts.
I can now lift and move the section of fence off the posts and 2 by 4’s if I need to work on this back section of fence without walking all the way across my neighbor’s property. I have two pieces of pipe support hanging straps to hold the piece on from my side so no one on the other side can lift the section off.
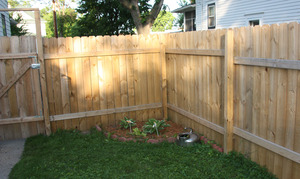
My pictures will show better than my explanations for the general build and particular problems I solved by simple do it yourself ingenuity. I hope I have done a decent job of explaining how to build a fence and a few hints and tips I can give from my work.
Painting it would also be easier with a sprayer but a good old brush and cans of paint will get the job done, as you can see I have not painted mine. The woods pressure treated waterproofing will last for years and only if you want to stain it for looks does it become necessary, eventually I will stain mine after I pick out a color for the house.
I’ll have more and larger pictures on my website here for you to see more details about my fence.