Collecting seeds can be a lengthy complicated process. Following the proper techniques ensures your seeds will produce mature, healthy plants. For beginner collectors and novice gardeners knowing how to clean, dry, and store seeds may not be first hand knowledge. If you don’t follow a specific set of procedures when collecting and storing seeds you will come to find your seeds rot away and never grow into adult flowering plants. After sowing a bunch of seeds it can be very disappointing to find out the seeds were bad and just will not grow. To avoid this problem there are a few basics every gardener should know. Here are some tips to teach you the proper way to collect seeds, how to identify mature seeds from immature ones, and how to store them to ensure they will grow when you plant them. The information provided here generally applies to seeds in pods and shells.
Collection of Seeds
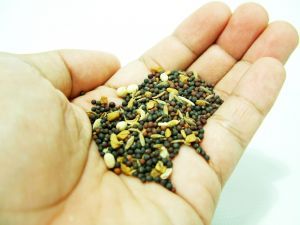
No matter what kind of seeds you are collecting there are a few basics that apply to most plants. Most seeds have a hard outer-shell, kind of like the exoskeleton on an ant or spider. This shell is natures way of protecting the seed inside, which happens to be alive whether you plant it or not. Ripe seeds will have a hard outer shell that is brown or black in color. Immature seeds will be green, pale yellow, or white and the outer-shell not being ripe yet can be easily crushed and destroyed. Seeds that are not ripe cannot be harvested and prepared for storage. Collect only mature seeds and you should have a good run of luck when it comes time to sow and harvest your plants. Just like anything else in nature, seeds have a life cycle and they will die if not properly cared for. Regardless of care, seeds will die eventually because they can only last for so long.
With the proper care you can extend the life of your seeds while making certain they will grow in the future. When you collect seeds it is best to use an envelope or brown paper bag. Using a paper container will allow air to circulate around the newly collected seeds, which may contain a good amount of water. Avoid using plastic containers or plastic baggies when collecting seeds. Using paper will ensure the seeds will not start to rot or mold before you get a chance to clean them, even if it’s a few weeks later. Using plastic will cause your seeds to start rotting almost immediately because air cannot circulate. Like all living things, seeds need air to survive.
Drying Seeds
If you don’t properly clean and dry seeds, then come spring you will find the seeds have rotted and will not produce a plant. After collection, the “raw” seeds can be stored in the paper bag or envelope for a couple of weeks. It is best to start the drying process right away, but if you don’t have the time don’t worry; most seeds will be fine. The best way to dry seeds is to lay them out on a flat surface for 10-14 days until completely dry. Usually a baking sheet is fine but any undisturbed, dry surface is also fine. When using a baking sheet just pour the seeds out onto it in a single layer and let dry at room temperature. Do not use a paper towel or any other absorbent material under the seeds because it can hold water making the drying process slightly more difficult, and longer. Just lay them out onto a dry and clean surface away from areas where there are extreme temperature changes (cold, direct sunlight, etc.) and high humidity.
In about two weeks time most seeds will be completely dry. Seeds in pods may need to be dried longer and could take up to 3 or 4 weeks. When pod seeds are dry the pod will generally open on its own and the seeds inside will fall out. If pods don’t open after 4 weeks it’s usually one of two things; either the seeds inside are bad or the pod is just being difficult. By applying some gentle pressure by hand the closed pods should open. If the seeds inside are shriveled, smaller than the others, or dark in color they are usually bad. If the seeds inside appear uniform in shape, color, and size to the rest of the seeds they are generally fine and should grow into mature plants.
Cleaning the Seeds
For many seeds, after removing them from their shell or pod there is a husk or chaff left behind. The husk or chaff most often resembles that of a nut, such as a peanut when the shell is removed you find a “skin” around the actual nut. The chaff can be removed in a number of ways. After removing the seeds from their pods or shells the chaff will come off easier if you let them dry for another 24-48 hours. Rolling the seeds between your fingers is the safest and easiest way to remove the chaff but it can be a time consuming process. To speed up the process you can use a manila folder or large paper envelope. Dump the seeds inside and gently shake them to loosen the chaff. After repeating this process a couple of times if you use a panning technique (the same technique used for finding gold in rivers and streams) you can get the seeds to roll to one end of the envelope while the husk stays in the bottom. This technique takes some practice to get it just right. Whatever chaff is left over should be manually removed as suggested by rolling the seeds between your fingers.
After this process is complete you should dry the seeds for an additional 24 hours before putting them into storage. Before drying the seeds for the third time make sure they are completely free of chaff and debris. As before, lay the seeds out on a baking sheet in a single layer and leave to dry at room temperature. One additional day of drying time should be plenty but if it is particularly humid or there was any additional moisture under the husks you may dry them for up to 2 days or until completely dry. The drying process will be the single most time consuming step of the entire procedure but it is also the most important. If all of the moisture is not removed before storage the seeds risk disease, rot, and mold. It is extremely pertinent that the seeds be dried slowly at room temperature over the course of 3-4 weeks. Do not use an oven or other heat source to dry the seeds thinking you can save time because you will kill the seeds prematurely.
Storage of Dry Seeds
Most seeds can be stored in a number of different ways and will be fine for 3-5 years if dried and stored properly. No matter what type of seeds you are dealing with, refrigeration generally prolongs the life of the seed 5-10 times longer than conventional envelope or jar storage at room temperature. Even if you buy seeds at the store they should be placed into the refrigerator until you are ready to use them. When the seeds are dried they can be stored in paper bags, envelopes, plastic containers, canning jars, etc. Because the seeds are now dry it is almost impossible to ruin them at this point so the method of storage is not that important. It is best to store your seeds in the refrigerator in a closed container. Even if you used envelopes or baggies for storage once placed in the refrigerator the seeds should be stored in an airtight container. Keep the seeds away from arid or humid places to ensure your best success with the entire process.
It is best to avoid storing your seeds in the freezer because although you may think it is better you are actually just killing them faster. Remember that most importantly that seeds are alive, even after being dried; they’re just in a state of suspension like dormant volcano. Of course, it is always better to use your freshly stored seeds sooner than later, but most regular garden variety seeds will last up to 5 years in the refrigerator with a temperature of no less than 35 degrees Fahrenheit.


