Our family really believes in getting the good out of something. Old toys, children’s furnishings, and old bicycles are all stashed in the barn, waiting to be used again at some future date.
One of the treasures that was tucked in the rafters of the barn, was my husband’s old Murray tricycle. The tricycle had been run over, and was rusted all to heck. It was also missing a pedal, a rear tire, and both grips. We had hoped to clean it up for one of our children. You can imagine our disappointment, when we brought the tricycle to the local bicycle repair shop, and they laughed at us. The staff suggested we buy a new one.
We decided to restore the tricycle ourselves.
The search for replacement parts
Our biggest concern was finding new tires. The local museum referred us to an industrial wheel supplier, where we were able to buy small, 6 inch tubeless tires for $8 each. The front tire was a different story. Tubeless 12 x 1.75 tires were no longer being manufactured. The wheel supplier suggested retreading the existing tire.
For the hand grips, we found a set on eBay for $5.
The leather seat was in marginal shape. We couldn’t find a reproduction replacement in the right size, but did find a car upholstery shop that could stitch a new leather seat for $50. One of the pedals were also in pretty sorry shape. We salvaged a replacement rubber pedal from another old tricycle we had found at the thrift store.
Once we had the parts purchased, dealing with the frame was the next step.
A friend recommended a welder, who could straighten the tricycle’s frame. He did a terrific job of fixing the handlebars and the pedal, plus knocked out a few other bends we hadn’t noticed. The price was around $80, and worth every dime.
Once the frame had been straightened out, it was time for the paint. The body paint was purchased directly from an auto body shop. From there, we brought the cans to our local paint & hardware store where they decanted the paint into spray cans.
The frame was prepped by applying steel wool to the surface. The areas of rust and missing paint were rubbed clean, starting with fine grade (0) steel wool and finishing with extra fine (0000). We wanted to keep the original Murray logo and other decals, and worked around them. The decorative embellishments, such as the swoop and the chevrons, were then masked off.
The tricycle was sprayed inside the garage, and allowed to let dry for 3 days. Once dry, we removed the masking tape covering the embellishments, and then masked the fresh blue paint so the white paint could be sprayed. We sprayed the designs and the handle bars, and let those dry for 3 days before removing all the masking tape.
To restore the wheel rims, we prepared the metal surface in the same way we had refinished the frame. Once the surface was completely smooth to the touch, the wheels were sprayed with the white paint and allowed to dry.
The wheels were then brought to the wheel supply shop, where the new tires were put on the rims. The service crew also arranged to have the front tire retreaded.
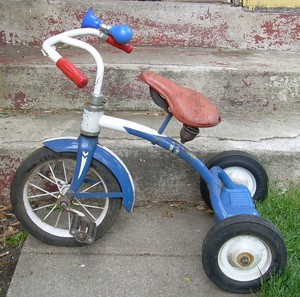
We decided to pass on the new seat for the moment. The tricycle was finished off with a $3 reproduction horn we found at specialty children’s toy store, and the vintage grips.
Total cost to restore the tricycle was $160 in parts and labor. My husband and I spent an additional 30 hours of our own time tracking down replacement parts, stripping the old finish, and repainting it. A brand new quality tricycle would have cost us between $100-150, but it wouldn’t have been nearly as cool as Dad’s old 1961 Murray.