Damaging a plastic car bumper is easy. It does not take much more than light contact with another vehicle, or a parking post, to cause dents, rips or paint problems. While plastic materials may be more prone to damage, they can also be repaired without a great deal of difficulty. I have recently finished repairing the plastic bumper of a Saturn and was able to complete the project easily.
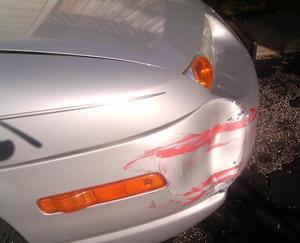
The first step in repairing a damaged plastic car bumper will be to assess the damage and determine what steps will need to be taken. If the bumper has been gouged or torn, it will require more work for a quality repair. The damaged area of the Saturn bumper pictured did not have any broken plastic that needed filling.
Remove paint transfer:
Begin the bumper repair by removing any paint transfer. Several methods can be used depending on the extent of the damage. For sections of the bumper that will not require any other work, buffing the area with a rubbing compound may be all that is needed. Other products can also be used, including WD-40 or nail polish remover. Chemicals should be used with caution and sparingly to avoid damage to the underlying paint. If the area will need to be repainted, it can be sanded with a fine grit paper.
In the case of the Saturn bumper repair pictured, a light rubbing with brake fluid removed the excess red paint. It should be noted that brake fluid will damage paint if used excessively or not cleaned away quickly. If paint transfer is the only damage, the area will only need to be cleaned and waxed for the job to be completed.
Remove any dents:
Removing dents in plastic bumpers is not as difficult as dent removal in metal body parts. When it comes to any type of body repair, the work should be done as soon after the damage has occurred as possible. Plastics and metals can develop a shape memory, which will make repairs more difficult over time. Warmer weather can be beneficial as warmth allows the material to be slightly more pliable. In many cases, small dents can be pushed or gently tapped out while the bumper is on the vehicle.
A slide hammer puller can be used if one is available. A small hole will need to be drilled into the dented section. The tip of the hammer is inserted and then screwed into the hole. The dent can then be pulled out using the handle. Caution should be used as excess force can cause the section to bend outwards. A suction dent puller is an option but they can be tricky to use. A rubber mallet may also used although the technique really requires practice.
The damaged bumper on the Saturn was easier to repair by removing the bumper itself. In this case, the bumper was held in place with two screws on each side and a series of plastic pins. The removal of the bumper took approximately 15 minutes. With the bumper off the vehicle, the dent was pushed out with ease. Caution should be used when working with the bumper off the vehicle. Avoid flexing it to prevent cracks from developing in the paint.
Plastic fillers:
Once all of the dents have been removed, any holes in the bumper can be filled with quality plastic filler. No fillers were needed with this particular repair making the project much easier. Follow the manufacturer’s instructions to ensure the best finished product. Filler can also be used to smooth out larger chips in the paint.
Repainting:
Repainting will be required after all other repairs are completed. Any sections of the bumper that require repainting should be sanded before primer is applied. Extremely rough areas or chips should first be sanded with a coarse grade-paper, 100 to 200 grit, to smooth out the edges. Sanding is best done in steps, moving up to a fine-grade, 400 grit, paper to ensure the smoothest surface.
Primer should be used before paint is applied. Tape off any areas of the vehicle that do not require painting to prevent overspray. Special primers are available that can help fill small chips and cracks in the paint. Additional sanding should be done between coats.
Most vehicles will have a paint identification number on a label on the driver’s door. This label may also be inside the glove compartment or under the hood. Saturn vehicles have a series of code numbers on a label inside the trunk. Remember that an exact match may not be possible with older vehicles due to the original paint fading over time. Follow the manufacturer’s instructions for drying times between coats. If the original paint on the car has a clear coat this will also need to be applied to give the repaired work the same optical depth.
The cost for repairs to the damaged bumper on the Saturn was less than $25. The longest part of the project was the drying time between coats of primer and paint. While it did have an original clear coat applied, this step was skipped due to the age of the car.