This year for the holidays, why not impress your guests with some homemade cheese. Whip up a batch of this easy to make cheese and sit back as your family and friends ooh and ahh over your handiwork.
To make the cheese you will need:
1 gallon of milk (preferably organic)
1 quart of buttermilk (preferably organic)
Heat up the milk and buttermilk in a pot on your stove over medium low heat. Keep your eye on the pot as you prepare the other items needed since the only thing you don’t want to do here is allow the mixture to come to a boil. You’ll know when it’s ready because large curds will form and separate from the whey in the pot. If you have a thermometer you can check the temperature. Ideally it should be about 180 degrees Fahrenheit. I never use a thermometer and my cheese always comes out great.
Meanwhile, cut the leg off of a brand new or very clean pair of tights or stockings. This works better than cheesecloth because the leg can be fitted over the mouth of a large jar. When the milk mixture is ready, you’ll just simply pour it into the leg and the liquid will collect in the jar. You will have to remove the stocking and dump out the liquid a few times during the process unless you have a super large jar. Not exactly traditional but I have found this method to be easy and super for cleanup time.
Once the entire contents of the pot have been strained through your stocking contraption, allow it to hang there for about 30 minutes. This will allow more moisture to drip out while cooling it enough so you can handle it. After the 30 minutes passes, it’s time to decide what you want to do with your cheese base.
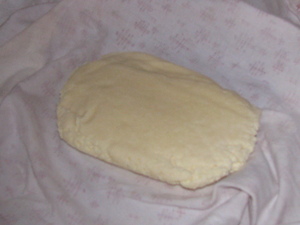
One option to transfer the cheese to a bowl, add salt, and form into a rectangle. Place it on a clean kitchen towel and lay it down on a cookie tray. Next fill a large pot with water (for weight) and use the pot as a press for the cheese. Simply put the entire setup, tray, cheese and pot, into the refrigerator and allow it to set 6 hours or overnight. The longer you allow the cheese to set the firmer it will become. When it is complete you will have a semi-firm cheese that can be used for anything your little cheese-loving heart desires!
One way to serve your cheese is to fry it up like Indian paneer. Simply cube the cheese and either deep-fry it for a traditional serving or pan fry it in oil. Serve the cheese cubes in Indian vegetable dishes or by itself with little toothpicks as an appetizer.
Another great way to serve your cheese is to flavor it before forming it. You can add anything you can think of to create endless possibilities of creamy goodness. I like to use premixed specialty dip mixes found at cooking stores to create unique blends. You can also make your own variations by using traditional spice blends associated with various countries such as Italy, Spain or Greece.
To create a creamy cheese dip, omit the step that allows the cheese to hang for 30 minutes as well as the step that forms and presses the cheese. Instead place the curds in a food processor, transfer it to a bowl and add your favorite flavorings or dip ingredients such as a spoon of mayonnaise or sour cream. I often add sour cream and homemade caramelized onions to create a fabulous homemade onion-cheese dip. You can also use the unflavored processed curds the same way you would use ricotta cheese.
As you can see, when you make homemade cheese the possibilities are amazing. Once you try your own homemade cheese you will quickly become addicted to it as will your friends and family. Surprise them with something new this year that you can also be proud of!