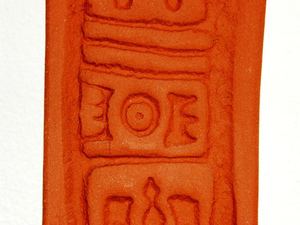
This article will teach you how to make basic salt modeling clay. This is an excellent clay for making holiday ornaments, mobiles, three dimensional pieces, and for using in clay molds as seen in the photo.
This salt clay can be molded into practically anything like flowers, birds, animals, tiles, decorative plates, figurines, etc. And you can choose whether to let it air dry for several days or to speed up the drying process by baking in the oven. Just don’t make your works of art too thick. Thicker objects will take longer to dry.
This clay is very cheap to make so you will save money by making this salt clay for your kids! They have fun and you save money... it’s a win win situation! This recipe will make about 3 cups of salt modeling clay. For larger batches it’s best to make separate batches and not just one huge batch.
Step 1: Gather the following ingredients to make salt modeling clay: 2 cups wheat flour (not self rising), 1 cup salt, 2 teaspoons powdered alum, 2/3 cup to 1 cup of water, food color (optional).
Step 2: Combine the flour, salt and alum in a bowl and mix.
Step 3: Add water to the flour mixture a little at a time and stir. Keep adding water and stirring until the mixture is like pie dough.
Step 4: Knead the dough until it is smooth. If it is too sticky, you can dust it with a bit more flour.
Step 5: Separate into portions and add food coloring if desired to each portion. Knead the food coloring into the dough with your hands. You may want to wear plastic gloves for this step or you can put your hands into plastic bags to protect them from the food color.
Step 6: Use the salt clay as you would any modeling clay to make your desired works of art. You can make any type of creation you want, but remember, thicker pieces will take longer to dry.
Step 7: Let your pieces air dry for 2 to 3 days. To speed up the drying process, you can bake on a cookie sheet at 200 degrees for 1 to 2 hours, depending on the thickness of your creations.
Step 8: Paint your dried clay creations if you want. You can use any kind of paint. You can also glue pieces together with a glue gun.
Step 9: Store any leftover salt modeling clay in a plastic bag or any airtight container. This clay will keep a long time.
If you liked this recipe for salt modeling clay you must try some of my other homemade craft recipes!
How to Make Easy Play Clay
How to Make Quick and Easy Modeling Dough
How to Make Creative Play Clay
Paint Recipes for Kids – Foamy Paint, Instant Finger Paint, Glossy Paint
How to Make Collage Glue
How to Make Flour Modeling Dough