I will show you how create a paper mache statue. This tutorial will give you the basics, so you can create anything you desire with this incredibly diverse craft. Like French friesPaper Mache is not actually French. Paper Mache literally translates to chewed-up paper, due to the appearance of the paper pulp. Despite the French name, paper mache has a long history in Asia where it was famously used to make lacquered boxes. I used plastic bottles, cereal boxes, and duck tape, mostly items that would have done in the trash.Paper Mache is a wonderful medium, it’s free, non-toxic, and great to do with kids. No fancy equipment required! Paper Mache is so fun and so easy! You probably already have everything you need to get started. The materials are free and every week you get more in the mail! Everyone has their own methods and these instructions are more like guidelines. There are NO rules. Just creativity and fun. Start saving those newspapers!
Materials and Supplies
Everything you’ll need for a paper mache project
From the Kitchen
Flour
Water
Cornstarch or Liquid Starch
Old Bowls and utensils
Bamboo skewers optional
From the Tool Box
Old Scissors
Utility knife
Dremel or drill
Tape, duct tape and masking tape.
Glue gun (optional I don’t use one)
From around the House
White glue
Bleach
Fan (helpful for drying but not necessary)
Plastic and Styrofoam containers
Cardboard
Lots of newspaper
All-purpose Paper Mache Paste Recipe
I usually use 1/4 C flour, becuase that is the amount of paste I can use in 1-2 hours.
1/4 C flour
1 C water.
1 Tbsp of white glue optional
1 Tbsp of liquid starch* optional
*Liquid starch is available in the laundry aisle, or it can be made by mixing
2 Tsp of corn starch (corn flour in the UK) with 2 Tbsp cold water.
Boil 1 1/2 Cups of water and whisk together.
Starch will keep for 2-3 days without refrigeration, or longer if refrigerated. Surface bubbles, a sour smell, or smell other than corn, indicates spoilage. Starch will make the paste a little more slippery and easier to spread on your strips.
Paper mache paste can also be refrigerated and saved overnight, but the water tends to separate and it’s quite unpleasant to stick your hands to cool mushy goo. I always prefer working with warm paste but I don’t like to waste anything either.
The Armature sub-structure for your statue.
An armature is a simple frame used support a sculpture. The armature defines the shape of the finished statue. The armature also gives the newspaper strips something to stick to.
For this example I’m making a gargoyle. The beauty of gargoyles is they can be any combination of animals, in other words, they don’t have to like any real animal. If you already have an idea in your head, great, just make a quick sketch. If not, begin by looking at inspiration pictures like I did. I looked at photos of the gargoyles on the Notre Dame Cathedral in Paris. I also looked at pictures of lions, because I wanted the stature to have a similar to feel to marble “guarding” lions placed on the sides of driveways and stairways.
Before making the armature look at your rough sketch to establish the body shape. In my case this was an S-shape.
For the Armature I used several kinds of injection-molded coffee containers, half gallon milk containers, coke bottles, and cardboard. The curvy shape of plastic coke bottles made great “muscular” arms, somepaper mache artists sweat by the thin foam used in food and meat containers. By all means, materials you have on hand. Part of the fun is being resourceful and finding the perfect material for the desired effect.
I started by establishing the “S” shaped body. The top of a two liter soda bottle fit perfectly into the handle of the coffee container, so I taped that together. Hot glue can also be used during construction, instead of or with tape. I started off with masking tape, but ended up using duck tape, because it is stickier and the woven fiber makes the structure stronger.
In general it is good to weight down the base of your sculpture. Play with the features, come back to it later and see if everything look well proportioned. For the example I had to totally redo the upper body and neck (the latter was non existent!)
One skewer runs vertically through the armature, like a spine. Holes were drilled through all of the plastic bottles.
Skewers are very handy for making shoulders. Ideally use a rubber band or a paper ring to draw a level horizontal line where the shoulders should be. Mark two points, directly across from each other, to drill.
Once your armature is ready you can begin applying the paper mache strips.
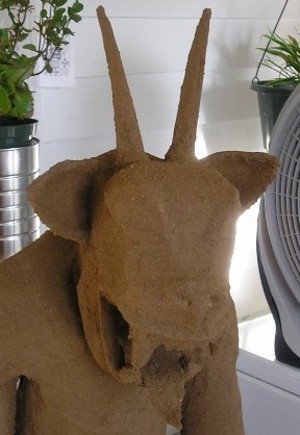
The Head: Bringing out the Features
The easiest way to add features is to draw the shape on copy paper, cut out the shape and drape it over the armature to test the fit. The best materials to make features are cardboard and plastic milk containers.
I cut slits into the milk container and then taped the ears in place. I shortened the head by cutting it in half and then pushing the portions inside each other, like a box, until it was the correct length.
The horns are made from cones of newspaper taped and bent into curves. I made two plus-shaped cuts into the skull where the horns will poke out from and then taped them in place. A pocket knife or other utility blade works well for cutting plastic.
Plastic is very slippery, making it very easy to lose control of your blade. Never underestimate the danger of tools. Even that pair of dull craft scissors could send you to the ER. Always supervise your children during paper mache projects and do all of the cutting yourself.
Paper Mache Pulp: Learn how to make paper pulp.
Paper pulp is a great way to add features. I used pulp to build up the gargoyle’s muscles and features. Paper pulp can be mixed with paste and molded like clay. Making the pulp was the messiest part of this project. I filled a mop bucket with small squares of newspaper and poured hot water over it to soak overnight . As the paper soaks, the ink separates from the paper and floats on the surface, waiting to stain anything it touches. Rather than ruin a cooking dish, I elected to soak the pulp for another 12 hours in more hot water until the paper fibers were sufficiently broken apart. The next step is to drain off the water from the pulp. I used an out-of-service sheer curtain that I didn’t mind ruining.
I used the pulp to slowly build up the back and shoulder muscles, ear and horn cartilage, haunches, paws, ribs, fangs, eyes lids, and nose.
I outlined the eyes for extra definition, (not that it needs it.)
The paper pulp mixture is quite dense and takes a long time to dry.
I built up the paw bones with paper pulp. For the claws I rolled up a 4″-6″ strip of paper into a cone-shape, taped it together, and curved it.
Troubleshooting: Potential Problems and How to Fix Them
Mold
Thick layers of paper and pulp can take a long time to dry. In combination with rainy weather and high humidity your creation may start to smell sour. Although, mold isn’t visible the sour smell is the first indication of mold or mildew can be easily fixed by spraying the structure with undiluted laundry bleach. It’s best to do this outside, to avoid the fumes.
Creative Finishes: Ways to complete your project.
There are a multitude of ways to color your paper mache project, the fastest way is spray paint or stain. These are all self-explanatory. I will be sharing a natural earth finish that gives the gives the statue a rock-like appearance.
I gathered some nice loose earth from outside and placed it in a 1 quart Ziplock bag to break apart the clods to make a powder. I sieved the dirt through a makeshift sifter made from the bottom of a 2L soda bottle with holes drilled into it.
Paper mache is a fun and incredibly versatile craft. No fancy equipment required! You probably already have everything you need. These instructions and the basic paste recipe work for all types of projects, from bowls, to bracelets and pinatas.