Summer always takes me away from the city and my usual daily routines. There is one exception and that is my craft hobbies. This time of year seems to put me in a mood to do even more than usual. I came across a very cute mailbox idea last summer and had to try it myself.
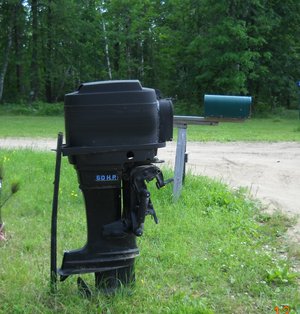
The picture featured with this article shows the finished project. This boat motor mailbox was up and in place for only one day before I started getting comments about how fantastic it is and questions on how I went about making it.
It is really not very difficult to make this mailbox as long as you have a boat motor you can do without. Here is how I went about making mine and how you can make one of your very own.
Items You Will Need For The Boat Motor Mailbox:
1. A standard mailbox
2. A Boat Motor
3. A strong wood post
4. Concrete Mix
5. Paint
6. Paint brushes
7. A strong metal bar
8. A good glue
9. Metal fittings to mount the mailbox
Making Room In The Boat Motor:
Stripping the guts out of a boat motor is a job that is so difficult that it should not be attempted by most people. The easiest way to go about getting the job done is to barter with a boat motor repair shop. Take the time to call a few repair shops and offer to let them keep all of the parts if they will just strip the shell off for you. The boat motor mailbox featured in the picture with this article was gutted for parts by a local shop.
The type of motor you are using may be the deciding factor in whether or not any repair shop will be willing to do the work for parts only. If they are not interested in the parts, try to get a bargain rate to get them to remove the outer shell for you.
Once you have the boat motor shell ready, you will still need to cut an opening in the front of it that will allow you to slide the standard mailbox into it. You will want to cut this opening so that the mailbox fits very tight and you are barely able to push it into the motor.
Boat Motor Mailbox Finishing Touches:
After you cut the opening for your mailbox into the front of the boat motor and adjust for fit, you will want to use a good glue on the bottom of the front of the standard mailbox. This will keep it from sliding or moving. Use very small drops of glue across the bottom front edge of your mailbox and slide it into place. Press firmly on it so that it gets a good seal. You can use any good glue you like, but i found a great deal on glue by shopping for it here.
You will now want to paint your boat motor mailbox so that everything matches and looks finished. You will also want to paint a name or address on both sides of the motor. You may need to also paint something on the front of the motor depending on what area you live in.
Setting Up The Boat Motor Mailbox:
The hard work starts now. The first thing you need to do is mount your mailbox on to the strong metal bar. You will then need to mount the bar on to the wood post you intend to use. Be sure to use strong metal fittings to mount your motor mailbox so that it stands up during turbulent weather.
When your boat motor mailbox is ready to be set in place, it is time to dig a hole. Dig your hole at least three to four feet deep and slightly larger than the post you are using. You will need to mix and pour your concrete in to the hole and let it get firm before sliding your post and mailbox into place.
Give yourself plenty of time so that you can hold the mailbox in place until it is firmly set. Once the concrete is strong, your job is finished. Step back and take a look at your new boat motor mailbox.
I hope you enjoyed this summer craft project. If you liked this article you might want to click here to view other craft ideas of mine.
Source :
http://michaels.com/art/online/home


