Measure
Measure area to get the correct square foot measurement. To get your square foot measurement, measure length and measure width. Multiply the length by the width and you will have your square footage. Be sure to add 10% extra for waste. For example, if you need 20 square feet, pick up 22 square feet at your local home improvement store.
Pick up all your supplies from you local home improvement or tile store
Be sure to make al list of all the items you will need so you don’t have to make a special trip in the middle of installation. Here is a list of the items that I used.
1. Wet saw
2. Tiles
3. Premixed mastic
4. Grout
5. Grout float
6. Notched trowel
7. Rubber gloves
8. Sponge
9. Bucket to mix the grout
10. Bucket to rinse the sponge in
11. Spacers for the tile
12. Level
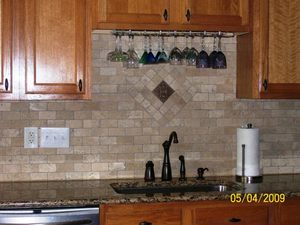
Prep your wall for the tile installation
Make sure the wall is free of debris and smooth. If you have removed old tile, make sure there is no caulk or grout left on the surface. If there is, remove it and smooth out the wall.
Dry fit your tile ahead of time to make sure the tiles are centered on the wall
When laying out the tiles, you want to make sure that each end has the same amount cut off. In other words, if each end will have a cut piece, you want them both to be the same size. If you need to cut 1 inch off one end, then you want to cut one inch off the other end so it is properly centered on the wall. Sometimes you get lucky and the tile fits perfectly. But usually you have to cut the tile on either end.
Once you have figured out where your tiles will be centered, you can start installing them. Apply mastic to the wall with your notched trowel. Put a coat on with the un-notched side, then using the notched side, remove the mastic in order to leave grooves. Place the tiles sheet or individual tiles onto the mastic in as slight twisting motion to make complete contact with the tile. Check to make sure the tile is level. If you are using a sheet of tile with the mesh backing, wipe off any mastic that has come through the tile. Once it is all level and clean, you can move onto your next tile.
Cut pieces using a wet saw
Make sure you wear safety goggles when using a wet saw, pieces of cut tile could fly towards your eyes. Cut tile is very sharp, so protect your eyes. Use a pencil to mark your tile and use the wet saw to cut. Take your time, and if you make a mistake just try again.
Back buttering tile
Some pieces may need to go in at the end of your project. Usually those are the cut pieces. It will be easier to back butter those tiles. You take the mastic and put it on the back of the tile instead of on the wall. Be careful not to leave any mastic in areas that you are not prepared to put the tile on yet, or you will have to scrap it off if it dries.
Grouting
Check the back of the container of mastic for drying time. Once it’s dry you can grout. Mix up the grout in a bucket. Be careful not to use your hands, most grouts have sand in them and the sand is really rough on your hands. Scoop up some grout on your grout float and apply it to the wall being sure to press it into the grout lines. Scrap the grout off with the float at an angle. Keep applying that way until all the grout lines are filled with grout. Then wipe off with a wet sponge any extra grout on the time. Make sure you only work in an area that you can wipe off with a sponge in 15 minutes, otherwise the grout will get to dry to wipe off.