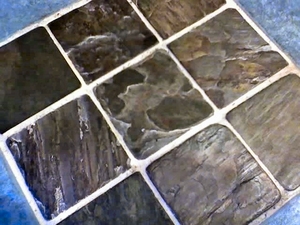
If you are laying down a tile floor, you have probably either talked with people about the project or looked it up online. The odds are good that at least one person or website told you a horror story about how hard the grouting and sealing part would be. In my experience, the grouting and sealing is no more difficult than the rest of the work. This article will only explain how to grout and seal slate tiles. If you need to know how to install the tile itself, please see my other tutorial on installing a slate tile backsplash.
The first thing you should do is choose what color grout you need. If you have lots of little variances in the gaps between the tiles, you probably want to go with a grout color that is close to the tile color to help you hide mistakes. On the other hand, if your lines are ruler straight, you may prefer to go with an contrasting shade to make your tiles and straight lines pop. You will need grout, tile sealer, a grout float, a sponge mop, a bucket, and a floor buffer or hand sander with buffer attachment. You may also want grout sealer and a paintbrush.
Since slate is porous, you will need to apply a sealer to the tiles before grouting so that the grout does not soak into the tile and cause it to become dull. Mix according to the package directions, in a bucket. Take a sponge mop and gently spread the sealer over each tile. Allow to dry according to package directions.
Mix the grout as per the package and scoop a small amount onto the grout float. If you take some extra time now, you will save yourself headaches later. Carefully apply over a small section of the tile joint. Work at an angle and gently press the float back and forth (with short strokes to minimize later clean up) to press the grout into and fill the gap. You should move the float as though you are making small “X’s” on the joint, from top left to bottom right and vice versa. When you complete each joint, wipe up excess grout from the tile before it dries. Repeat these steps for all joints. When the grout is dry, use a floor buffer or hand sander to gently remove any remaining grout from the tile tops.
Now, the grouting is done. The next question is To Seal or Not To Seal the grout? There are arguments for both sides, but in the end, the choice is yours. Think about where the tile is in your home. Is the tile in a place where it is likely to be subject to a lot of moisture or heavy dirt? If so, you’re probably better off sealing the grout, especially if you have light colored tiles and want it to maintain a lighter grout color. If the area is not too large, you can apply the sealer directly to the grout with a paintbrush, to spare yourself the possibility of hazing.