DSL Linux (a.k.a. “Damn Small Linux”) was originally created as an attempt to see just how many applications the developers could cram in a tiny 50 MB space. Why 50 MB? That is how much room available on a business-card-sized CD. Fitting on such a small device meant that DSL could be carried around easily but that wasn’t enough–it had to be useful as well!
Not only did DSL linux become useful, it can actually be installed as a lightweight version of Debian Linux–a version that this writer and others have used to breathe life back into otherwise obsolete Windows 95 and 98 computers!
System Requirements:
DSL Linux will run on a computer with an ancient 486 processor and 24 megabytes of RAM, while DSL-N (a slightly larger relative) can actually run on as little as 16 megabytes of RAM! Since the actual operating system is so small you can install this on hard disks even smaller than 500 megabytes in size–but if you plan on installing a lot of different applications go with the largest hard drive you can stick in the computer. A CD-ROM is the best option for using DSL on really old computers, especially if they don’t have built-in USB.
Note: If your computer’s BIOS does not have a setting to allow it to boot from the CD-ROM drive, download Smart Boot Manager and install it on a floppy disk. This little tool boots from floppy (something that all older computers support) and gives you the option of booting from the CD-ROM or USB (if installed). Keep this disk around–it comes in handy when working with really old systems!
Download DSL:
Click here to download the current version of DSL linux (DSL version 4.4.10, released November 17, 2008). This is a direct link to the *.iso file that contains the operating system. If you would like to try other versions or related distributions such as DSL-N or beta versions you can explore the DSL directory by visiting this link at iBiblio. If using a high-speed internet connection the download will be very fast, but if you have a dial-up connection do not despair: I assure you from experience that while it will take a little while it is far from an impossible download!
Burn DSL to CD:
If you do not have a program that will burn *.iso image files to disc download BurnCDCC by clicking here. This little application will burn discs without even needing to be installed. Download the program, extract the files using your preferred ZIP utility and click on the BurnCDCC.exe file. A window will appear with the program. Click the “Browse” button, locate the downloaded DSL *.iso file and click the “Start” button to begin the burning process. BurnCDCC will open your CD-ROM drive and request a blank CD. Place a disc in the drive and close it before pressing the “OK” button. Within a few minutes DSL will be ready for action!
Boot DSL Linux:
Place the DSL CD that you just created into the CD-ROM drive of the computer. If you are using a computer that cannot boot from CD-ROM, place the Smart Boot Manager floppy in the floppy disk drive as well.
Turn the computer on. If it boots from floppy the Smart Boot Manager will load. Use your arrow keys to instruct the computer to boot from the CD-ROM drive and press “Enter.”
When your computer boots from CD-ROM press the “Enter” key to begin DSL Linux. A lot of colorful words will appear on a jet black screen–don’t panic. DSL is doing it’s job and loading all of the necessary files into the computer’s memory. Within a minute (faster or slower depending upon your computer) DSL will load.
Play with DSL:
If you aren’t pleased with the default resolution right-click and go to “Setup,” “XVESA.” A window will appear with a variety of resolution and color depth choices. Make your selection and DSL will restart the window manager with the new settings.
At the bottom of the screen is a task bar much like the one you find on Microsoft Windows. On the far left of that taskbar is the equivalent of the “Start” button–labeled “DSL.” Click that button and explore all of the programs that have been crammed into such a small space!
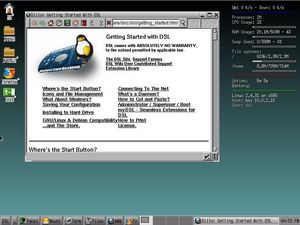
On the desktop you will find an icon to load Mozilla Firefox–a double-click will put you on the Web! Take a moment to read the brief FAQ that appears in Dillo–this will go a long way in acclimating you to DSL Linux!
Two things of interest: instead of just one desktop DSL Linux has four desktops for you to play with! Click on one of the four squares at the bottom right of the taskbar to be taken to another desktop then look at the first square–you will see the outlines for any open windows but your desktop will be clean of any open software! Click back to the first box and you will once again be back at the first desktop! This enables you to use different desktops for different chores. One can be for emails, another can be for games–the uses are infinite!
Another thing to note is that right-clicking an open space on the desktop will enable you to access any program installed on DSL–just as if you pressed the DSL “start” button!
Installing DSL:
There are two methods for installing DSL should you decide to. The simplest method, called a “frugal install” copies the contents of the live CD onto a 50 megabyte partition that you create on the hard drive. The other method uses a larger partition but creates a lightweight Debian distribution on the computer. Of the two, the Debian install is the most flexible, allowing you to install and uninstall programs at will as you explore the world of Linux and is described here.
Important: Make sure that you back up ALL DATA on the computer before beginning the installation process–any files on this computer will be destroyed during the installation process!
Installation Part One: Partitioning the Hard Drive:
The hardest part of the install is partitioning the hard drive. DSL comes with a command-line program called “cfdisk” to partition the hard drive while you wait. Open an X-Terminal by clicking the box labeled “Term” on the bottom taskbar and type:
sudo cfdisk /dev/hda
This will take you to a screen where you can partition your hard drive. You will see any partitions that are already located on your hard drive. Use the up/down arrow keys to select the partition at the bottom of the list.
Use the right arrow key to highlight “Delete” and press “Enter.” The partition will disappear leaving you with some free space.
Tap the up arrow key to highlight any partition above it then tap the right arrow key to highlight “Delete” once again before pressing “Enter.” Continue with this method until all of the partitions are deleted.
Use the right arrow key to highlight “New” and press “Enter.” Press “Enter” again to create a primary partition. The size of the entire hard drive will appear in megabytes. For your primary partition type in a number that is the size of your hard drive minus twice the capacity of your RAM. For instance, on a hard drive that is 1024 megabytes (1 GB) on a computer that has 32 megabytes of RAM input the number 960 (1024 – 32 – 32 = 960). Press “Enter” and then “Enter” again to create the partition at the beginning of the hard drive.
Press the “Enter” key to make that partition bootable before tapping the right arrow key 6 times to highlight the word “Type” before pressing “Enter” again. This will take you to the menu where you will define how the partition will be formatted.
Press any key to reach the end of the menu, type the number “83” to choose a Linux filesystem and press “Enter.”
Use your down arrow key to highlight the free space and then the right arrow key to highlight “New” and press “Enter” three times to create another partition. Use the right arrow key to again highlight “Type,” press any key to get to the end of the choices and press “Enter” to accept the choice of 82. This creates the swap file that Linux needs to run more efficiently.
Use the right arrow key to highlight “Write” and press “Enter.” Type “yes” to verify that data loss could occur and press “Enter” to create those two partitions.
Use that arrow key to highlight “Quit” to exit the program, and click the “X” on the top left side of the window to close it. Congratulations–you have just partitioned a hard drive!
Installation Part Two: The Installation Process:
Go to “DSL,” “Apps,” “Tools,” “Install to Hard Drive.” type hda1 to select the first partition you created and press “Enter.”
Type “n” to disable multi-user logins (recommended for new users) and press “Enter.”
If your system is very old (Windows 95/98 era) type “n” for the question about using an ext3 journaling file system. This type of file system will significantly slow these really old systems down. Otherwise type “y” and press “Enter.”
Type “y” and press “Enter” again. DSL will now format your hard drive and begin the installation process.
Type “y” then “Enter” to install the boot loader.
Type “g” then “Enter” to choose the Grub bootloader (you can type “l” to install Lilo if you desire.). Type “y” to reboot the computer. The CD will eject. Remove the disc, close the drive and press “Enter” to reboot the computer.
When the computer reboots use your arrow keys to choose what screen resolution you would like DSL to use and press “Enter.”
You will be asked to create a root password, and retype it for confirmation. Put this password in a safe place–you will need it if you want to make changes to your system.
DSL Linux is now installed and ready to go, so have fun!
Tips:
If your computer is newer and uses a SATA hard drive replace “hda” with “sda” in any appropriate places in this tutorial.
References:
“Linux Bible, 2007 Edition;” Christopher Negus; 2007.
Absolute Linux: Partitioning using CFDISK
Damn Small Linux FAQ
Personal Experience