Everyone has heard of programs to help you edit images. Often these cost hundreds of dollars. For most people, simple cropping is all that is needed. Believe it or not, Microsoft actually offers a free image editing program with its operating systems. There is quite a bit that Paint allows a user to accomplish. The following steps will show you how to take advantage of Paint to crop your image and change the file type. Some programs and web sites only allow certain file types, so file conversion can be vital to using your image where and when you need it.
Open the Paint application. Go to Start, Programs, Accessories, Paint. If you do not see this, go to Start, Run, and type mspaint.exe and click OK. Once Paint is open, go to File, Open and browse to your image. Another method is to right click your image and choose Edit or Open With and choose Paint. If you have an image editing application installed, Edit will normally open your default program. Open With allows you to choose with application you use.
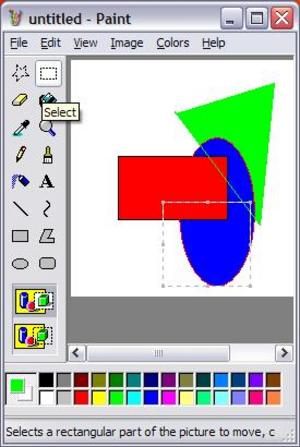
There are two important tools when cropping. You will see a dotted star and dotted rectangle in your tool palette. Clicking on the star will allow you to draw a line around what you wish to crop out of your image. Clicking the rectangle allows you to draw a rectangle around what you wish to crop out. Once you click to use either of these tools, small handles appear around your image. Placing your mouse on one of the handles lets you cut parts of the bottom and side of the image.
You can crop one of two ways. Deleting the parts you do not want or selecting what you want and clearing the rest of the image. To delete the parts you do not want, simply select these with your chosen tool and hit the delete key on your keyboard. Be sure to close the deletion section when using the free form star tool.
To select part of the image to keep, choose just that section with your selection tool. Use the key combination Ctrl+X to cut that section or go to Edit, Cut. After your section disappears from the screen, go to Image and Clear Image or use the key combination Ctrl+Shift+N. Your Paint area will go white. Go to Edit, Paste or use the key combination Ctrl+V to paste your selected image. You can then use the handles to delete the white space left around your image.
If you chose to delete certain parts of the image and you are now left with your image in the middle of bunch of white space, simply use your selection tools to select your image, place your mouse in the middle of the selection and drag to the top left corner. Then you can use the handles around the white space to finish cropping your image.
You are now ready to save. Paint saves images as bitmap, .bmp, as default. Most web sites and applications prefer JPEG or GIF. Go to File, Save As and use the drop down box under Save As Type to choose your type. You will see any color loss before you close the program so you can decide which type works best for you. This works great for images you create or download as well. Simply open the image in paint, choose Save As and save as a different type.
So many people are unaware of how useful Paint really is. Keep checking for more ways to put this free application to use. Why pay, when you can use what’s free?