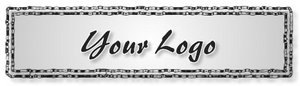
In this Fireworks tutorial I will show you how to create the black lace logo in my image. This is a silver gradient background with a black lace border around it. I used a fancy font to set this logo off. There are two parts to this tutorial. First, we will create the background of the logo. Second, we will create the text part of the logo. Open your Fireworks program and we will get started.
Creating the Background of the Logo
Step 1 – Create a New Document to Work On
First, we will create a new document to work on. Create the document the size that you need for your logo. Select the color background that you need and click the OK button to create the new document.
Step 2 – Drawing the Logo Background
Select your Rectangle Tool from your toolbar and draw the rectangle the size that you need for your logo background.
Step 3 – Applying the Gradient
Next, we will apply the gradient to the logo background. Look in your Properties and drop the Solid Box down. Click on Gradient > Radial. Then click on the color box to change the colors of the gradient. Change the color on the left to White and change the color on the right to #CCCCCC. Then click off of the box.
Step 4 – Applying the Border
Now we will apply the border to the logo background. Apply the following to the Stroke Fields.
This is the last thing to apply to the logo background. Click the Effects button at the bottom of your window. Click Effects > Shadows and Glow > Drop Shadow. When the drop shadow box comes up, change the color to #999999 and the distance to 10. Click off of the box to close it.
Creating the Text Part of the Logo
Step 1 – Typing the Text
The first step is to type the text on your logo background. Select your type tool from the toolbar and draw a text field on your logo background. Then type your text in the field.
Step 2 – Changing the Text Style, Color, and Size
Now you can change the font style, color, and size to what you want. I used the font style Brushstroke 35. I used the color #242424 and a size 50. You can use what you want.
Step 3 – Applying a Stroke to the Text
Next, you will apply a stroke to the text. I used the color white for my stroke. The white stroke seems to make it stand off of the logo background.
Step 4 – Applying a Drop Shadow
This is the last step. This is where you will apply a drop shadow to your text. Go to the bottom of your window and click Effects > Shadows and Glow > Drop Shadow. Set the color to #999999 and the distance to 7.
That’s it. Now you are ready to crop your logo and export it. If you have any problems with this tutorial, please feel free to leave me a comment at the bottom of this page.