In a previous article, I talked about my occasional need to connect two Macs together, in order to transfer files between the two. When I visit relatives, I often find myself – typically near the end of the visit – needing to move files from their laptop to their desktop computer. This is usually because while I was visiting, I did some writing and now need to email the files to myself, to be downloaded to my home computer. The house is not set up for wireless, so that option is out, and while I could simply hook up the laptop to the cable modem (and sometimes do), I often have files on both computers, and I find it simpler to combine them into one archive and have only one email waiting for me when I arrive home.
I have found two very simple ways of moving files from one Mac to another, and all you need is either a Firewire cable (assuming both Macs support Firewire!), or an Ethernet cable. In my other article, I described the steps necessary to connect the two Macs via a six-pin Firewire cable.
In this article, I will go over how to do the same thing, only using an Ethernet cable. The process is a bit more complex, but the file transfers should be a bit quicker, and in the end, the process isn’t really THAT hard at all!
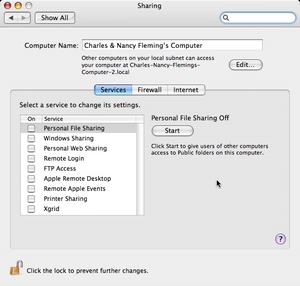
The first step is go into one of the computers you want to connect (it doesn’t matter which computer), and go to your System Preferences. If you haven’t changed your dock very much from the default, there is a rectangular System Preferences icon near the right side of the dock. Otherwise, go to the Apple menu, and the third or fourth option is System Preferences. Once this has loaded, simply go to the Sharing preference pane and click the button to start sharing.
Once file sharing has started, you’ll see an address near the bottom of the window. This is the address that others can use to “find” you on their network. It’s not completely necessary to know this, but it can be helpful.
Now that file sharing is set up, use a single Ethernet cable to connect the two Macs, forming a tiny network, if you will. In the Mac that you didn’t set up file sharing, go to any Finder window and hit the Network option in the sidebar. If you have removed this option, you can do the same thing by navigating to the Go menu and then the “Connect to server” option.
If you chose the second option, you’ll see a space where you can type in the address of the server (your Mac that has file sharing turned on), or you can hit browse. If you choose the address option, simply type it in, and hit the Connect button. If you choose to browse, you’ll be taken to the same window you would have seen had you clicked the Network button in the side panel of the Finder window.
Regardless, you should now either “see” the other computer in your list of available servers on the network, or else a window should have popped up requesting that you log in. Since both of these computers (in my case) are mine, or at least belong to my parents, I know the username and password, and am able to log in. Otherwise I could have simply logged in as “guest,” but with fewer privileges.
Once you have successfully logged in, you will see a kind of 3D icon on the desktop, representing the other computer. At this point you can either drag the files from the server or to the server (depending on where the files are). When you’re through, simply drag the server icon to the trash, and you will be disconnected from it.
You can now disconnect the computers from each other and – in my case – hook the one back to the Internet. That’s all; it’s really that simple!
If you’re looking for an even easier way, check out my other, similarly-titled article, on how to hook up two Macs using a Firewire cable.