It is every cooks secret desire. The kitchen pantry that is the envy of all the neighborhood. Well, with my helpful tips you can have that pantry that people actually beg to see!! Now that may sound ridiculous and a bit contrived but it is true. I designed my pantry for optimal performance and to cut down on food waste. I never once imagined that it would cause my friends to want to take pictures so they could beg their husbands for a pantry like mine!! Even strangers coming into my home want to see my pantry!
First things first. Let’s figure out where you stand in terms of pantry space. Do you already have a pantry but it is non-functioning? That will be super easy to solve. Have no pantry but a hall full of unused closets? That is easy to fix as well. Have nothing, not even a little niche in which to place a pantry? That will be a hard one but not necessarily undoable. Now you need to answer a few more questions of yourself. Do you want your pantry to serve for just canned, bottled and boxed goods or do you want to add a space for a fridge or freezer to store additional frozen and perishable goods? What size is your family? Do you have a lot of parties? Do you want to be able to use the pantry for additional baking space? Do you want natural light? Write your answers to these questions down on a piece of paper and let’s move on to the next step, the design process!
Gather all of the bottled and canned items you use on a daily basis and measure them for height. You heard me right!! Measure and make notes of each item’s height on a piece of paper, adding 1″ to each and every measurement. For example, black beans 4″ can, tuna 2″ can etc. This may leave you scratching your head and wondering why all the extra work but trust me, you will thank me in the end!! Now see what you have the most of. If you have a ton of 4″ heights you will want to design the majority of your shelves in that height. Now why I had you do this was to maximize usable space within the pantry. For example, if you have 8′ (8’=96″) or standard height ceilings and you use 1″ thick wood with all 4″ spaces between your shelves you will be able to get about 19 shelves into your space. By not stacking items you will keep the space clutter free and keep the temptation of stacking items that don’t belong together, together. This also maximizes your space usage. If you think about it and look at a 1′ spaced shelf in a pantry what happens? You see people trying to stack 3 3″ height cans one on top of the other. Then said people close the pantry and jarring of the door knocks their pyramid over. So they get frustrated and stack only 1 or 2 high. Now their pantry has just become too small for their needs!! Notice I left out boxes. I have a reason for this so bare with me.
Now you have a good solid list of how many shelves need to be and can be fit into your space based on height. Now let’s look at width. My house came with a small hallway that contained not 1 but 3 coat closets!! Now I don’t know if the designer had a fetish for coats or was a bit tipped when she or he designed the place but it left me wide open in the possibilities department. I made one closet part of the bathroom and the other two I combined to create a large pantry. I just removed the doors, door headers, and separating wall to create one large open space. If however, you have a pantry already and it doesn’t function then you will want to gut it by removing all the existing shelves and/or cabinets as well as the door. If you have no pantry and no closets then start looking around you. Do you have a washer/dryer closet near the kitchen that could be moved to the basement? Do you have a too small bedroom or den off of the kitchen? Do you have a door to a spacious back yard that would allow for a small addition? Do you have a utility closet with an oversized water heater in it? Any of these ideas will eek you out just enough space for a modest or large pantry. If you have the hot water heater problem just purchase an on demand hot water heater and relocate it to the basement if possible. These take up little space and save tons of money on water heating costs.
Now that you have your blank canvas it is time to protect it against pests. At Home Depot you can purchase a type of Oriental Strand Board that is made up entirely of cedar shavings. The bugs hate this stuff so apply it to every one of your walls and ceiling. Since this is a porous material I wouldn’t suggest applying it to the floor. On the floor apply bamboo or ceramic tile. These are easy to clean and stand up to pantry spills such as that broken bottle of pickles!! I would also like to note that sheet metal works great in keeping out the mice. If you are adventurous you can do sheet metal with the cedar over it!! I actually have all of my cabinets lined in sheet metal in the kitchen area.
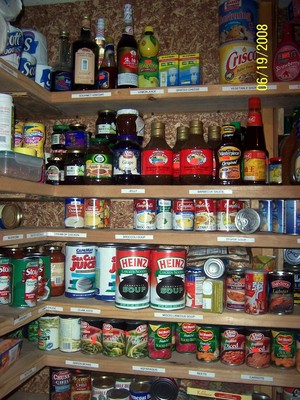
Now you have what looks to be a finished and empty room so let’s fill it full of shelves!! This is where you are at free reign on how and what you use for shelving. Just keep consulting your list for spacing between shelves. Some tidbits I would like to share are these. Use at least 1″ thick lumber or shelving. You will need this extra thickness to ensure your shelves don’t warp over time from the heavy load of cans and bottles. Plan the top shelves for items you seldom use. Nobody wants to have to do calisthenics to reach the tuna for lunch everyday!! Make sure the hangers you use to affix the shelf to the wall are rated for 100 lbs or more per bracket. For my shelves we used 2×12 s in varying lengths. The 11 ½” depth of this type of lumber allows for larger items such as restaurant size cans. For hangers in my pantry we used scrap pieces of the 2×12 s cut into blocks about 2x12x2 and placed at each stud. This guarantees a secure shelf that will not move or warp over time.
Now you have a pantry but wait….you are not done!! You have no doors!! To build these cut pine planks in your choice of thickness to the correct height for your door opening. Lay these side by side by side vertically until you have the correct width to bridge your opening. If you have a large opening you will want to make two of these doors as I did in my pantry. If you need to you can rip these planks down to smaller size to fit the opening. After your planks are laid out to the correct size you will want to use a level to chalk a horizontal line at least 1′ from the top and bottom edge of the planks. Cut two planks to a length that will allow it to cross all planks but still leave 2″ on either side. For example, if your width measures 32″ then your plank should measure 28″. Attach these planks horizontally to the planks you have laid out with screws and/or glue being careful to stay on your chalk line. Now, with several pieces of thin 1/2×6 lumber create some window box style boxes to the length of your short connecting planks. If we were to use the 32″ door example then these would be 28″ long. You can create these boxes with a simple butt joint or, if you have the ability, with dovetail joints. Either way, make sure they are nailed and glued tightly together. Now attach these window boxes to the inside of your door scattering them between the two 28″ long planks. How many of these boxes you can attach to the inside of your door depends on how tall your door is. I have 4 on my door. These boxes are perfect for storing boxed cake mix, pudding mix etc. Since this will be your door don’t use them to hold cans. The weight will cause the door to swing funny and could rip it from the hinges altogether. Attach your doors with hinges designed to handle hundreds of pounds of weight. Also make sure you have long screws attached right into the studs on the side of the door. This will ensure a good swing and lasting quality.
Think your done? Well, you would be wrong!! It is time to go back to your list. Here is the part that you will thank me for. Get your label maker and make a label for each and every item on your list. Now affix these labels onto your shelves making sure to put them where the food item mentioned will fit best. Fill up your shelves with the correct food items and you are done!! This may sound like a lot of work but if everything is labeled and you are out of say mushroom soup then you will know on shopping day that you are out because nothing will be behind the label saying, “mushroom soup”. Not only is this convenient but it saves money too!! How you may ask? If you are 100% sure you have something you will not buy more of it. That will save because certain acidic foods will go bad and burst their cans if left hiding at the back of a cabinet for extended periods of time. In my old cabinets I thought I had run out of mandarin oranges so I bought a ton more (My family loves these things!!). When I went through the very process I have brought you through I found that I had a stash hidden way at the back of the cabinet. I ended up with several hundred cans altogether!! I have not lived down my mandarin escapades but in the four years I have had my pantry I haven’t had that happen again!
Before I leave you to your pantry duties I would like to leave you with a few parting ideas. Our pantry is approximately 4×6 with two doors containing 4 window box shelves each. We are a family of four who enjoy inviting friends over for theme parties and dinners. This said, I would like to say that I feel my pantry is a bit small for our needs. Ideally I would prefer a pantry that would fit an upright freezer and have just a little bit more shelf space. Due to the design of our home this would be impossible so I have had to get creative. If you are starting from scratch with a newly built home and have a family like ours I would suggest a much larger pantry. If you are able to accommodate a much larger pantry and love to have dinners and parties you may want to think about equipping it with a dishwasher. I have seen people do this so they have a spare for parties. Also, if you have a room you are converting to a pantry keep the windows in place. If you add cabinets below and shelves above you can use this space as a secondary prep area. If mice and ants are a problem in your house go the old fashioned route with Ball bail top jars. The bail tops create a tight seal perfect to keep out bugs and the glass is not chewable by mice like Tupperware is. Only the one and two gallon sizes are still available from the manufacture but you can pick up the smaller sizes from antique shops and yard sales. I have my ball jars on a shelving unit in my kitchen but bigger pantries should provide plenty of room for them inside the pantry. Either way they are attractive and practical.
Good luck with your remodel or new construction. If you have any questions or need any help don’t forget to ask me. I will do whatever I can for you.