After planning my scrapbook and craft room for over a year I finally realized my dream of the perfect space in which to create. You can do it too. Here are the steps you need to take to build the craft room of your dreams. My room is primarily used for scrapbooking but it’s organized in such a way that the other crafts I enjoy creating can easily be done there too.
Find a space – Your dream space can be housed anywhere. Whether you have a full size room, an extra closet or even a corner of your living room you can make any size room work. It is best to find a space that will fit your current inventory of supplies and give you enough room to grow a little bit. You’ll also want enough room that you can create a workspace or desktop to make your crafts.
Know yourself – Take the time to figure out what you’ll be using the space for and how you work best on your craft. Do you like to have everything out in sight so you know what you have or do you prefer everything be hidden behind doors and in drawers to keep things neat and tidy? This might seem like an obvious thought process, but until you know how you like your space you can’t make a plan for your space.
Inventory what you own – How much stuff do you have and how much stuff will you accumulate in the near future? Some crafts, like scrapbooking, lend itself to the collection of lots of supplies that require a lot of storage space. Other crafts, like beading and jewelry making, requires much less storage space because all the parts and pieces are small. Is it time to purge your supplies before the big build? Before I started construction in my scrapbook room I sorted through every single supply I owned and determined what I loved and wanted to keep. Everything else was donated or given away.
Set a Budget – How much are you able to spend on your craft room? Will you be able to buy everything you want up front or will you add to it little by little? Buying everything new is the most expensive of course, but you can find bargains on like-new stuff too. For instance, I saved over $300 on the corner cabinet in my scrapbook room because I bought it at the Habitat for Humanity ReStore outlet. I also salvaged three nearly-perfect glass shelves from being thrown in the garbage and they add a touch of class over my desk space. Can’t get better than free. The decision that helped me keep a consistent look throughout my space was determining a color scheme for the space. I knew I wanted all my furniture to be white and accents to be pink and silver – so even if I didn’t buy everything at the same time I could still stick to my plan if I bought the same type of furniture along the way.
Make a plan – Take measurements of your space and draw a diagram of your space. Don’t forget to measure your vertical space too – wall mounted shelving provides a lot of storage space for supplies that you want to keep within easy reach. Will you buy ready made furniture and shelving units or will you build your own? Create a scaled drawing of the space and work on a design that will best fit your needs. The room layout will change several times before you’re happy with the plan. Take your time during this stage and keep playing with the layout until you find what will work best for you.
Once you finish your space planning and have decided where you want everything to be housed, make a list of materials you’ll need for the build. I literally made a shopping list that included lumber, brackets, screws, paint, brushes, drop clothes and every single thing I would need for the construction project. This allowed me to do some comparison shopping before I started construction. Check prices for your supply list at all the big box stores (Home Depot, Lowe’s, Menards, etc.) and also check the small locally owned hardware stores for some surprisingly good deals.
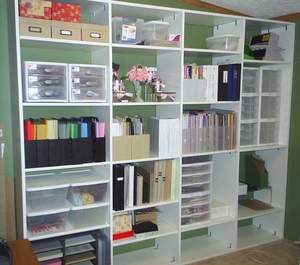
Build and organize – Construction day has arrived and you’re ready to see your dream craft room become a reality. Whether you plan to complete the entire project at once or will spread the work out over a period of time, stick to your original plan as closely as possible. Once you have the hardscape pieces in place (furniture, shelving, desk, etc.) you can begin adding your organization tools. Plastic drawer units, decorative storage boxes, magazine holders, pen and pencil containers are all things to consider adding to your organizational plan. Sort your supplies into these storage solutions and put everything it its place in your new craft room. When I made my original plan I actually determined which storage items would be placed on which shelves in my room. The planning process made it easier to begin my organizational process.
Keeping your new craft room organized and in good working order is important to keeping it your “dream room.” Labeling your storage containers is an easy way to remember where everything goes and motivates you to return tools and supplies back to their proper home. Take the time after each big project to tidy up your space to keep it efficient and pleasant.
Now that you have created your dream crafting room, it’s time to move on to your next big dream. How big can you dream?