The craft I am about to talk about in this article is for all you sea shell collectors and beach lovers out there. The craft I have been doing to display my sea shells and enjoy them all year is by making a sea shell shadow box using all the sea shells I have collected over time.
To make a sea shell shadow box, you defiantly need sea shells, a wooden shadow box with a glass frame, a bottle of Elmer’s glue, some paint, paint brushes, and some sand art sand. All these materials can be found in a craft store for fewer than twenty dollars. If you are not sure what a shadow box is and what it looks like check the link attached to my article to view one.
Now, to begin making your sea shell box, you will want to take any dirty sea shells you may have and rinse them in hot water to remove any extra sand that may be on them. Once you have cleaned all your dirty sea shells you will then dry them with a paper towel or cloth and place them onto the table you will be doing your craft at.
The second thing you will want to do is to take your shadow box you have gotten at your local craft store, and begin removing the back of the shadow box in the same manner you would a picture frame, by removing the metal latches and freeing the cardboard backing. Once you have the cardboard back from the shadow back, you will want to lay it flat on the table facing the same way as it was facing inside the shadow box so you are directly looking at it.
The third things you will need to do is to take your bottle of Elmer’s glue and cover the entire flat surface of the cardboard backing you have just removed from the shadow box that is facing you. Once you have the glue all over the cardboard backing of your shadow box, you will then want to take your paint brush and brush the glue into one even layer.
The fourth step would now be to take your bag of sand art sand and pour a layer of sand onto the cardboard backing of your glued shadow box covering the layer of glue completely with sand. Once you have covered you glued cardboard backing with sand you will allow it to dry over night, or for about 12 hours.
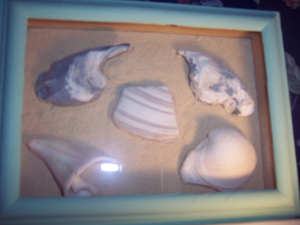
Once your glued sand has dried to the cardboard backing of your shadow box, you will then want to grab your sea shells and arrange then all to fit onto the sanded cardboard backing and then gluing your sea shells into place with the Elmer’s glue. The when you have all your sea shells glued to the sanded backing of your shadow box, you will allow them to dry to the sanded cardboard backing over night again, or for another 12 hours.
Mean while, while your sea shells are drying to the sanded cardboard backing of your shadow box, you will begin choosing a colored paint and begin painting a thin layer of paint all around the wooden frame of your shadow box until it’s completely covered with the color paint or paints you have chosen to use. Make sure you do not get any paint on the glass part of your shadow box, and if you do wipe it off immediately. Then you will need to allow the painted frame of your shadow box to dry for about 4 hours.
Now, when both your painted wooden frame and the sanded sea shell covered cardboard backing of your shadow box have dried, you will then gently place your cardboard backing back into place just as you would place a picture frame back into place. You will then have a painted frames sea shell shadow box to display in any room of your home. I would highly recommend placing your shadow box under lighting to give it a shadow like affect. You have now learned how to make and display your sea shells inside a shadow box. I really hope you have enjoyed learning how to do this craft. For more information on how to make different kinds of shadow boxes check the links attached to my article! Have fun!