Building your own Shaker step stool is simple with this woodworking project. It’s a perfect addition to any kitchen with hard to reach pantries and shelves. It can be built with the most basic of hand tools and materials. In just a few hours and for just a few dollars, you can have your beautifully built Shaker step stool.
Back in the day, the Shakers had simple hand tools and plentiful selections of diverse materials. Fortunately for us, we have power tools to help speed up production and make work easier. You could easily build this Shaker step stool with a handsaw and hand drill
; But let’s not over do it. On the other hand, it is unfortunate for us that we have a lack of diverse materials. They just don’t make old growth forests anymore to where we can chop down 100 year old trees to build a step stool. But we have adapted and evolved, and now we require only a sheet of ¾” plywood instead of a 21″x 21 ¾” piece of old growth ancient oak.
You can use plywood with a nice veneer if you want to stain your Shaker step stool to have an antique look. You can also use ¾” finish plywood and paint it. Another approach to really give it the feel of solid wood is to use 1×8 pieces of oak or other suitable species that you may see fit. Just keep it in the hardwood family. You don’t want white pine or spruce for steps; they will give way under foot and break!
Using a circular saw, cut two pieces of ¾” plywood, 21 ¾”x 21. Stack and align the two pieces together and put a finish nail in the corners to hold both pieces even as you cut it. Designate one 21″ side as the bottom and measure in 5″ from each side towards the center and make two marks. From these two points create an arch using a compass or a pencil and string.
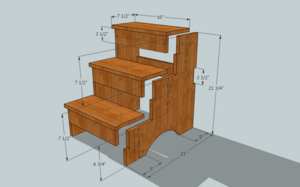
Use the blueprint to find all of the measurements for the stabilizer supports and tread cutouts. It is crucial you follow the measurements exactly, otherwise your risers wont all be 7 ½”.
Now cut the four stabilizers supports at 15″ from either 1×4 stock or by ripping down a few pieces of the ¾” plywood. If you have the wood, use it. It may be best to buy some solid pieces of 1×4 for extra support that may be needed for you Shaker step stool. Plywood works, but it’s not the best solution for this particular project.
Now cut the remaining three treads 7 ½”x 16″ from either real wood or the ¾” plywood. Again the choice is up to you on how stout you want your Shaker step stool to be, or how much you’re willing to spend on it.
Once the pieces are all cut and have been sanded and painted or stained, assemble the four supports to the two side pieces using wood glue and 8d finish nails. Square up the Shaker step stool and attach the three steps using the same method. Allow the whole project to dry for 24hours and you’re ready to use your new Shaker step stool.
Reference:
- sites.google.com/site/helpfulhandymanhints/
- groups.yahoo.com/group/the_helpful_handyman/
- thehelpfulhandyman.blogspot.com/