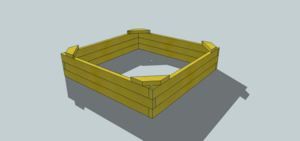
A sandbox is a great way for kids to express themselves through dirt. Whether they are building the kings castle or a highway for big trucks, a sandbox can be a child’s best friend. You can easily build your own permanent and sturdy all-wood sandbox. This attractive 4×4 frame sandbox can be easily built in a few hours with a minimum of tools and materials; all you need is the sand.
Begin by selecting a suitable species of lumber. Most pressure treated lumber is ok to use, check with the sales associate at the lumber yard to ensure it doesn’t contain CCA (copper chromium arsenic). Some pressure treated materials can leach poisons into the soil after heavy rains and should not be used in playground equipment. If your adamant about not using pressure treated materials, a good alternative is to use cedar.
You’ll need at least seven eight feet long 2×4’s for the side rails and seats. You’ll also need eight feet of ¼” rebar to support the sides and stake the sandbox into the ground. The project also calls for a box of 2″ decking screws, suitable for outdoor use.
Begin by cutting each of the 2×4’s to length according to the slide show blueprints. Cut all 12 pieces and sand and finish each piece to suit your design. Use a belt sander to smooth out any rough edges and remove all splinters and sand. It’s crucial you have no burrs or splinters for little hands and feet to get cut on.
After the cuts and sanding have been completed, start by laying each of the four 2×4’s for the base on the ground. Use a shovel and rake to level the ground prior to assembly of the sandbox. Attach each board in sequence, staggering each 2×4 according to the dimensions on the slide show blueprint. Attach each end into the other with two 2″ decking screws. Counter sink each screw so that no raised surface is available and the screw is below the surface of the 2×4.
Either drill a ¼” hole now through each of the centers for the rebar or wait until you’re complete and use a long drill bit to drill out all of the 2×4’s. Make a note of each location of the ¼” hole.
Now attach the remaining two levels of 2×4’s, staggering each piece according to the slide show blueprints and attaching them with the 2″ decking screws. Don’t forget to drill the holes out on each level if you’ve done so on the first layer.
Now square up the sandbox using a framing square or the 2, 3, 4 method and attach each one of the corner seats with two 2″ decking screws. Finish the sandbox by driving each of the four ¼” rebar pieces into the ground, countersinking each piece below the 2×4’s surface.


