Step One: Decide the size and style of garden pond you want. You can look at examples of styles online or at garden stores.
Step Two: Mark off you garden and pond area. Lay black garden liner to kill the grass and weeds that might be growing there. Black yard trash bags will also work for this.
Step Three: List the materials you will need. Example: dirt, rocks, bricks, stones, pebbles, colored rocks, pond liner, formed ponds, shovel, pick axe, wheel barrel, air pump, Filter system, decor, garden liner, plants, stepping stones, border material, walkway material, ect.
Step Four: Begin collecting materials. You can talk to construction sites about removing extra dirt they have piled up. Some will let you have it instead of moving it themselves. List some items you need on Craigslist. Many people redesign there gardens every few years and will let you come get material and/or plants they no longer need, saving them the cost of removing it. Older Relatives usually have nice gardens and thin them out in the fall and you can get plants from them if your willing to help thin. (Be sure to replant them in indoor pots for the winter if needed, Some Plants can be planted in the fall to come up in the spring.) You can watch fall garden sales and get many items for pennies on the dollar.
Step Five: In early spring, remove the black liner and begin digging out the pond area.
Step Six: Cover pond and garden area completely with black liner.
Step Seven: Place your pond liner or formed pond into place to make sure the hole is correct. (I used an old indoor round garden bathtub I was able to get at a garage sale.) Make sure you have dug trenches for any underground lines in your design and that they fit in place. (I buried my electrical cords to the pump)
Step Eight: Once you know all you equipment will fit correctly its time to start installing it. Run your cords, and lines, place your pond and fill in the places needed around the pond and over the lines.
Step Nine: Water the dirt and use a flatting tool to pack the dirt in around your pond. (I used a small log to pack the dirt) Repeat this until you are sure your pond is permanently placed.
Step Ten: Build up the garden areas that need it with fresh good dark garden dirt with no grass seed in it or you will be pulling grass more then enjoying your garden pond (build up depths depends on your design and lands slope.) (Be sure to do this before putting anything in the pond in case you drop dirt in it.)
Note: If you need the garden border to hold in built up dirt now is the time to border your garden. However, if you do not need the border to function as a wall, it is easier to do the work without the border in the way and it can be done at the end.
Step Eleven: Add rocks or stones, around your pond edge and Rock formation is your design has one. Add pump, filter system decor, plants, and the material you have picked for the bottom of the pond. When this is done and the pond design is finished, add water slowly so not to cause any small rocks or item in the bottom to be moved by the water force. Check for leaks, fix any you find, repeat any necessary steps. Add any chemicals you have chose to use to water to get it ready for fish. (I recommend you let the pond run for at least 2 weeks before trying to add fish allowing the water to build some alga the fish will need.)
Step Twelve: Once pond is finished (and your waiting for the 2 weeks before adding the fish) Start Placing the plants and garden decor.
Note: if you did not need to do so earlier, border your garden after placing plants. Then place any rocks if your garden floor calls for them. ( I only placed a few rocks to help keep the dirt from washing away in areas between plants that will grow in the coming years and fill in bare spots).
Step Thirteen: Add walkway around or beside garden pond area depending on your design.
Step Fourteen: Add fish when its time and enjoy!!!
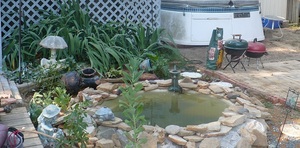
My Pond Cost me a total of $50 and 20 hours digging and pulling and hauling (those hours were not time spent building my garden pond). I bought only used items and worked in other people’s gardens for plants and décor and material they were changing.
Once I collected all my materials and had my design ready, I was able to build my garden pond in one day. (With the help of my teenage sons.)
Source: Personal Experience