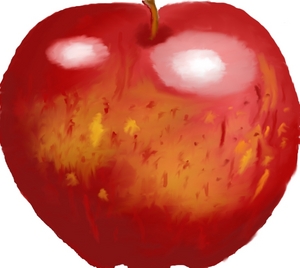
GIMP (GNU Image Manipulation Program) is great for editing photos but it can do much more. I never thought that I could create a picture from scratch. I am not even good at drawing. One day I decided to try and was pleasantly surprised at the result. After that I drew more and improved. This GIMP tutorial will show you how to draw simple pictures that look impressive. You do not need to be an artist. Unleash your creativity. Start with something easy, an apple.
1. Open a New File
From the GIMP control panel, go to File>New. A window will appear asking you to select the image size. The default is 420 pixels wide and 300 pixels high, which is fine for any simple image. You should make it close to square to prevent distortion on a picture that you will actually use as an avatar. After adjusting the size, click on “OK”. A new image window will pop up. This is where you will draw.
2. Select Background Color
You can select a different color if you don’t want white. Of course you can keep white. This is more important to think about if you are drawing something with a specific background, like sky, or if you plan to draw a white object.
On the GIMP control panel, near the bottom you will see two squares. The top square shows the default foreground color (black) and the one behind it shows the default background color (white). Click on the white square. A color selection window will pop up. The rainbow column at the side of the large color square is where you can select a different hue. The large square shows different saturations, light and dark, of the selected hue. Point and click with your cursor to change the hue or select a part of the square that has the shade of color that you want. When you like the “current” color showing underneath the large square, click on the “OK” button. This is the new background color. The color in the new image has not changed yet. Bring the blank image window to the front and go to Edit>Fill with BG Color.
3. Select Color
This is the same process as changing the background color. Click on the (black) foreground color square in the GIMP control panel and bring up the color selection window. Green and red are the most common apple colors, but don’t feel limited. If you want something avant-garde, who says you have to be literal? When you have the color you want click on the “OK” button.
4. Select a Paint Tool
There are two basic paint tools, an airbrush and a paintbrush. Either one will do well for this picture. To select one, click on the icon from the selection of tools on the GIMP control panel. These appear above the foreground and background color squares. Once you have a tool, check the size of the brush. It appears as a black circle underneath the color squares. Since you are making a simple shape, a large brush size is fine. The default is 11, which is medium. Try that to start with and change it to whatever you are comfortable with.
5. Draw the Shape
Bring the image window up to the front. When you touch your cursor to the inside of the window the paint tool will apply the foreground color you have chosen. Use your mouse to move the cursor and draw a round, apple-shaped outline.
If you mess up, don’t worry. At the top of the image window go to Edit>Undo. You can undo anything. GIMP has an unlimited memory for each session, so you could undo all the way back to the beginning as long as you haven’t closed and reopened the image. Between the undo feature and the pink eraser tool any mistake or blemish can be corrected. There is nothing to fear.
After you have drawn the outline, change to a larger brush, 17 or 19, to fill in the rest of the shape with color. You can stop and save your work at any point. I recommend saving it after completing each step to your satisfaction. At any time you can leave and come back later.
6. Shading
Go back to the GIMP control panel and change the foreground color to a darker shade. Change the brush size on the paint tool to 5 or 7. Return to the image window. Chose one side of the apple to be the dark side and with your cursor apply the darker color to shade. At the top of the apple there should be less shading because it is wider and the light shines more on the top. At the bottom of the apple there should be shading most of the way across. As you move toward the center of the apple there should be less and less shading.
After you have some dark color down, change tools to blend. There is an icon on the GIMP control panel that looks like a pointing finger. That is the smudge tool. Click on it and make the size of the tool larger, 9 or 11. Go back to the image window and smudge the dark color by moving the cursor over it with your mouse. Make short strokes toward the center of the apple to blend the shading and make it appear smooth. It may take a few minutes to make it look the way you want. Be patient. You will probably need to make adjustments. Go back to the paint tool to add more shading. If you need less shading, you can change the foreground color back again and paint over the darker color. For a slight adjustment, you can use the smudge tool from the center out to soften shading that is too dark.
7. Highlighting
This is the same process as shading, but with a light color. Use this mostly at the top of the apple and also some on the other side. Change the foreground color. Select your paint tool and set the brush size to 5 or 7. Bring up the image window and add your highlight color. Again, use the smudge tool (size 9 or 11) to blend. Make adjustments and go back and forth between the paint and smudge tools until you like it. Now the apple should look shiny and round. For a lot of shine, add a little bit of white highlight.
8. Finishing
Change the foreground color to brown and use a small brush size, 3 or 5. Draw a stem on the top of the apple. You can add a green leaf if you want. To get fancy, make a mottled apple, like a Fuji. Draw streaks and spots of other colors with the paint tool. Experiment with making the colors you are adding slightly transparent by changing the opacity. This is shown as a percentage on the GIMP control panel. A photo (search in Google images) or a real apple to look at for reference helps if you want realistic coloring. You can always undo, so there’s nothing to lose.
Be impressed with your artistic self. Using this GIMP tutorial you have drawn your first piece of computer art. Take it as far as you want. First draw pictures with easy shapes to help you learn and improve. Some suggestions are a leaf, a pumpkin, a heart, or a daisy. Discover your creativity and draw original avatars.