DVD Flick is an absolutely awesome DVD authoring software. This utility is open source so it is 100% free to use. DVD Flick can take many types of video files and convert them to a DVD ISO image which can then be burned to a DVD. There are a few commercial software utilities that can do the same thing and maybe even give the user a few more options, but this software is free and very simple to use. I have been using DVD Flick for some time and I have had no trouble at all in converting AVI, MPEG, XVID, DIVX, or even iTunes MP4 to a DVD compatible format that will play perfectly on any DVD player.
Now that I have told you about this great software utility I am now going to treat you to a small basic tutorial so that you can start using the software right away. First you will need to download and install the software. You can download it at the developer’s website by following this link, (http://www.dvdflick.net/download.php). Once you have done this you must find a video file, or several video files that you wish to burn to DVD. This can be music videos, news shows, or other various media that you have downloaded from the Internet.
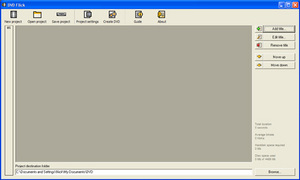
This program is so simple to use that the tutorial part is actually very short for a program that does so much. First you need to open your program. Once the DVD Flick program has loaded you will notice that in the toolbar on the right side there is a slot that reads “Title.” This is what you will click on to add your video file or files. After your files are loaded you will then need to look at the menu bar on the top of the program and set your “Project Settings.” It is in this are where you will set the preferences for your DVD. In North America under the video setting you want to make sure that you select NTSC.
The only other setting I worry about is the audio and I merely check the upmix audio to Surround Sound 5.1 and it does work. Now unfortunately, the only way to put in chapters is by cutting up your film into the sections that you want your chapters to be. Personally, I do not worry about menus or chapters because I just prefer my DVDs to play automatically. Now this software can burn to DVD directly but it tends to take too long. So, in the burning tab in the Project Settings I choose to have the program create an ISO. Then in the top menu bar you will see a button which reads “Create DVD.” Go ahead and push it and the process will begin.
The time that it takes to complete the process varies according to your computer system, but I get a movie completed in about 2 hours and it is not dependant on the source of the original video format. Once your program has finished all that you must do is burn your ISO image using your favorite DVD software.