I am a mother who wants made to match hair bows for everyone of my daughters special little outfits. After visiting the pricey boutique stores and looking online, I realized this was something that I was going to have to learn how to do myself. I could not afford to spend $10 – $15 per hair bow, and I am sure many mothers can relate.
There is a variety of different types of ribbon in different sizes to choose from. I usually bring the outfit with me to pick out my ribbon, and I almost always buy grosgrain because the bow is sturdier. I like to experiment with colors but that is a personal preference. You can do a solid color, which makes the hair bow more versatile or you can add patterns and designs with different colors. These directions will be based off of a solid regular bow.
I like big bows in my daughter’s hair and tend to like to make two for each outfit. This is important to keep in mind when cutting the pieces cause it is easier to do all the prep work ahead of time. I cut three 12-inch ribbons for each complete bow usually with 7/8″ grosgrains ribbon. I then treat of the ends of my bows with Fray Check and allow it enough time to dry. Go ahead and thread a needle with the same color thread as your ribbon. You can mark the bow ahead of time to be able to find the middle but I do not feel that it is necessary.
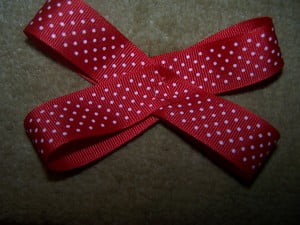
First step is to fold the bow making a loop on one side and then a loop on the other while still holding the middle do this again. You should forma an X. With your hand still firmly holding the middle of the X bow run you needle through so that you are sewing all the ends together. You repeat this step on all the ribbons. You should have three X bows when you have completed this. You can connect them in an arrangement that you like by once again sewing through the middle. I like to fan my ends out in order to allow bigger poof on the final product.
Once all X bows have been sewn together with the needled still threaded, pinched the middle of your bow. I then run the thread through the middle again and wrap it around the bow in order to pull the middle together tightly. This should give you the overall look of the bow. I take the ¼” grosgrains ribbon and cut off a piece that will fit firmly around the middle of the bow. While working on this, I allow my glue gun to be preheating. Once the glue gun is hot and I have the ribbon cut, I place a small dot in the middle of the front of the bow. Be very careful to a line the ribbon correctly because you want the middle to touch the glue spot. You then turn you hair bow over and do the back. I try to overlap the ribbon a little so the glue is only touching the ¼ ribbon versus the hair bow. Then I slide my alligator clip in and hot glue the back of the clip to the rest of the bow.
Once you get the hang of it you can experiment with different size ribbons and twisting. You will also realize that you saved a lot of money with this little “do it yourself” tip, while still allowing your daughter to look shabby chic!
Supplies
36″ 7/8″ Grosgrain or Satin Ribbon
1″ 1/4″ Grosgrain or Satin Ribbon
Alligator clip
Fray Check
Low Temperature Hot Glue Gun
Needle
Thread