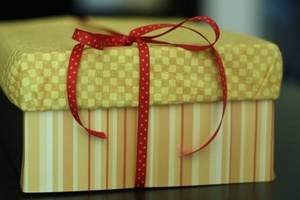
Having wedding card boxes or wedding money boxes at your wedding reception can be a good way to keep all of your cards and monetary gifts together so none get left behind. An easy way to save money on your wedding card box and to make it as personal as possible is with a little DIY project. Here is how I made a wedding card box for a yellow wedding.
Materials List
-A box… you can use a shoe box, diaper box, mail box, hat box, keepsake box, a box from a craft store, a cigar box, suitcase, basket, or pretty much any other kind of box or container that you will be able to cut a whole in the top of or is open on top
-Yellow scrapbook paper, wrapping paper, wallpaper, fabric, or spray paint
-White/primer spray paint (if you will be using yellow spray paint)
-Tape or glue/spray adhesive
-Craft knife
-Ribbon
-Cardstock
-Calligraphy pen, printer, or letter stamps and ink
-Scissors
-Pencil
Instructions
If you are going the painting route, you will need to start by doing a couple of white primer layers to get a good base for your yellow wedding card box. Make sure the primer layers are completely dry before you continue. Spray paint two coats of yellow spray paint onto your box. Make sure the first coat is dry before you do the second coat.
If you are using fabric or any type of paper, you will need to cut a strip slightly larger than the lip of the lid. Cut ridges in the extra that overlaps to the top of the lid and that goes inside the lid to make the seam less noticeable (especially important for round boxes like hat boxes) then glue it down doing the top and inside last. Next cut a piece to cover the top and glue it down covering the overlap from the lip of the box. Next cover the outside of the larger part of the box, leave a little extra on the top and bottom with ridges cut into it like you already did with the lip of the lid.
Next you will need to get the largest card that you can find to be a guide for the size of the hole you will need to cut in the top of the box. The opening should be about half an inch by 8 inches if the top of the box is wide enough for this. You might want to skip this step if you are using a cigar box or if you want to leave the lid off of any other type of box that you are using. Tie a big bow around the box with your ribbon; try to cover up any imperfections or seams.
Another optional step is to make a sign that says “cards” using the card stock and stamps, calligraphy pen, or by printing it. There are many other ways you could spell out cards such as by cutting the letters out or using wooden letters from a craft store.
Estimated Make Time
Depends on the materials you are using and your skill level. Should only take from 30 minutes to an hour, but might go over that.