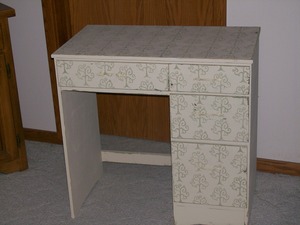
Transform an old wooden furniture cast-off into a charming shabby chic addition to your home. This desk started out with a horrible shade of green paint reminiscent of the 70s. We purchased it many years ago at a yard sale and it has been a hand-me-down for each of my three sons. We have no idea how old it is, but we are all in agreement that it is old.
I decided to give it a lighter appearance and try to match it with a more current and popular decor style. Shabby chic won out. With shabby chic style, I didn’t need to remove the existing paint, especially since I planned on a hint of it showing on the finished product. That meant it would be an easy project and quick to complete.
I recommend using flat paint for this project, as it has no sheen and will not smudge when sanded. The paint I used was flat interior wall paint I had picked up for free or for pennies at a yard sale.
The following steps will take you through the process of my desk’s transformation, but the steps can be used on most any out-dated wood furniture that needs a face lift.
Step 1
Remove the handles and set them aside. My desk had nicks and rough spots from years of child abuse. Hand sand the desk to smooth the roughest spots and to give the surface a tooth for the paint to adhere to. Wipe off the sanding dust with an old rag.
Step 2
Remove the drawers. Paint the desk and the drawer fronts using white, off-white, light tan or beige paint. Allow the paint to dry and repeat with a second coat if needed for complete coverage. Do not paint the drawer sides or bottoms. This may cause the drawers to stick or slide sluggishly.
Step 3
Choose a large rubber stamp to create a faux wallpaper application to the desk top and drawer fronts. My stamp was about 4 inches square. I started the design by stamping the image in the left hand corner of the desk top with the left half and the top half of the stamp hanging off the desk’s edge. I spaced and stamped vertically from the back of the desk top to the front. In the next vertical row I adjusted the stamping a half image. I repeated this pattern across the surface of the desk and the drawer fronts. I used a lighter shade of green wall paint than the original green color of the desk. To prepare the stamp, dip a make-up wedge sponge in the paint and dab the paint to the rubber stamp.
Step 4
When the paint is completely dry, sand the surface and the edges of the desk with an electric palm sander. This will age the desk and allow the bottom layers of paint to show through, giving it the shabby chic look.
Step 5
I decoupaged old book pages to the inside bottoms of the drawers. They had been marked and marred from years of use. Use a sponge brush to apply Mod Podge to the bottom of the drawers and lay book pages or other lining paper over the Mod Podge. Seal the paper with a layer of Mod Podge.
Step 6
Spray paint the handles in a color that closely matches the painted color of the desk. Allow the paint to dry. Lightly scuff the handles with a piece of sandpaper to give them a worn appearance. Reattach the handles.


