Getting your negatives developed and preserving the photographs in albums is fast becoming a thing of the past. People these days prefer to save their photos digitally either on their computer, on a DVD, or on a flash drive. But for those who still like the old way of actually being able to hold a photograph in your hand, here’s an easy way to dress up those ugly photo albums. I’ve made these for weddings, baby showers and general use. You can purchase any size photo album to you want to cover. Buy one already made or get a three-ring binder and add clear photo pages to the inside.
To get started you will need:
* A Photo Book
* Material of your choosing
* Batting
* Poster Board
* Hot Glue
* Scissors
* Ribbon (Optional)
* Lace (Optional)
Step One:
Cut out a piece of batting the same size as the open photo book.
Step Two:
Glue the batting to the outside of the photo book.
Step Three:
Open your photo book and lay the outside of the book on the wrong side of the material. Make sure the print is going in the direction you’d like it to be on the photo book. Cut material about 1″ away from the book. If desired, you can first draw a light line on the material around the book and then cut out the material.
Step Four:
Open your photo book and lay the outside on the wrong side of the material. Make sure you have the print going in the direction you want it to go. Cut diagonal notches in the material at the corners. Fold the corners down and hot glue to the inside of the photo book. Don’t just glue the corners – glue all the way down the inside edge of the material. Trim away any excess.
Step Five (Optional):
If desired, you can add lace around the outside edges of your photo book. Also, if you want to add a piece of ribbon to tie the pages closed, now is the time to do it.
Step Six:
Measure the inside flaps of the photo book from the outside edge to where the spine bends. Cut out a piece of poster board this size. (You will need 2 of these – one for the inside front of the book and one for the inside of the back.) Once you cut out the poster board lay it on the inside cover to make sure the book will close. Lay the cut piece of poster board on your material and cut out a piece of material 1″ larger than the poster board. Cut notches at the corner of the material and glue the material to the poster board. Glue the finished piece to the inside covers of the photo book. This should cover the material you glued on the outside so you have a nice, clean finish on the inside flaps.
Step Seven (Optional):
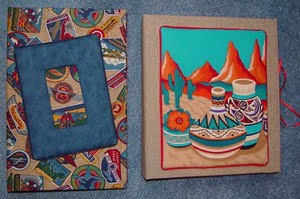
You can add a photo frame to the front of the album using the poster board, material and batting. Be creative with this. I did an album in a watermelon print and then made my frame on the front look like a slice of watermelon. (See photo.) Or you can do a basic 4″ x 6″ rectangle. Cut your piece of poster board and then cut the inside out so you have what looks like a photo mat. Glue the batting and material to it, much like you did for the photo book. Make sure to leave enough material to notch the material inside the frame so you can fold it back and glue it down. When finished, glue to the front of your album. Be sure to not glue the top edge so you can slide a photo down into it. You can trim the edges with lace or piping.
These covered photo albums make great gifts and you can customize them for any occasion such as weddings, baby showers, travel, vacations, etc. Use your imagination. Once you complete one, you will want to do more.