Everyone who is getting married wants to have a personal and customized wedding invitation. From simple to cute to beautiful to elegant or all of the above, customized wedding invitations that are done professionally can sometimes take a large chunk off of your budget. It does not have to be that way. You need to sacrifice your style. Wedding invitations are very easy to create. With a reasonable budget, little time, a sprinkle of creativity, and a few scrapbooking tools and materials you can have your personal and customized wedding invitations.
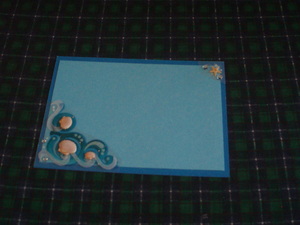
The following navy blue themed wedding invitations are designed with simplicity and “a relaxing day by the beach” in mind. The invitations are easy to make. Keep in mind that there are different hues and tones for this color. From preparation, assembly to finish, each invitation takes approximately about 3-5 minutes to make. Preparing for the materials in advance is advised prior to assembly for a smooth work flow. Sending the invitations is as easy as opening the envelope, sticking a stamp on the envelope and sending it due to it’s size. It can easy be slipped into a standardized 5 x 7 envelope.
Before I proceed to giving you how to make the invitation shown in the picture, here are my quick tips before heading out to the store and purchasing your items and starting on the project.
Design. It is important to first think of the design you want. Most of us have received wedding invitations. There are some invitations that stand out. Usually these invitations are the ones that are unique and or are very elegant. Try to remember what you like and don’t like about it. I am certain that you prefer that the invitation to your special day will stand out. However, don’t be too “daring”. This is a wedding invitation and you want this to look like a wedding invitation not something that looks like it came from the arts and crafts class.
Inspiration. Amazingly it is harder to to find inspiration on how to design your own wedding invitation. When this happens, the best thing to do is to figure out what your colors are. Then figure out if you prefer a formal or casual setting.
Find the Materials. Finding the materials for your wedding is as easy as going to several hobby and craft stores. If you prefer to use blank cards as your base template, feel free to do so.
Word Processing Programs. You would need to use your preferred word processing programs. If you are just like myself, I use an online word processing program. It works as good and as well as popular word processing programs. Make sure that you change the page settings to cater to the printable size of your invitation, the matching R.S.V.P., envelope and mailing labels.
Typing your invitation. Figure out what font would best match your invite. Wedding invitations tend to have fonts that are in this list. Don’t worry if you can’t get it right or perfect the first time you make a print. I suggest you make practice prints until you find the font, “words” and font color. You can always change this.
Here is the list of items that you will need to make your invites:
your choice of two shades of navy blue (one darker and one lighter). Card stock and multu-purpose textured paper
White textured card stock or textured paper (for “figure 3” invitation)
navy blue ribbon with white stitching from the Morex company. ($1 per roll for 8 ft ofr 2.67 yards. Available at Michael’s)
dimensional stickers from Jolees’s Boutique (of your choice that matches your theme)
glue or any strong adhesive
super glue (or equivalent)
Fiskars paper cutter
How to make “figure 1” and “figure 2”
cut the darker shade of navy blue card stock at 5 x 7.
cut the lighter shade at 4.5 x 6.5.
print the announcement on the 4.5 x 6.5 sheet.
depending on your “vision”, place the the stickers in place. Press firmly.
(Note: these dimensional stickers are costly. You can maximize their use by making a “layout” prior to assembly)
How to make “figure 3”
cut white card stock or textured paper into 5 x 7 inches
print announcement on the cut paper
cut ribbons for bows at 7 inches
cut another set of ribbons at 7 inches to accent the bottom portion of the invite
using the super glue, stick the bow in the middle top portion of the invite
using glue or a strong adhesive, attach the longer ribbon at the bottom of the invitation