Recently, I embarked on a small DIY project that cost only about $50 and greatly increased the attractiveness of my kitchen. Above the stovetop, a white painted wall was the victim of splattered grease, spaghetti sauce, and steam from constant cooking. The options were to repaint the wall again and again, or put up a block of tile above the stove to act as a shield against cooking splatter.
Learn from my experiences, and follow this how-to guide to complete a similar project in your home.
1. First things first. Get out a tape measurer and calculate the space. You’ll need to know what size tile you are shopping for. For my wall, we bought tile to fill a 1ft. by 5ft. area.
2. Bring a paper and pencil with you to the hardware store, because you’ll want to jot down some ideas and visuals for your wall. Decide what kind of a look you are going for, and sketch it out. The most popular size of wall tile is the 4.25in. square tile, but 1in. mosaic tiles (joined together in larger sheets for easy application) are also popular.
3. When choosing colors, it’s best to stay neutral (white, off-white, gray) if you are thinking about reselling your house down the road. You’ll also need to choose a glazed/glossy or matte look, and make sure that all of your tiles match. If you do want to throw in a splash of color, consider a brighter trim tile.
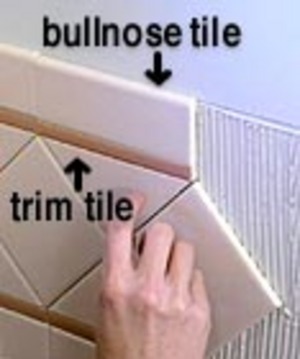
4. To get a clean edge, you’ll want to make sure to buy thinner trim tiles to use for edging or bullnose tiles for the outer frame. Rounded-edge bullnose tiles come in single-edge bullnose (to finish off the top of a wall) or double-out bullnose tiles (to finish off a corner). Once you’ve purchase as many tiles as you need, throw in a couple extra for good measure. (There’s always a chance that you’ll break en route. And besides, you can usually return your unused extras to the store.)
5. As long as you do not have to cut any tiles to fit, this should be a relatively easy job. You should buy: a notched trowel, tile spacers, a grout float, and grout sealer. You’ll also need something to stick it on with. My suggestion is to buy a tub or two of two-in-one adhesive and grout. You can save yourself some time and money this way.
6. Using the notched trowel, you will have spread the adhesive on a small section of the pre-marked wall. Use the v-shaped notches to make straight lines in the tile adhesive-this will help your tile stay put. Apply the tile and press hard. Wipe off excess adhesive lightly with a rag and keep going until your entire space is filled.
7. Use your tile spacers (which look like small white “x”es) to sit in between each tile, so your eventual grout lines stay even.
8. The next day (your adhesive will need 24 hours to dry), it’s time to fill in the cracks with the grout mixture. Remove all tile spacers. Cover your grout float’s flat edge with the pasty substance, and fill in all the cracks. You can use a damp rag to wipe down the fronts of the tiled surface, and a dry rag to buff them clean.
9. In a few days, you’ll want to seal the grout. I used a clear liquid grout sealer and painted over the grout lines with a small paintbrush. This will keep the grout from becoming stained or cracking in the future.
That’s it-admire your new kitchen wall space! I advise that you consult a professional or hire out a job that will be larger and much more cumbersome.